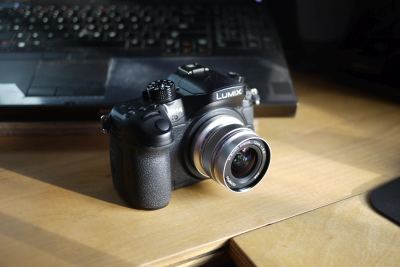
Olympus 12mm f2.0 Lens Flex Repair
[10.22.23]
While cleaning one of my camera sensors, I noticed my incredibly pocketable and convenient 12mm f2.0 Olympus lens developed a fatal flaw. A rather large reflective fragment became dislodged inside the lens and was robbing me of precious photons. I couldn't fully clean the rear element with compressed air and a microfiber cloth, so I decided to dig a little deeper and disassemble the lens.
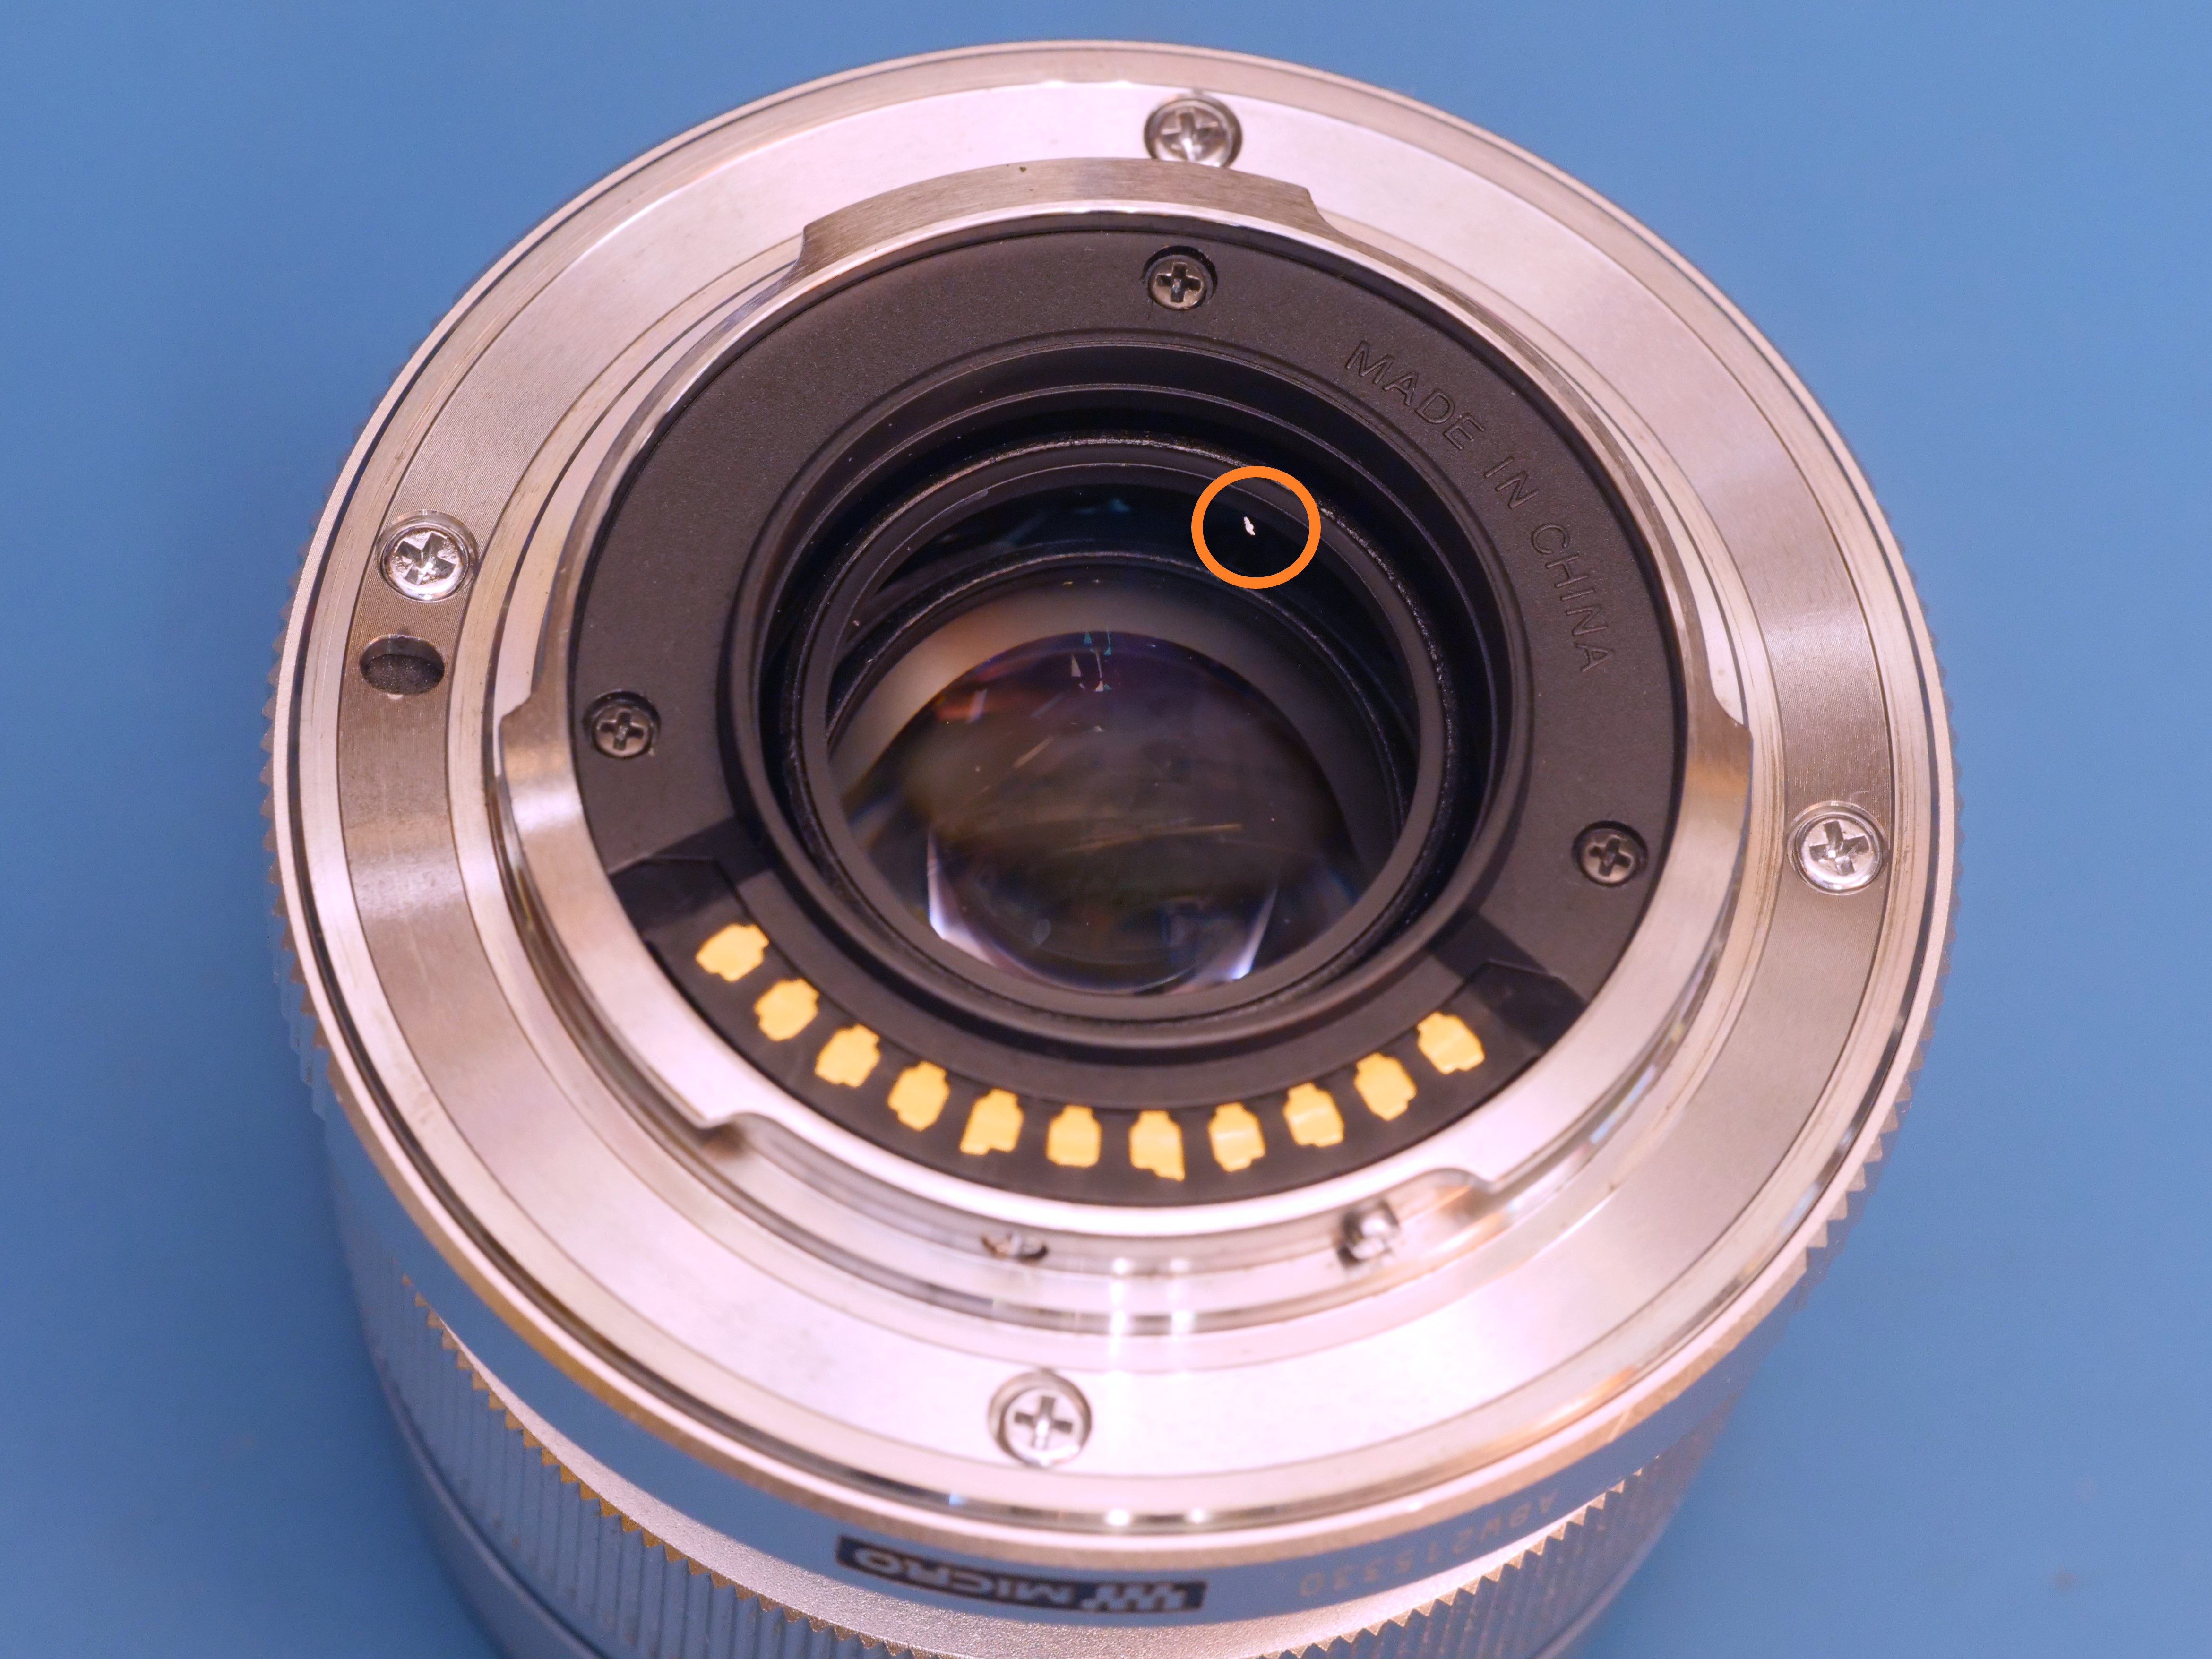
Spot on rear lens element
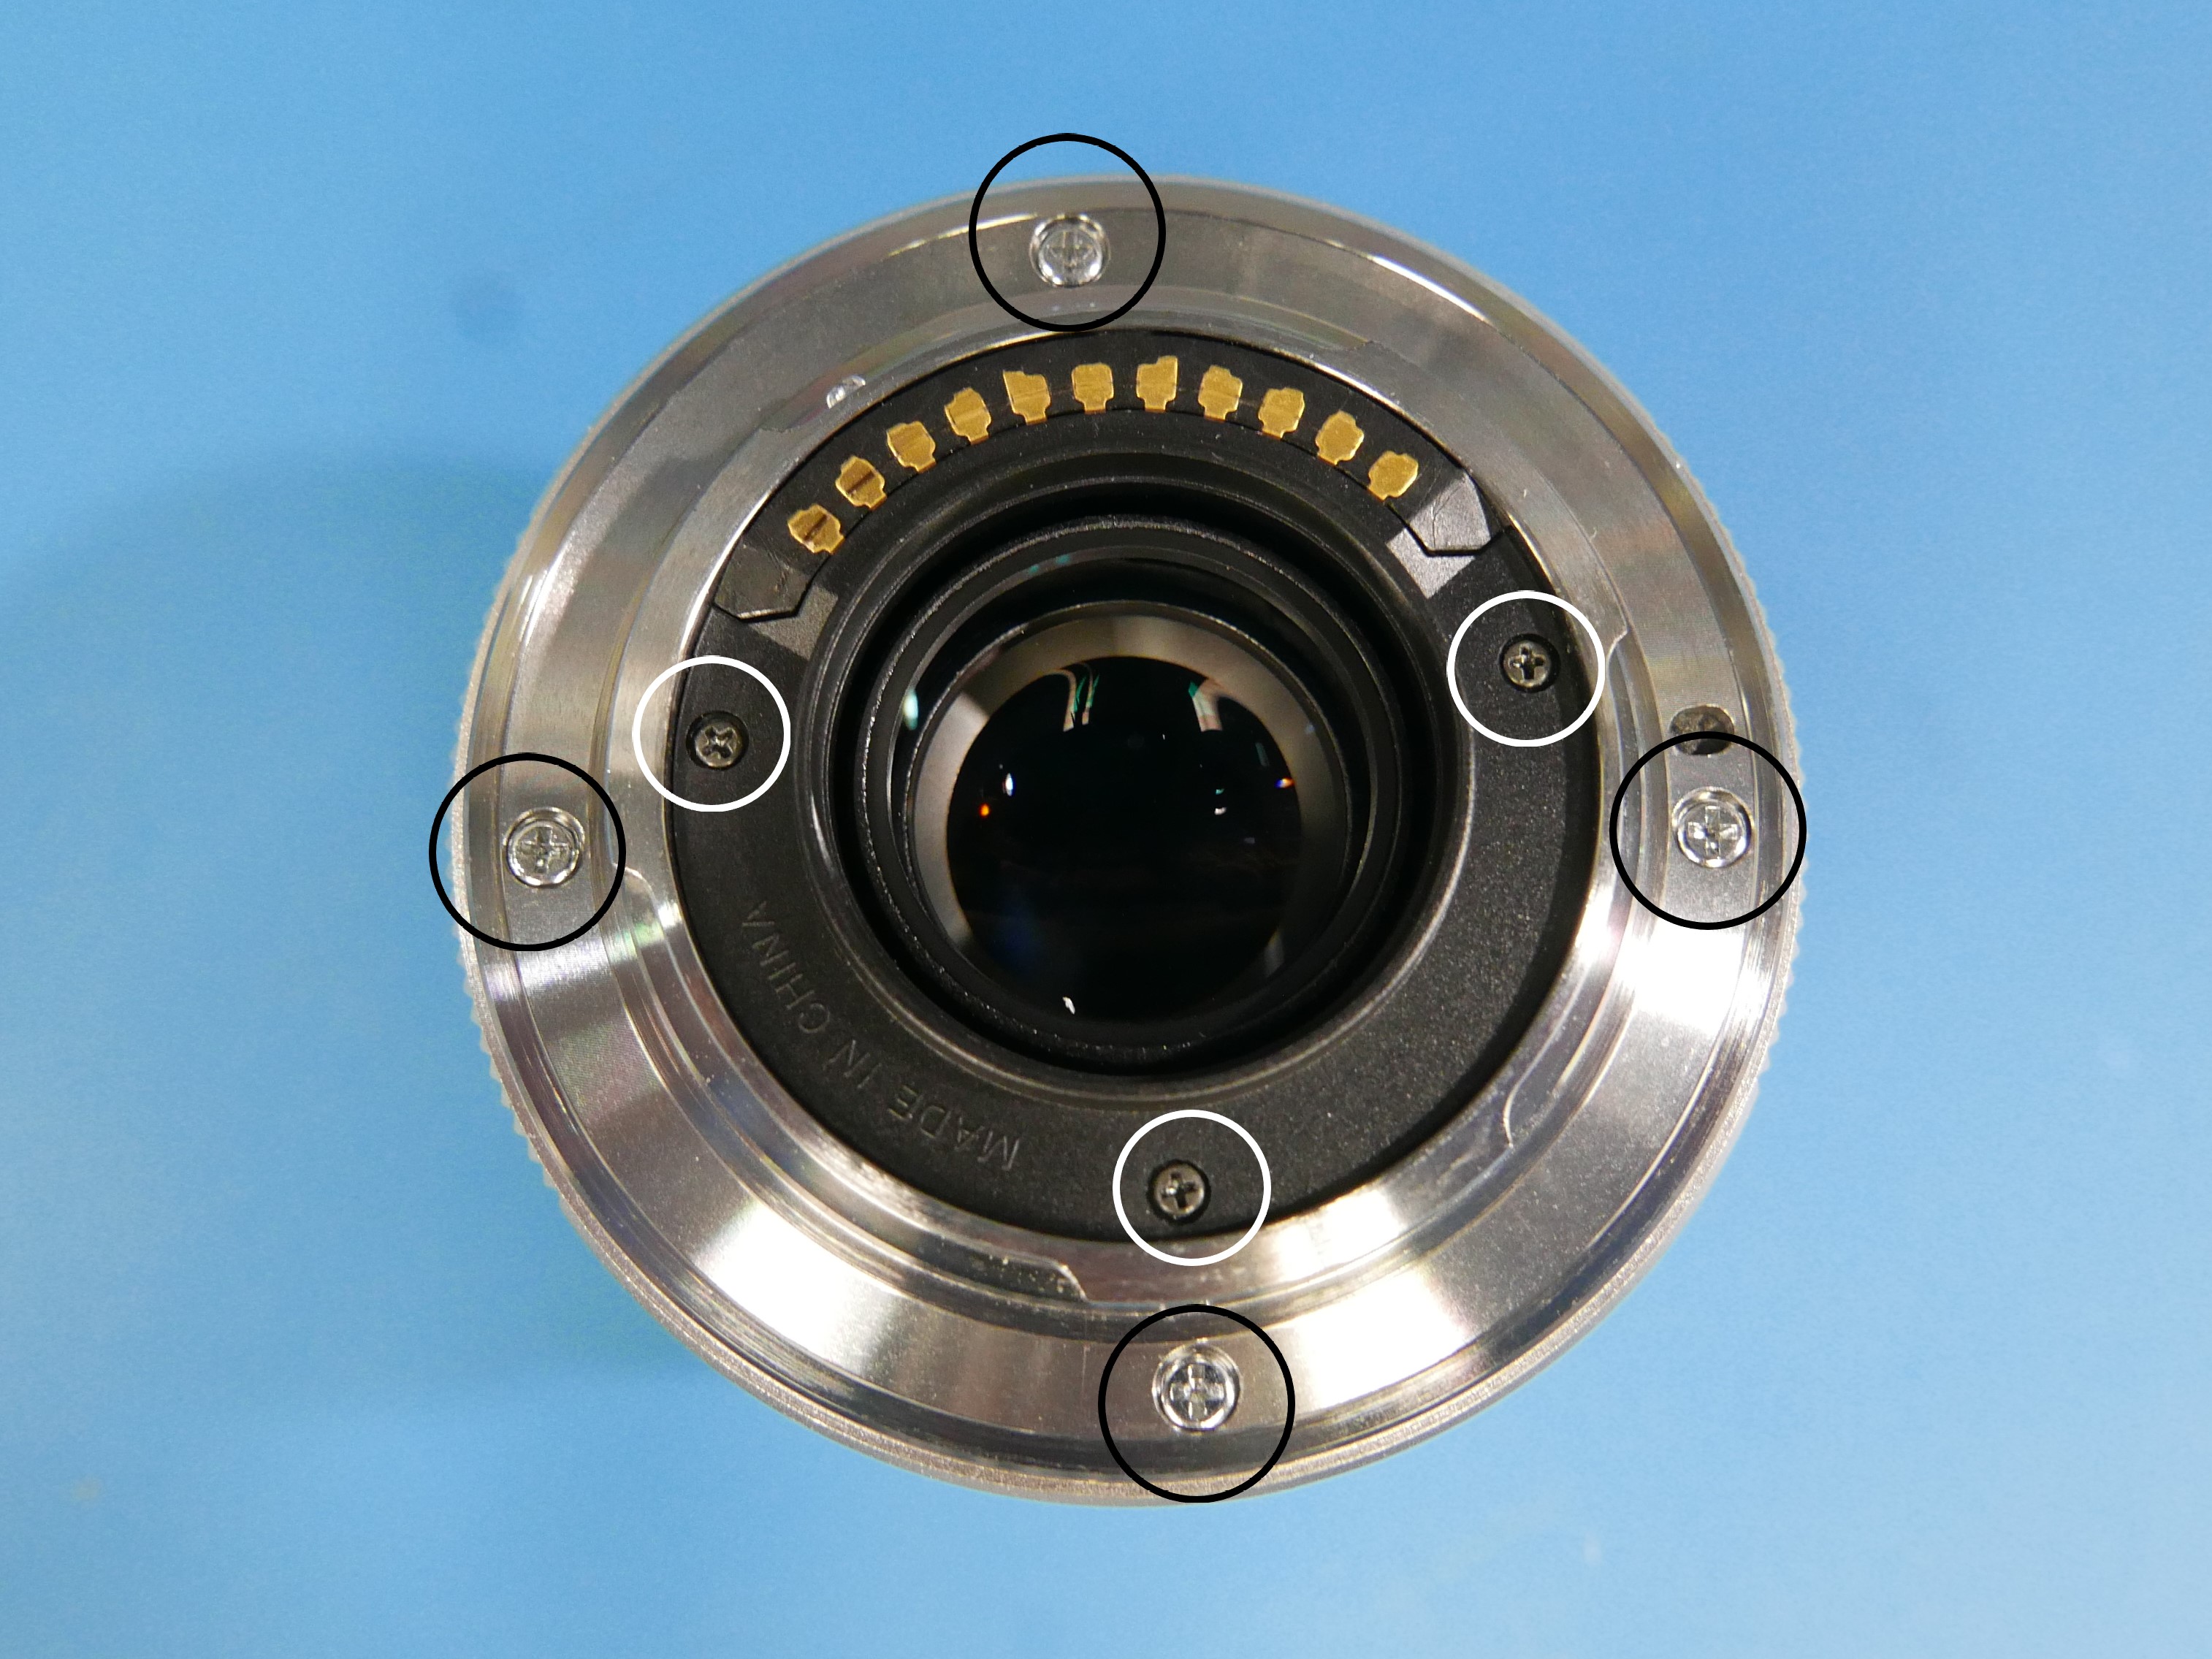
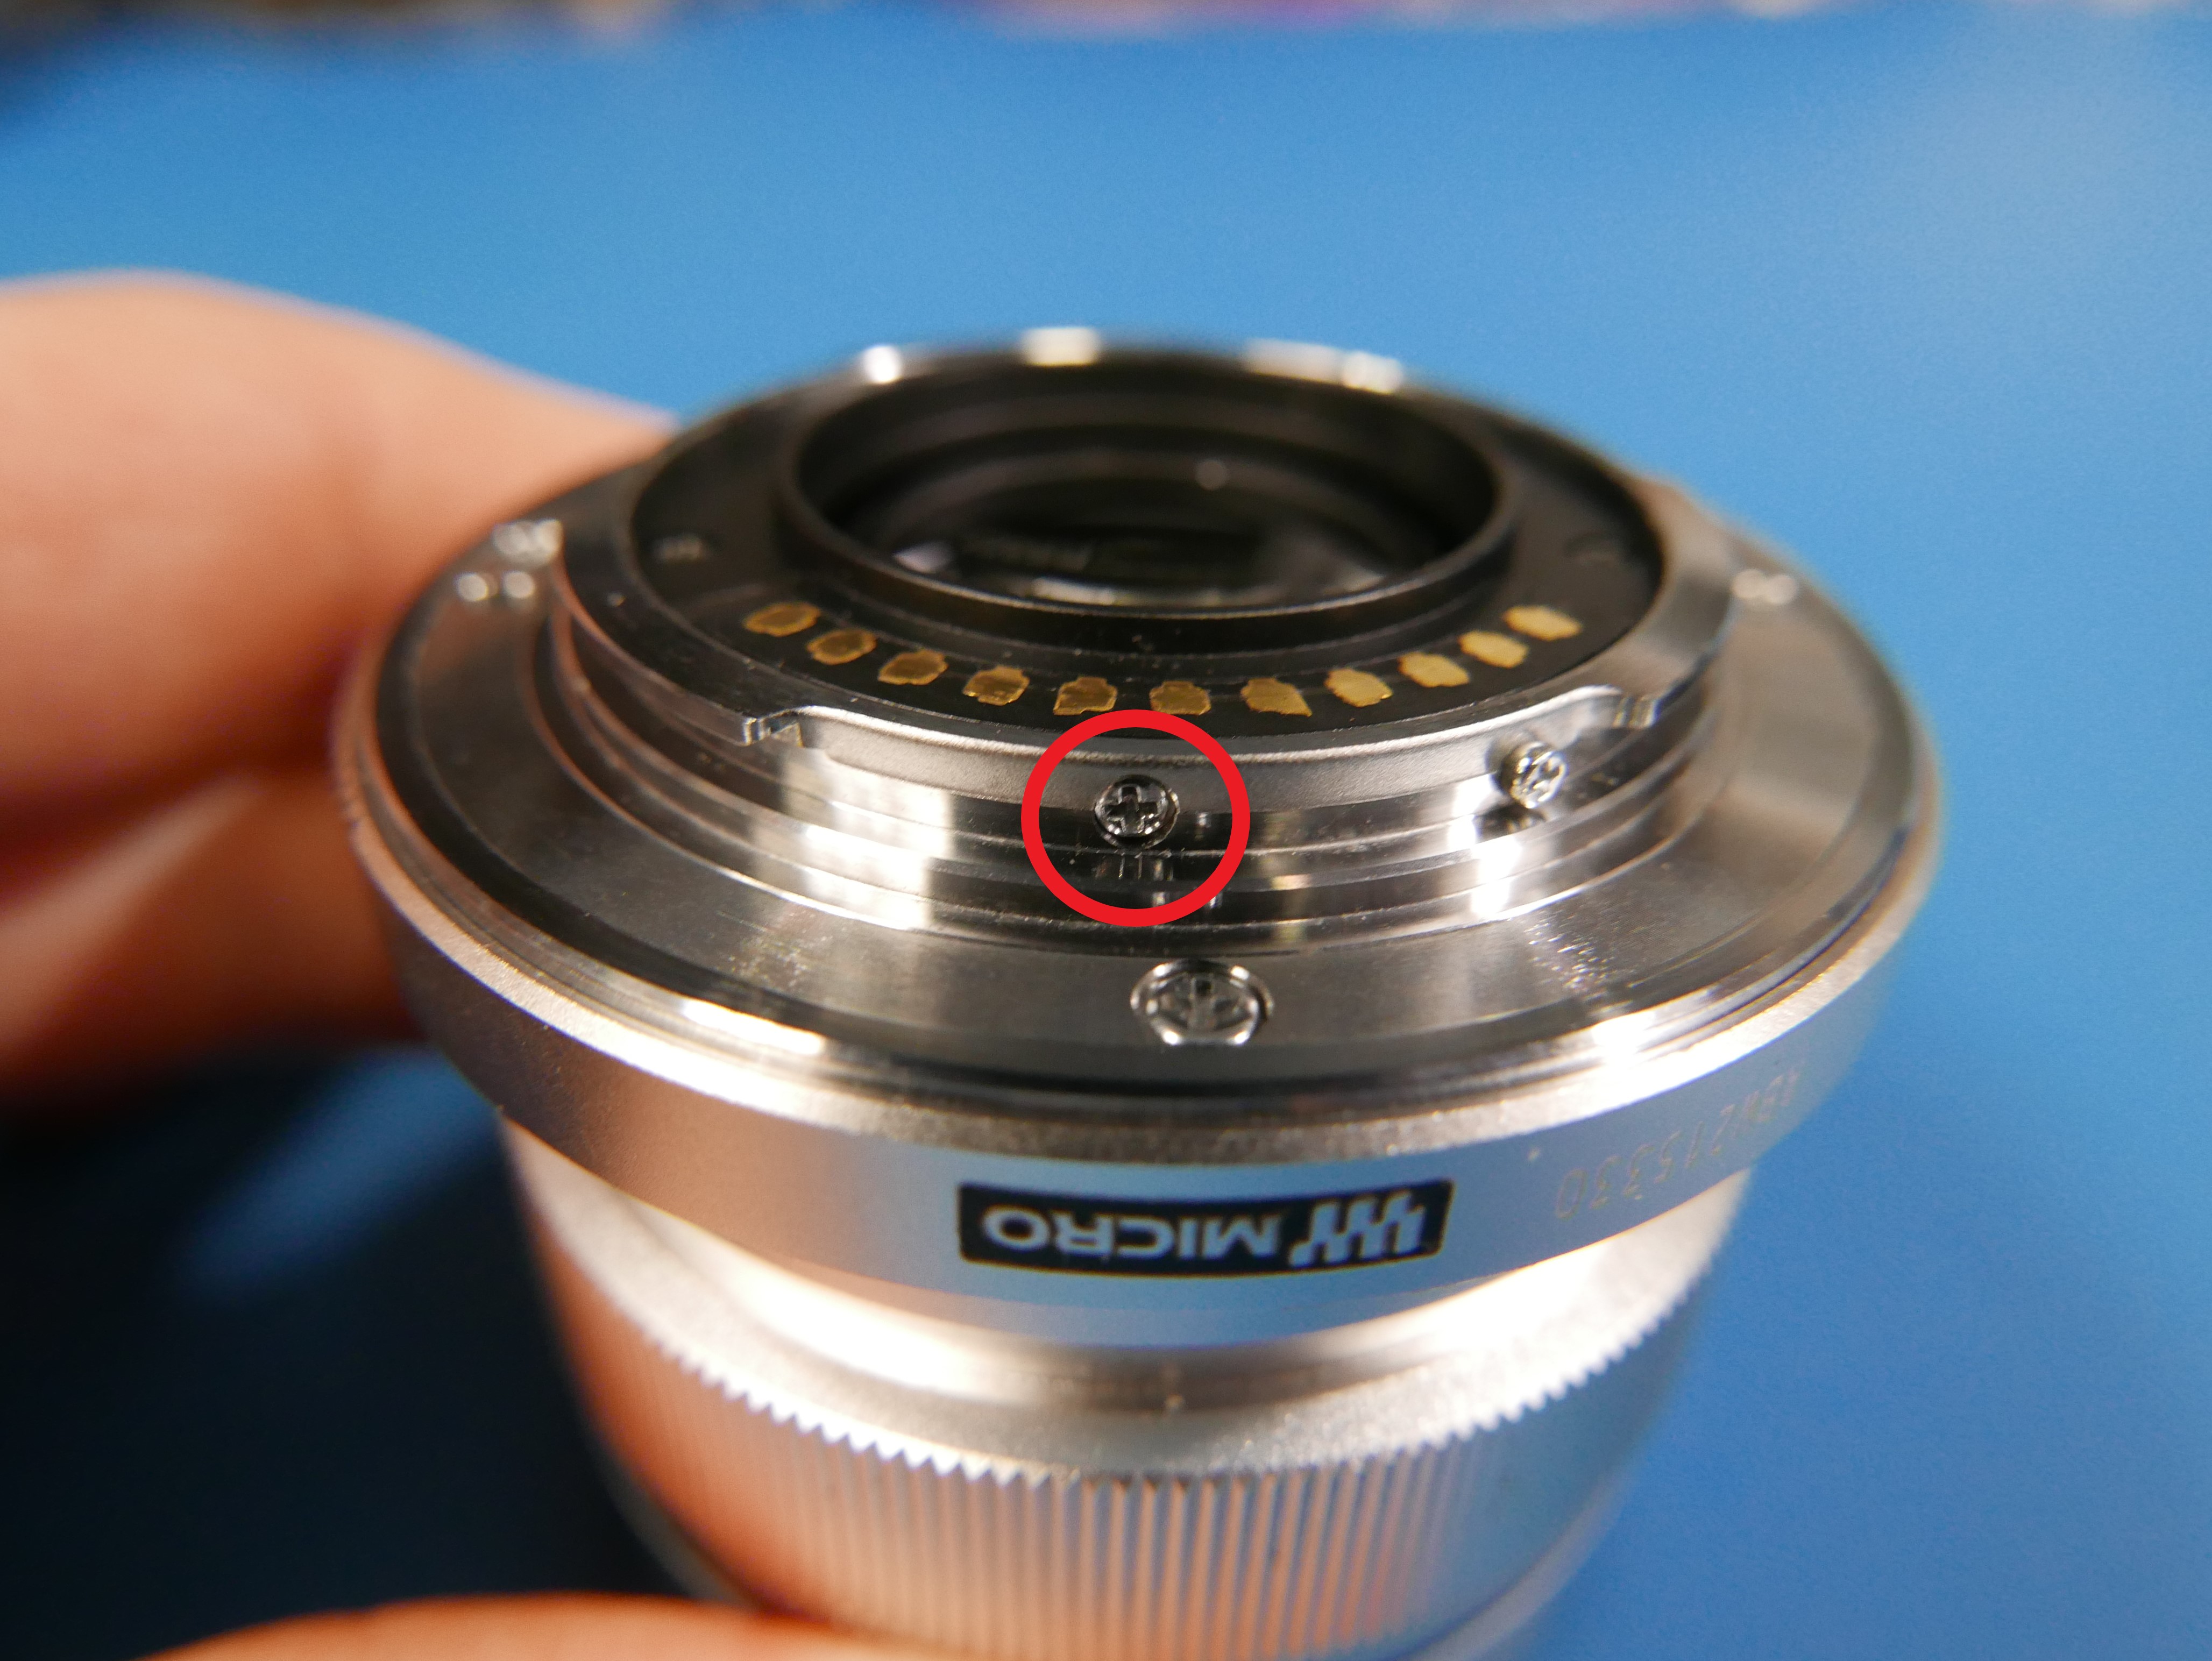
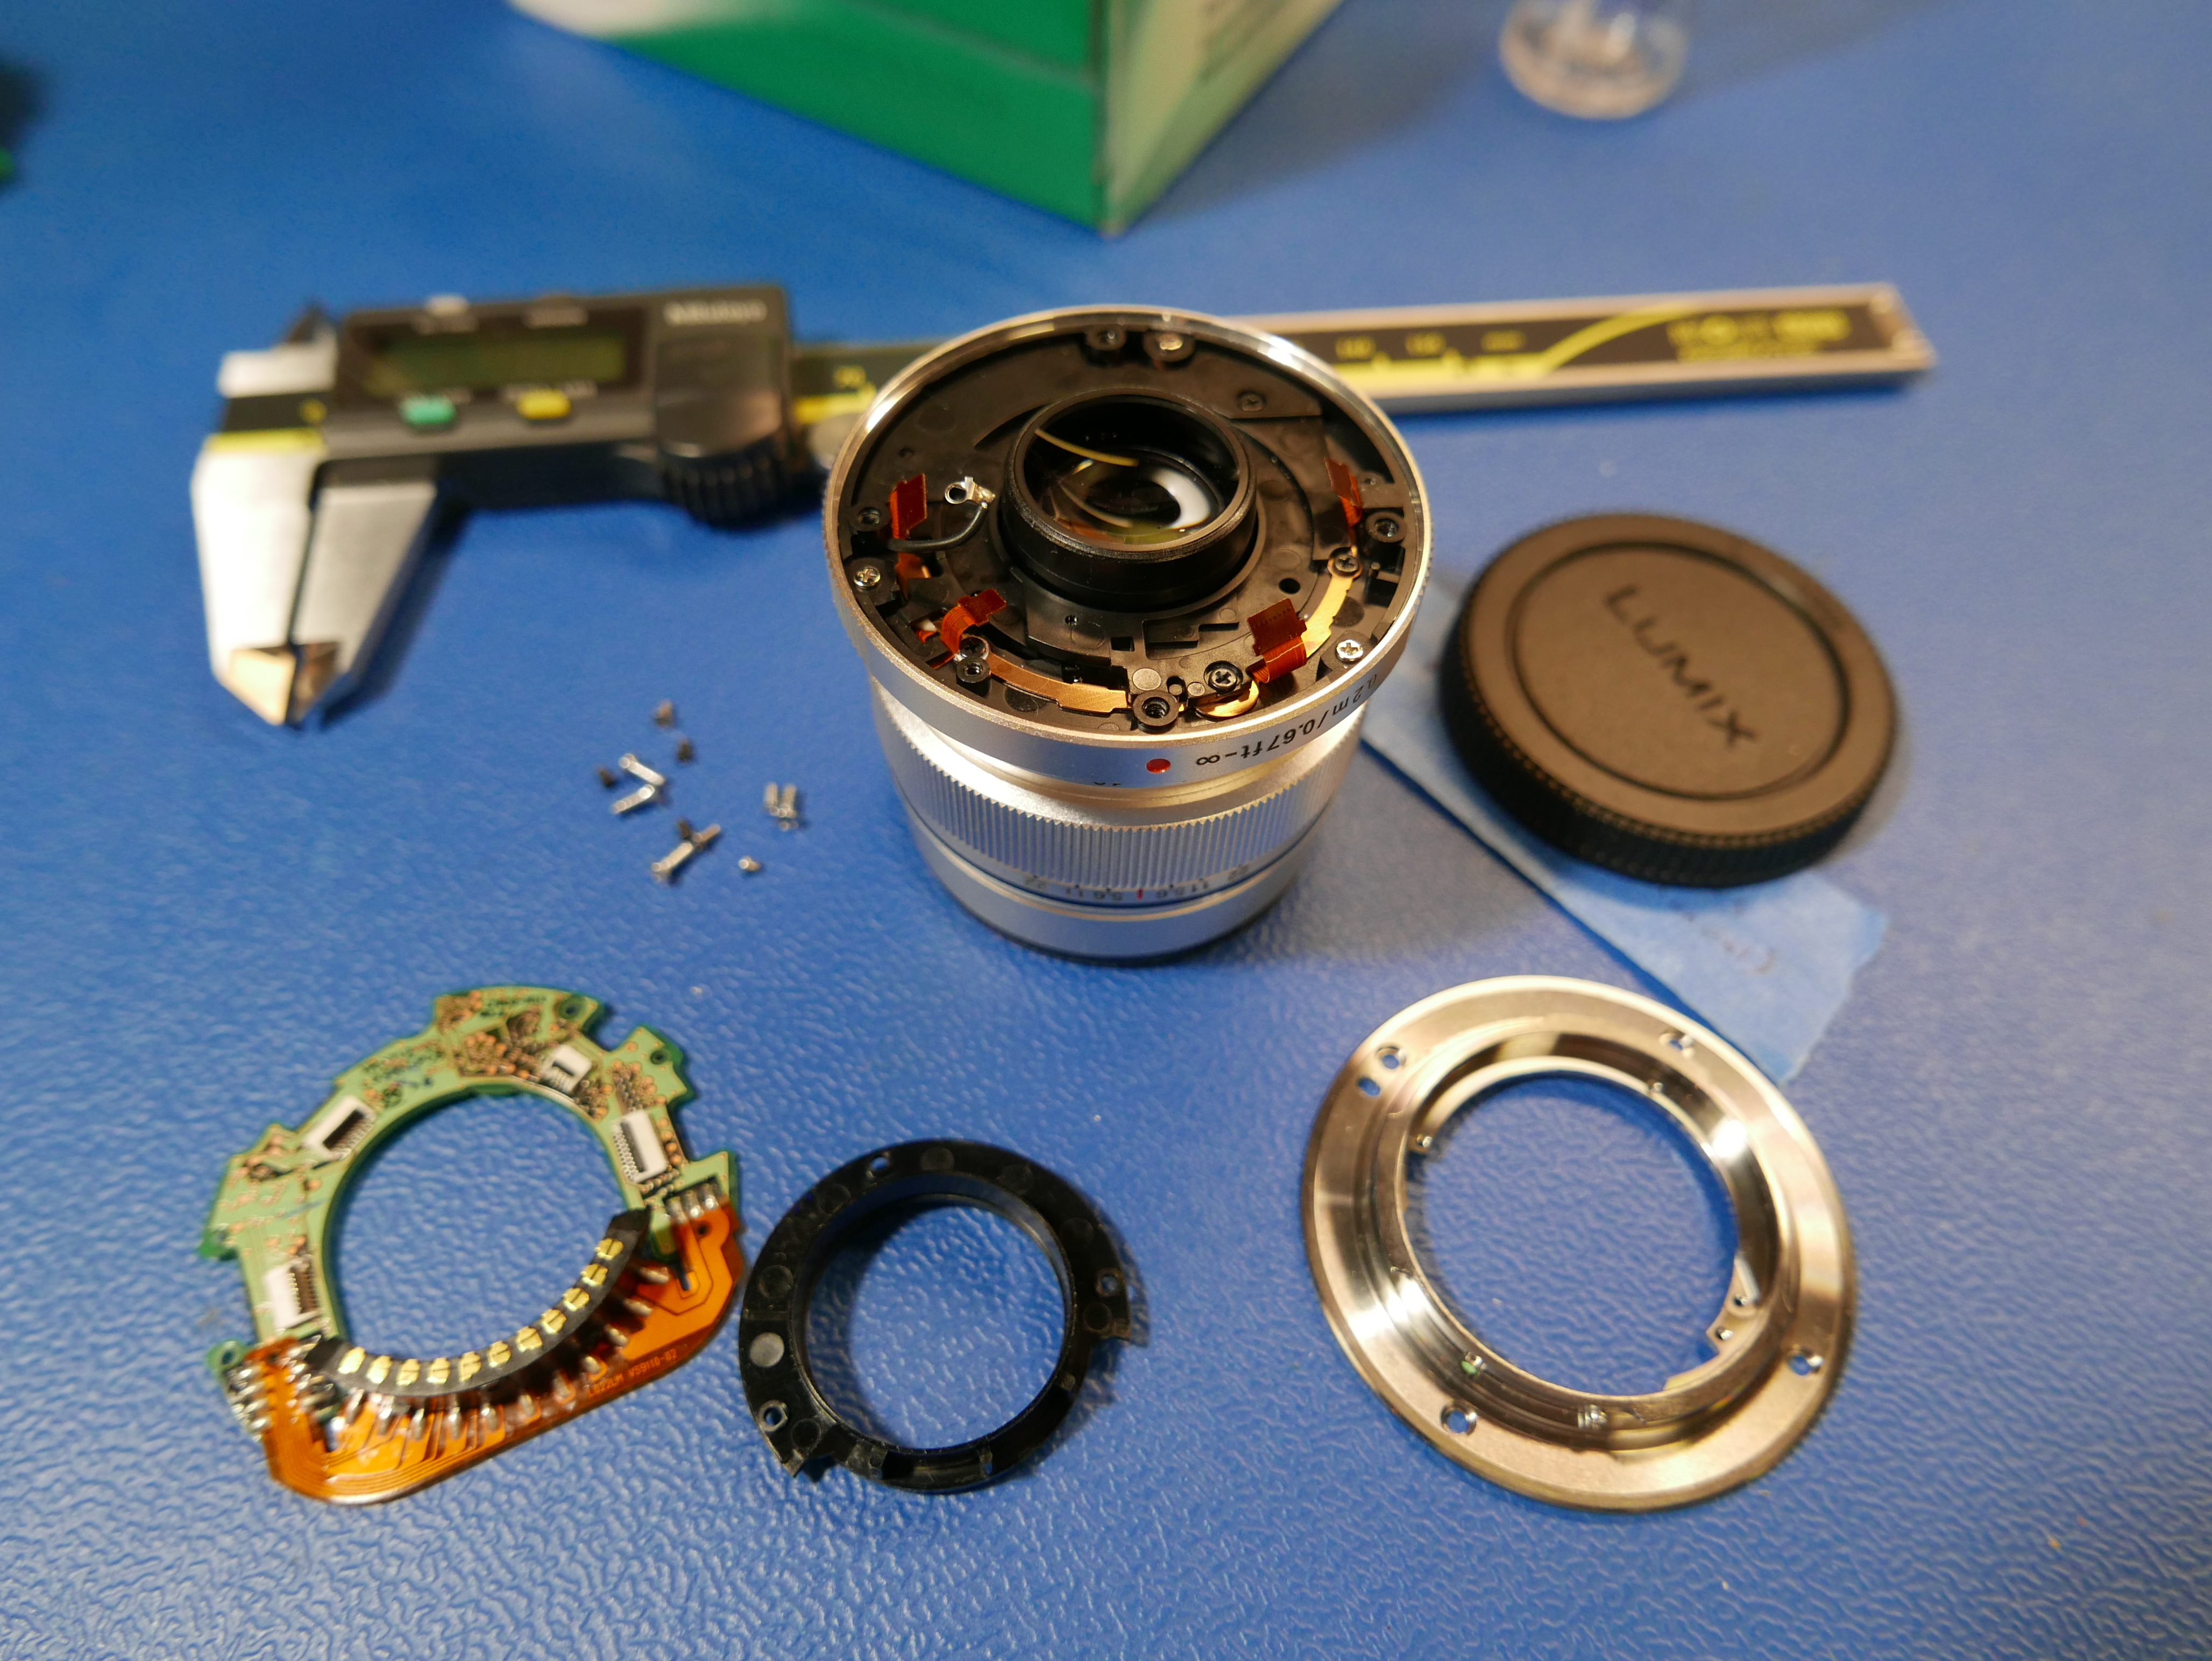
From the rear of the lens, there are 4 course threaded screws that mate the stainless steel mount to the plastic lens body assembly (circled in black) and there are 3 tiny black machine screws that retain the rear plastic baffle to the lens mount (circled in white). There is also one cheeky little countersunk machine screw that fastens down the electronic lens block to the side of the lens mount (circled in red). The disassembly went smoothly and I was able to remove the metal mount and plastic lens baffle in just a few minutes. This gave me full access to the rear element.
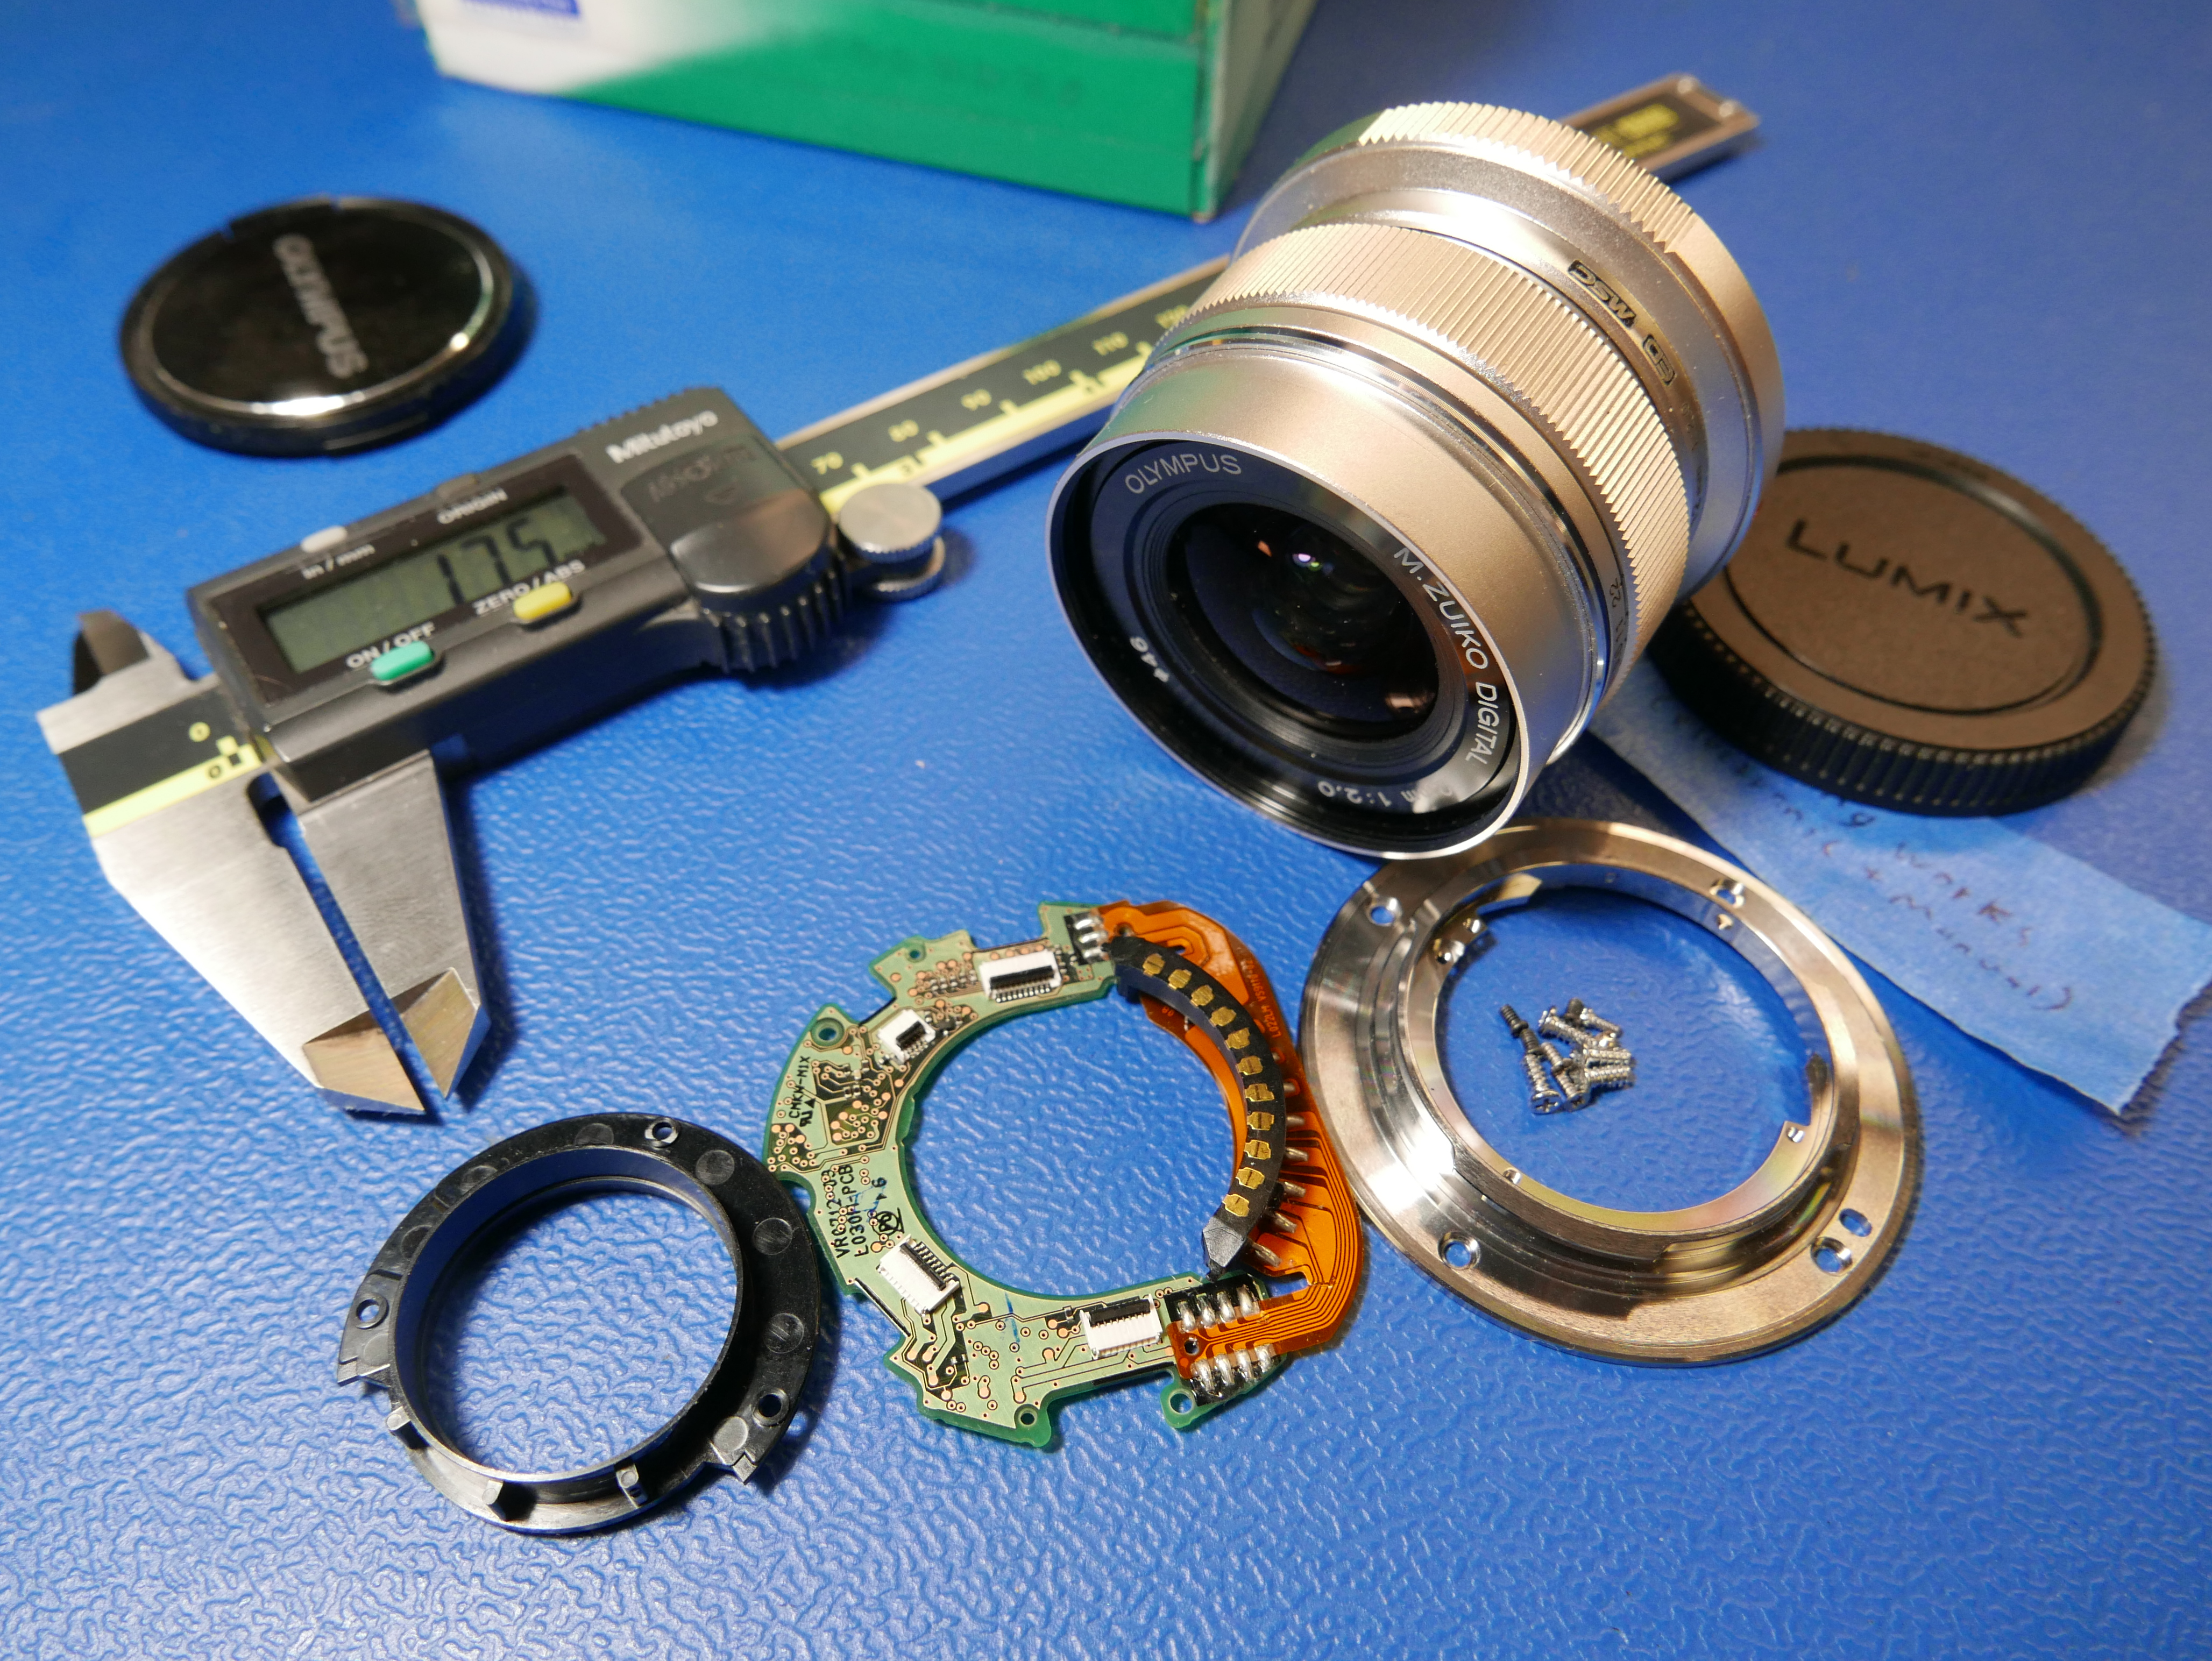
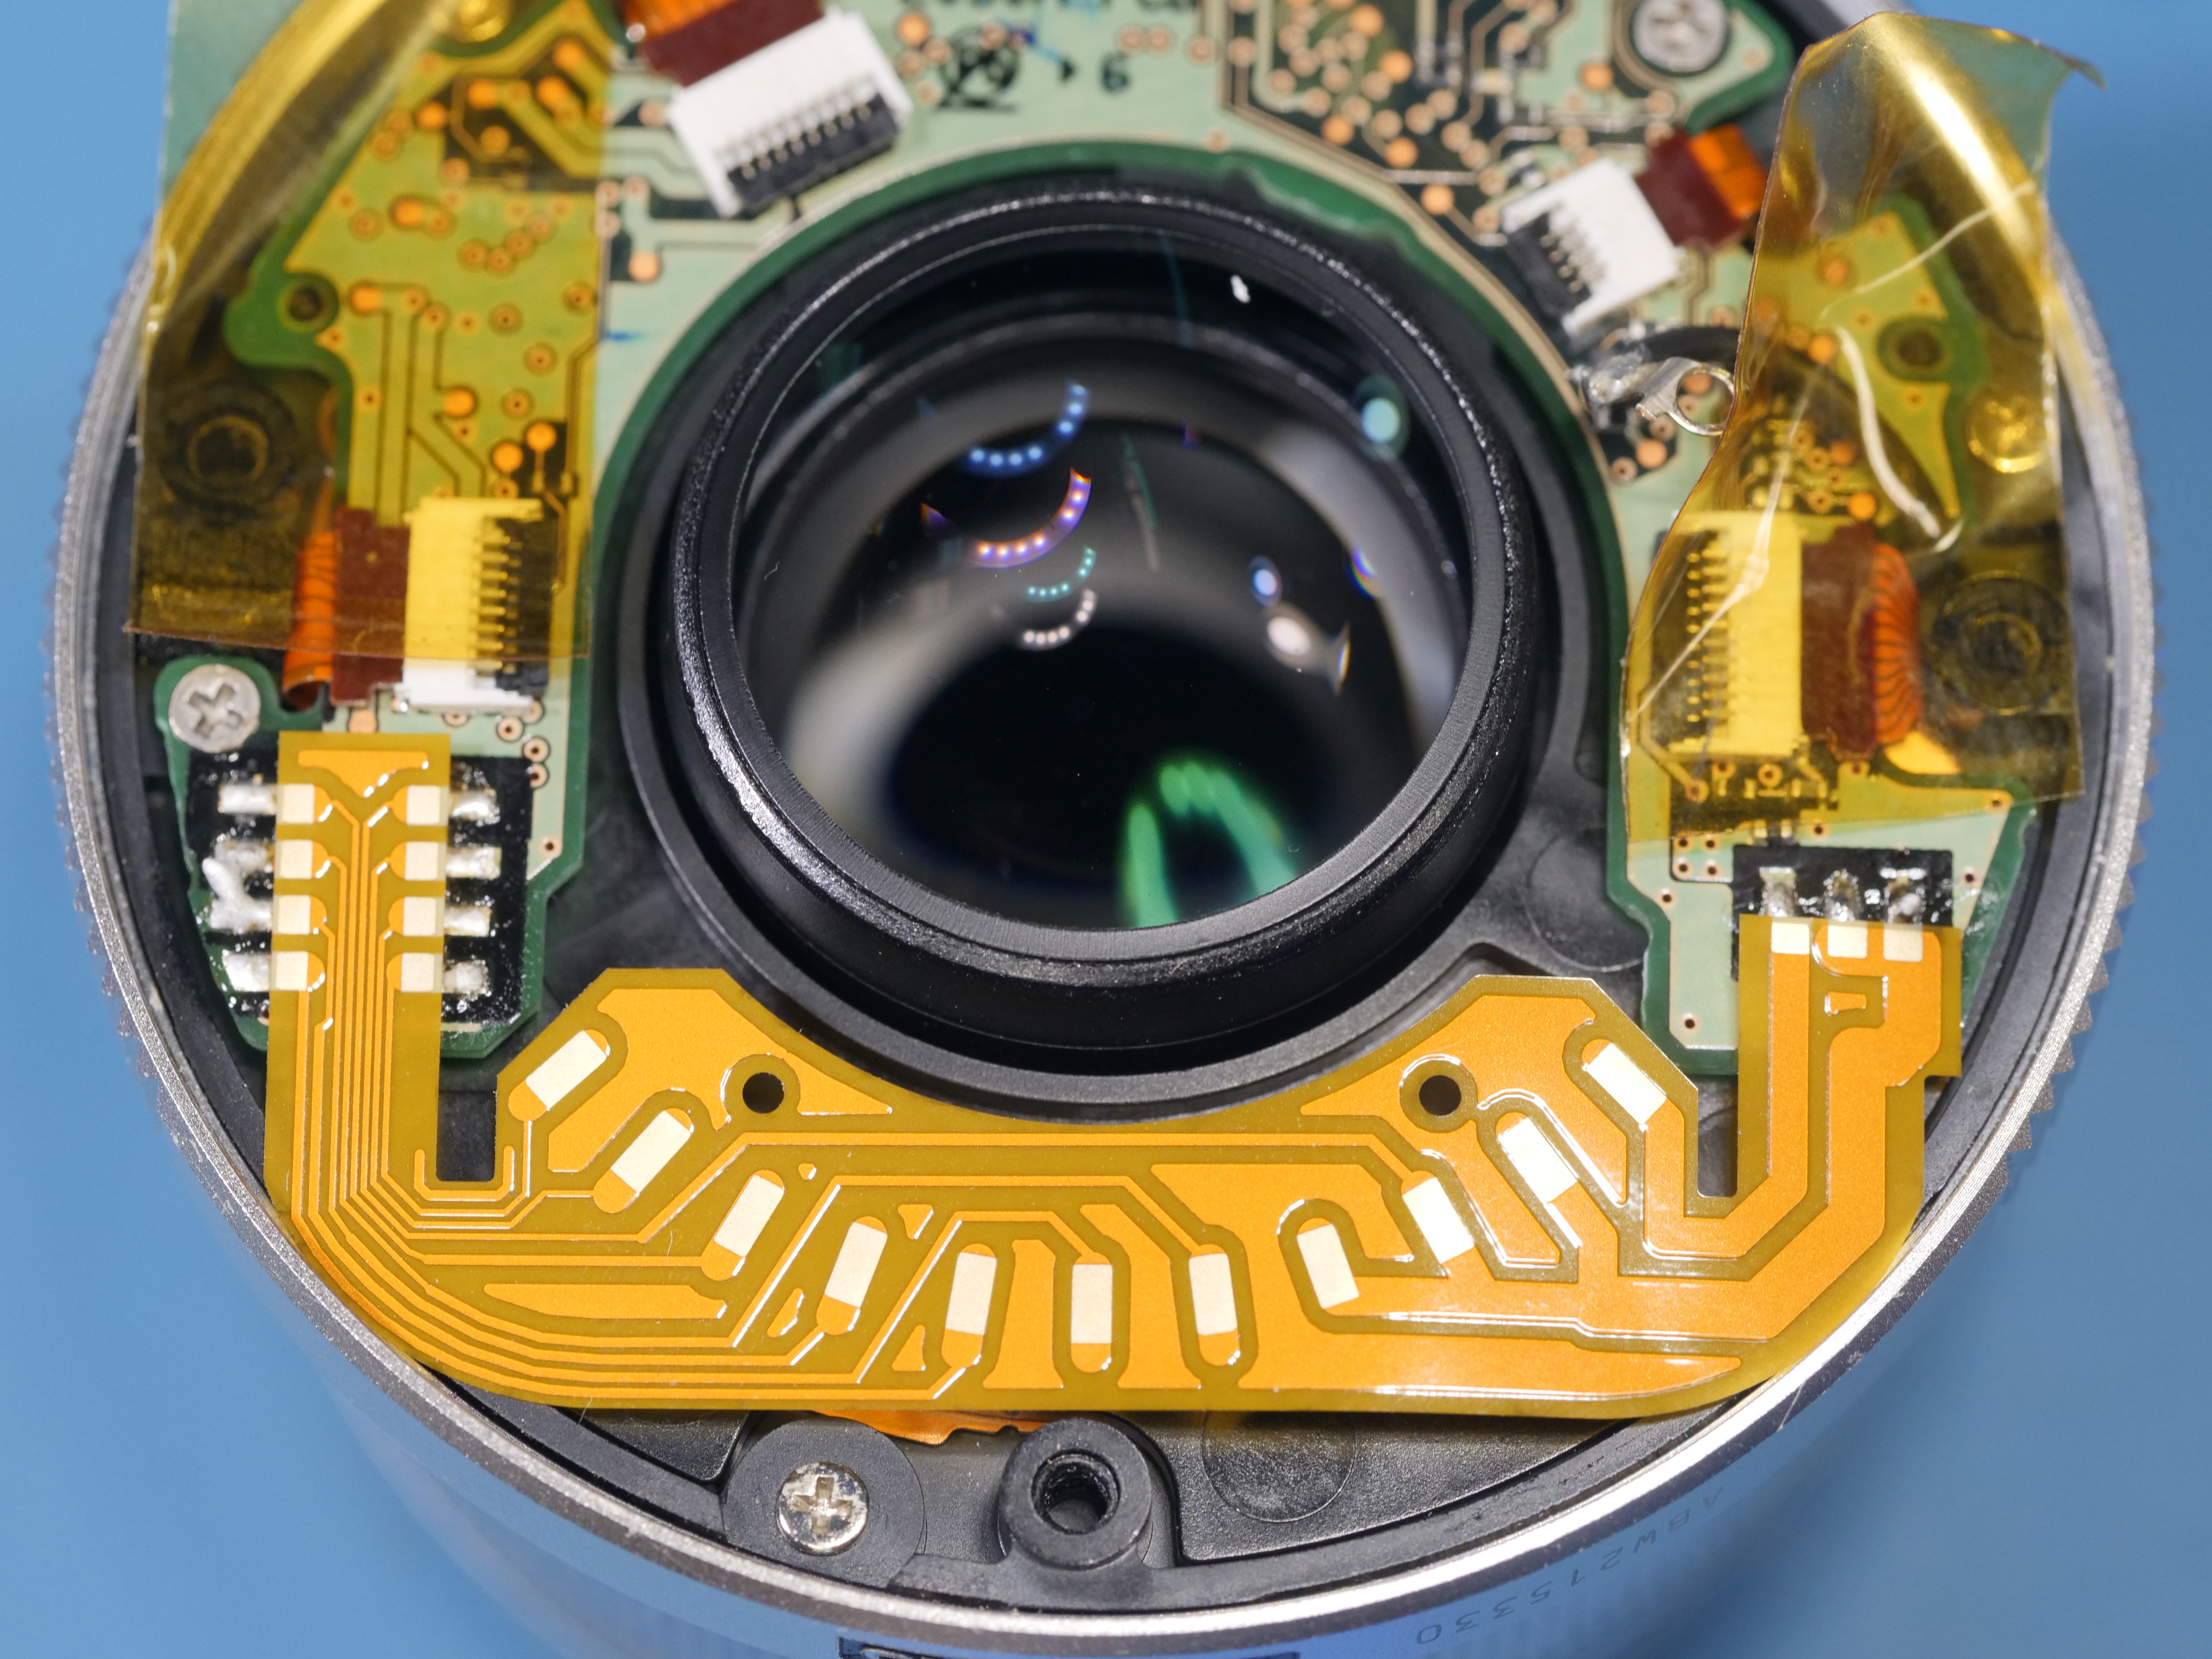
After initial opening, I saw the one thing that haunts every lens technician: a torn flat flex ribbon cable. It's not uncommon for flat flex cables to run completely throughout a lens, never to be seen again. Roger Cicala posts fantastic teardowns of such lenses on Lensrentals.com. These flat flex cables are not easy to source as a repair part from any consumer lens manufacturer, unless you have an inside man in a lens factory. Often times these ribbon cables are custom cables with varying trace widths and can't simply be replaced with off-the-shelf flat flex cables from Digikey or Mouser. Here's two examples of failed flex cables from the Lumix 12-35mm f2.8 lens. The auto focus motor flex cable fatigued and respectively, cracked at the bend radius in two separate instances.
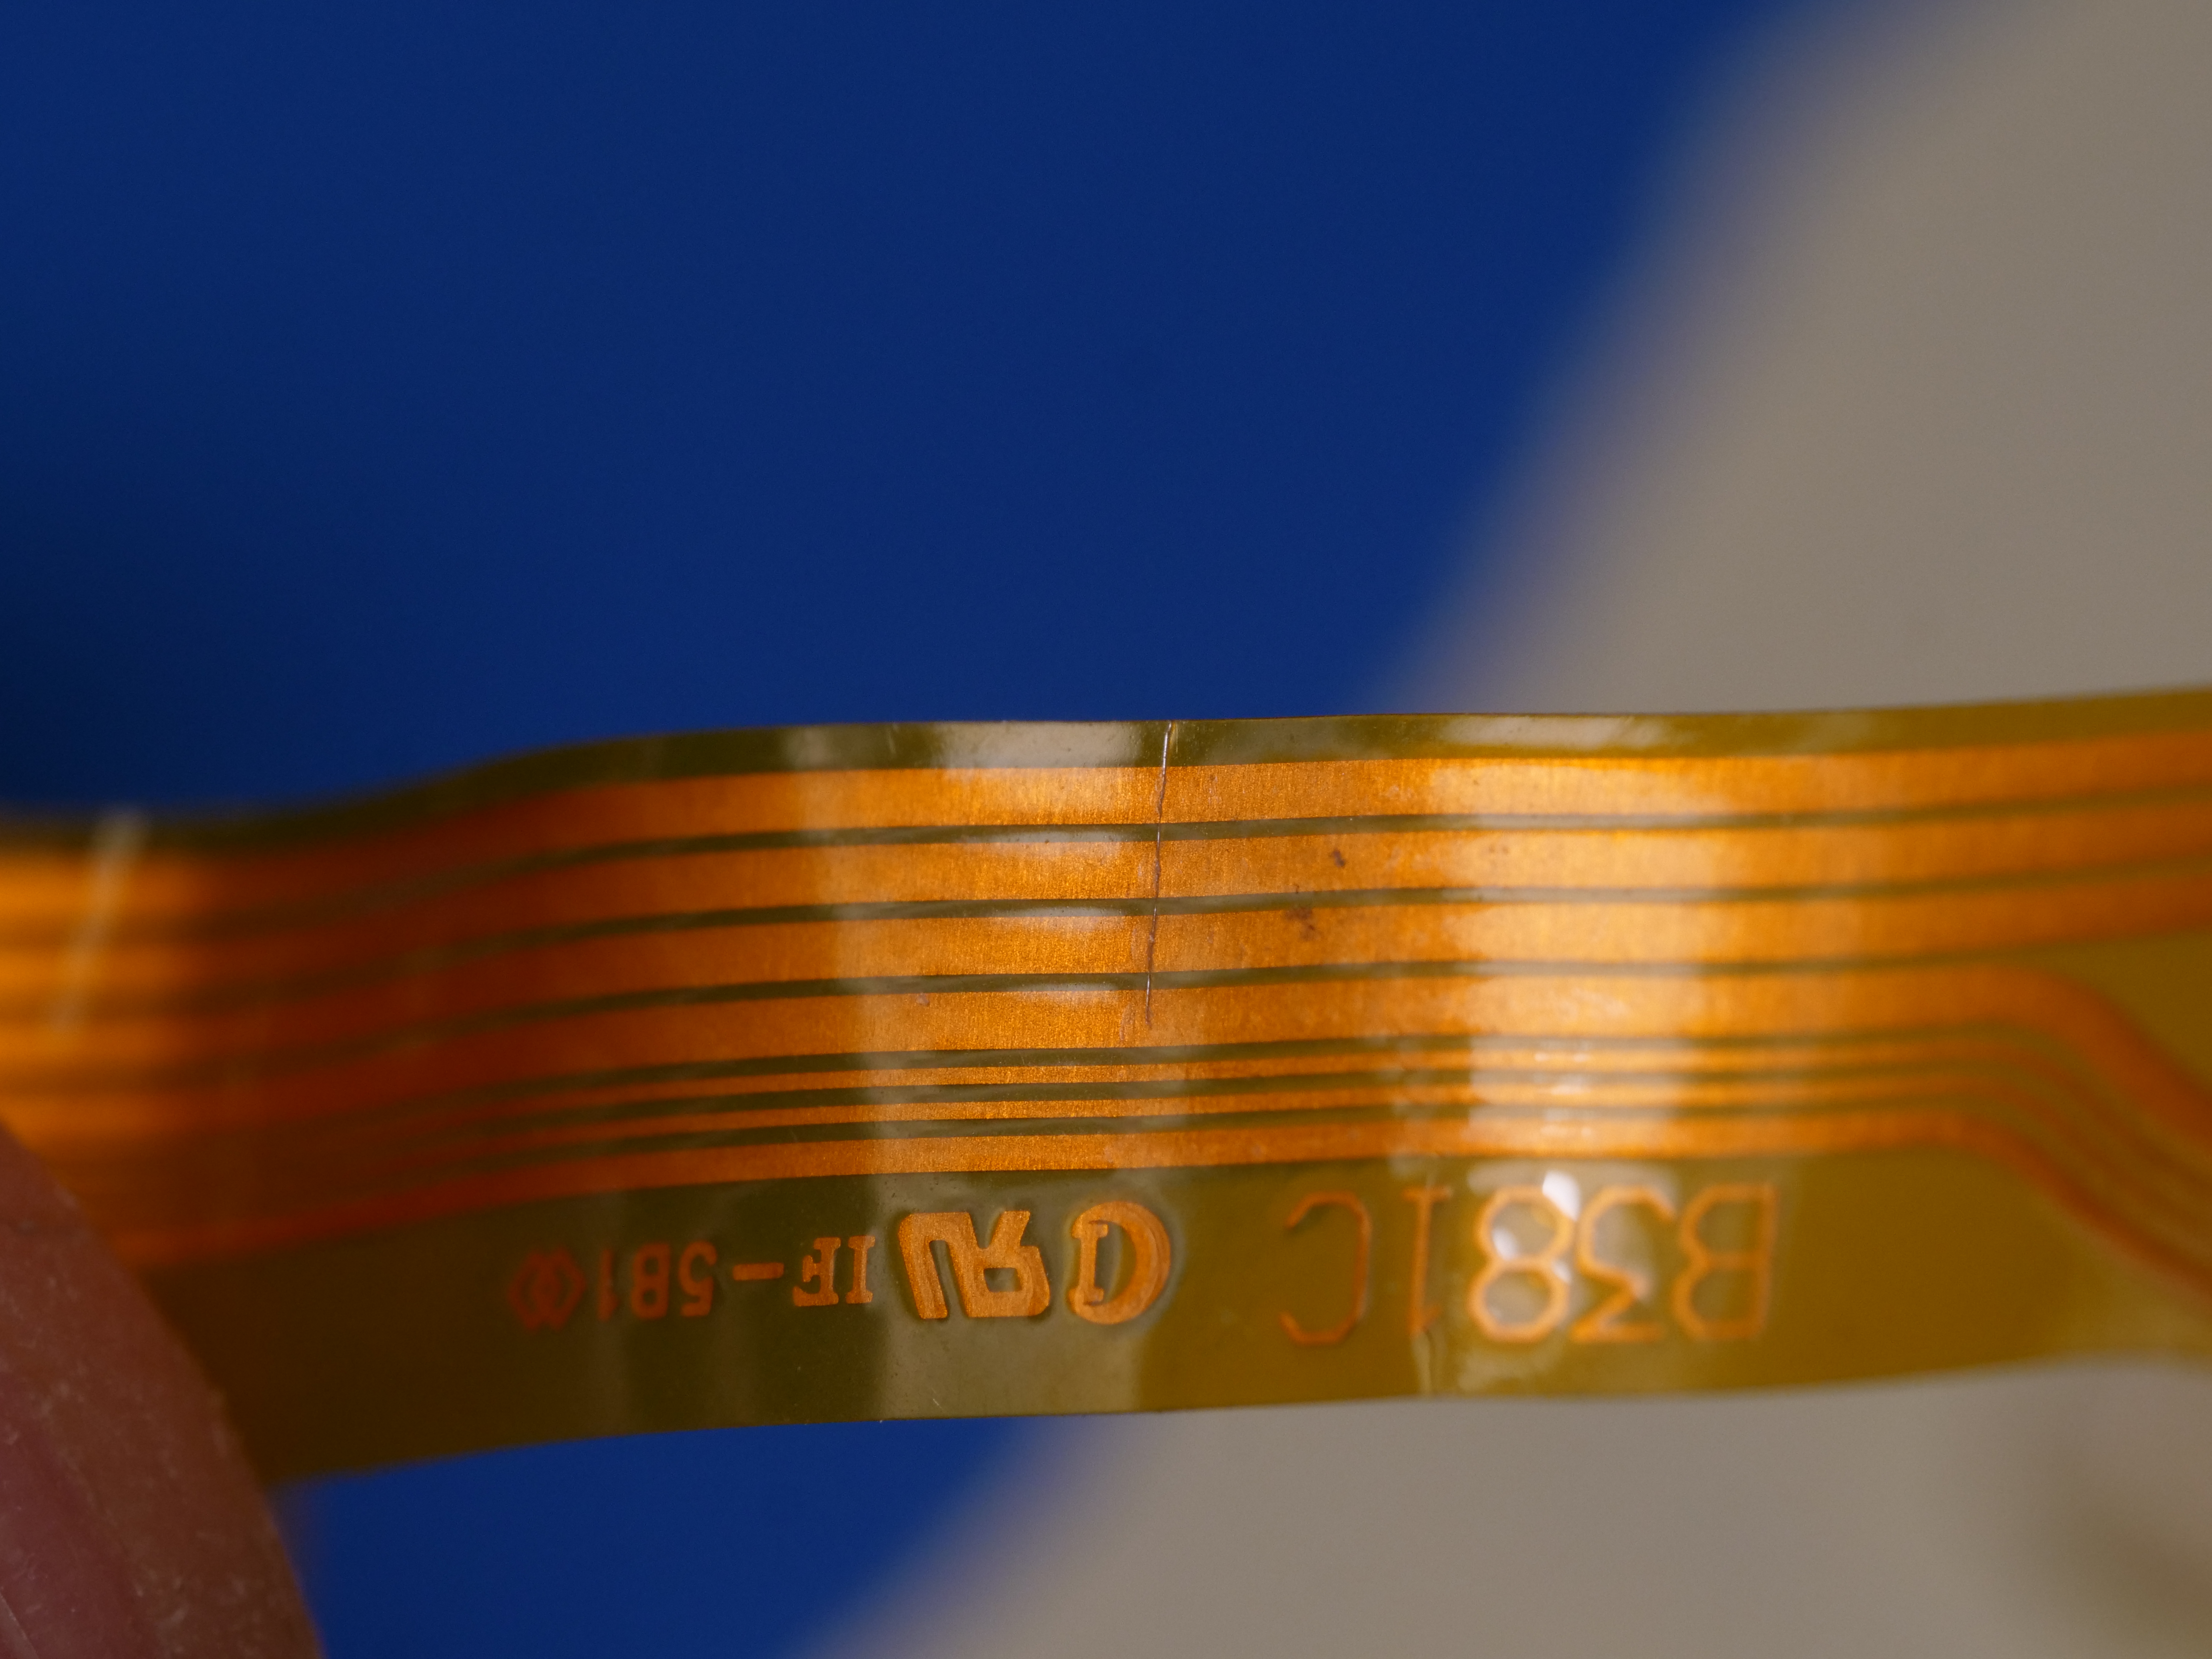
Luckily, in this case I just tore the lens mount contact block flex cable and no other flex cables. Lens mount cables tend to be short and easily accessible, not requiring a complete disassembly of the lens.
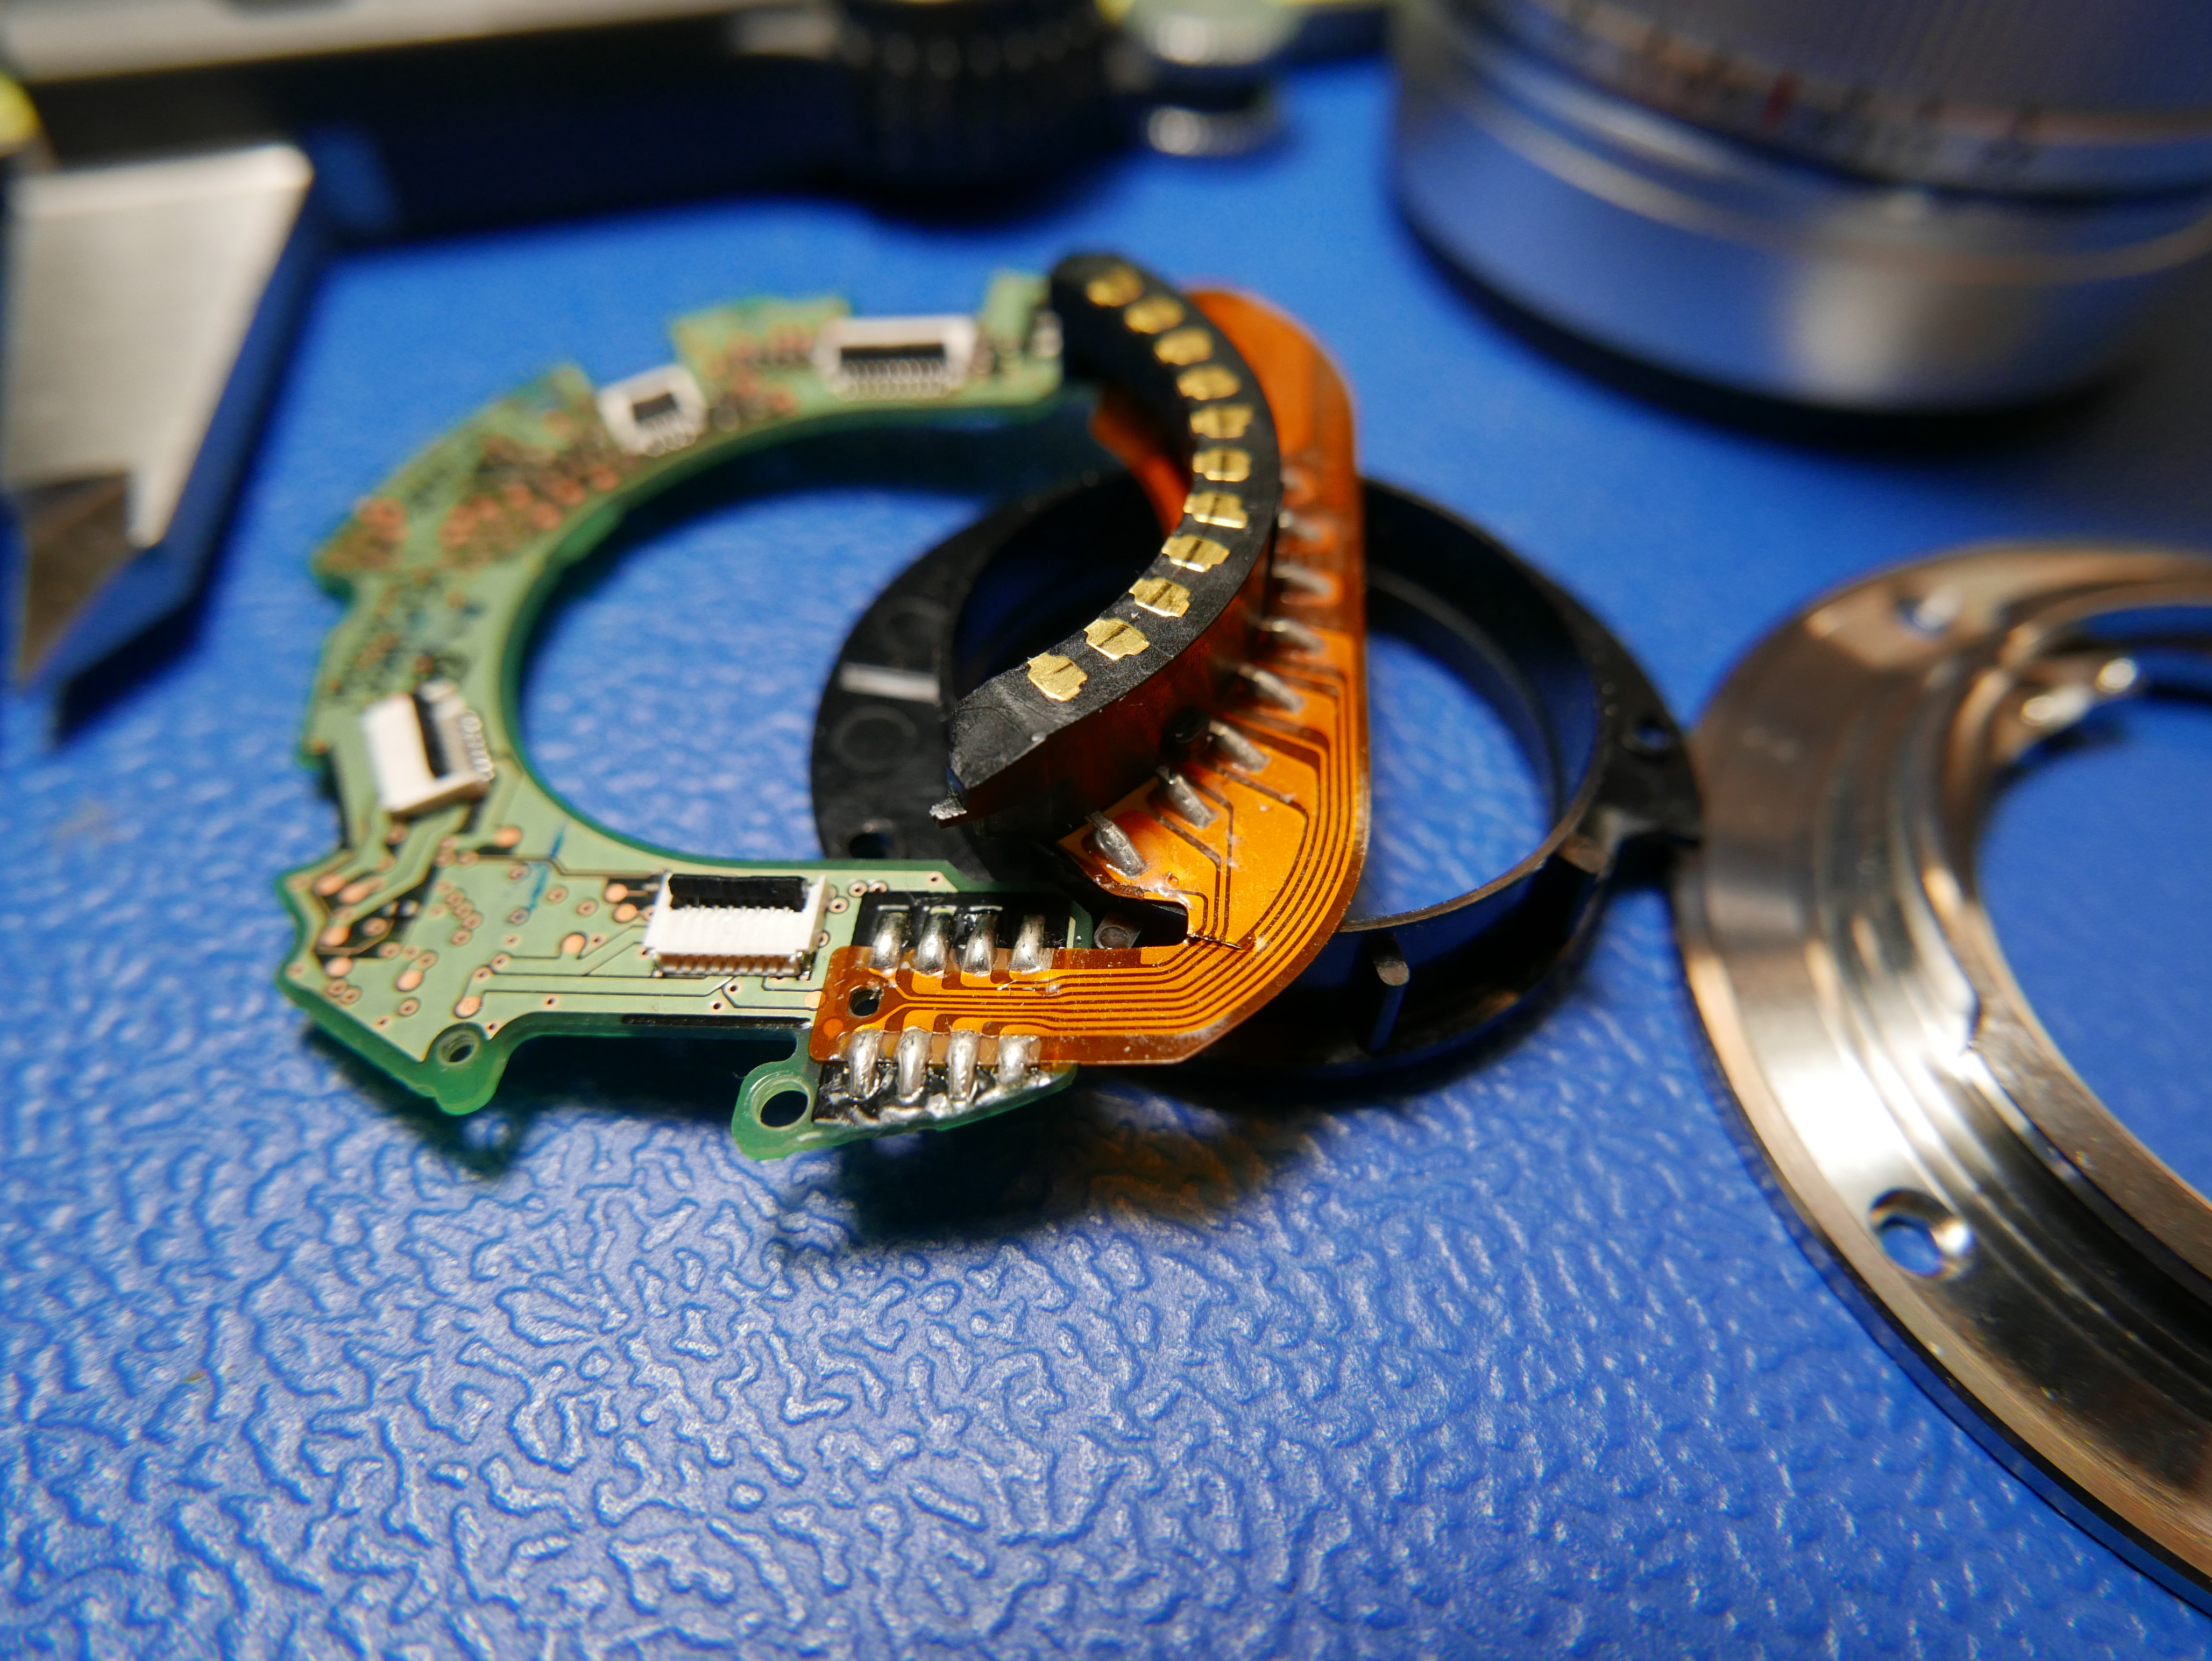
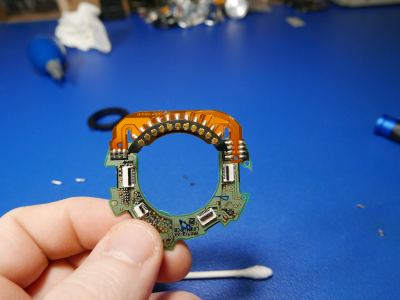
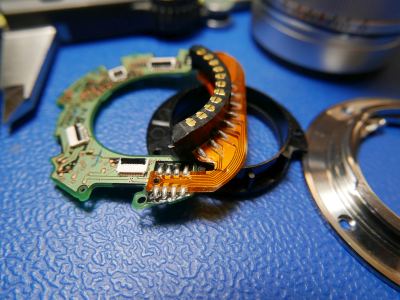
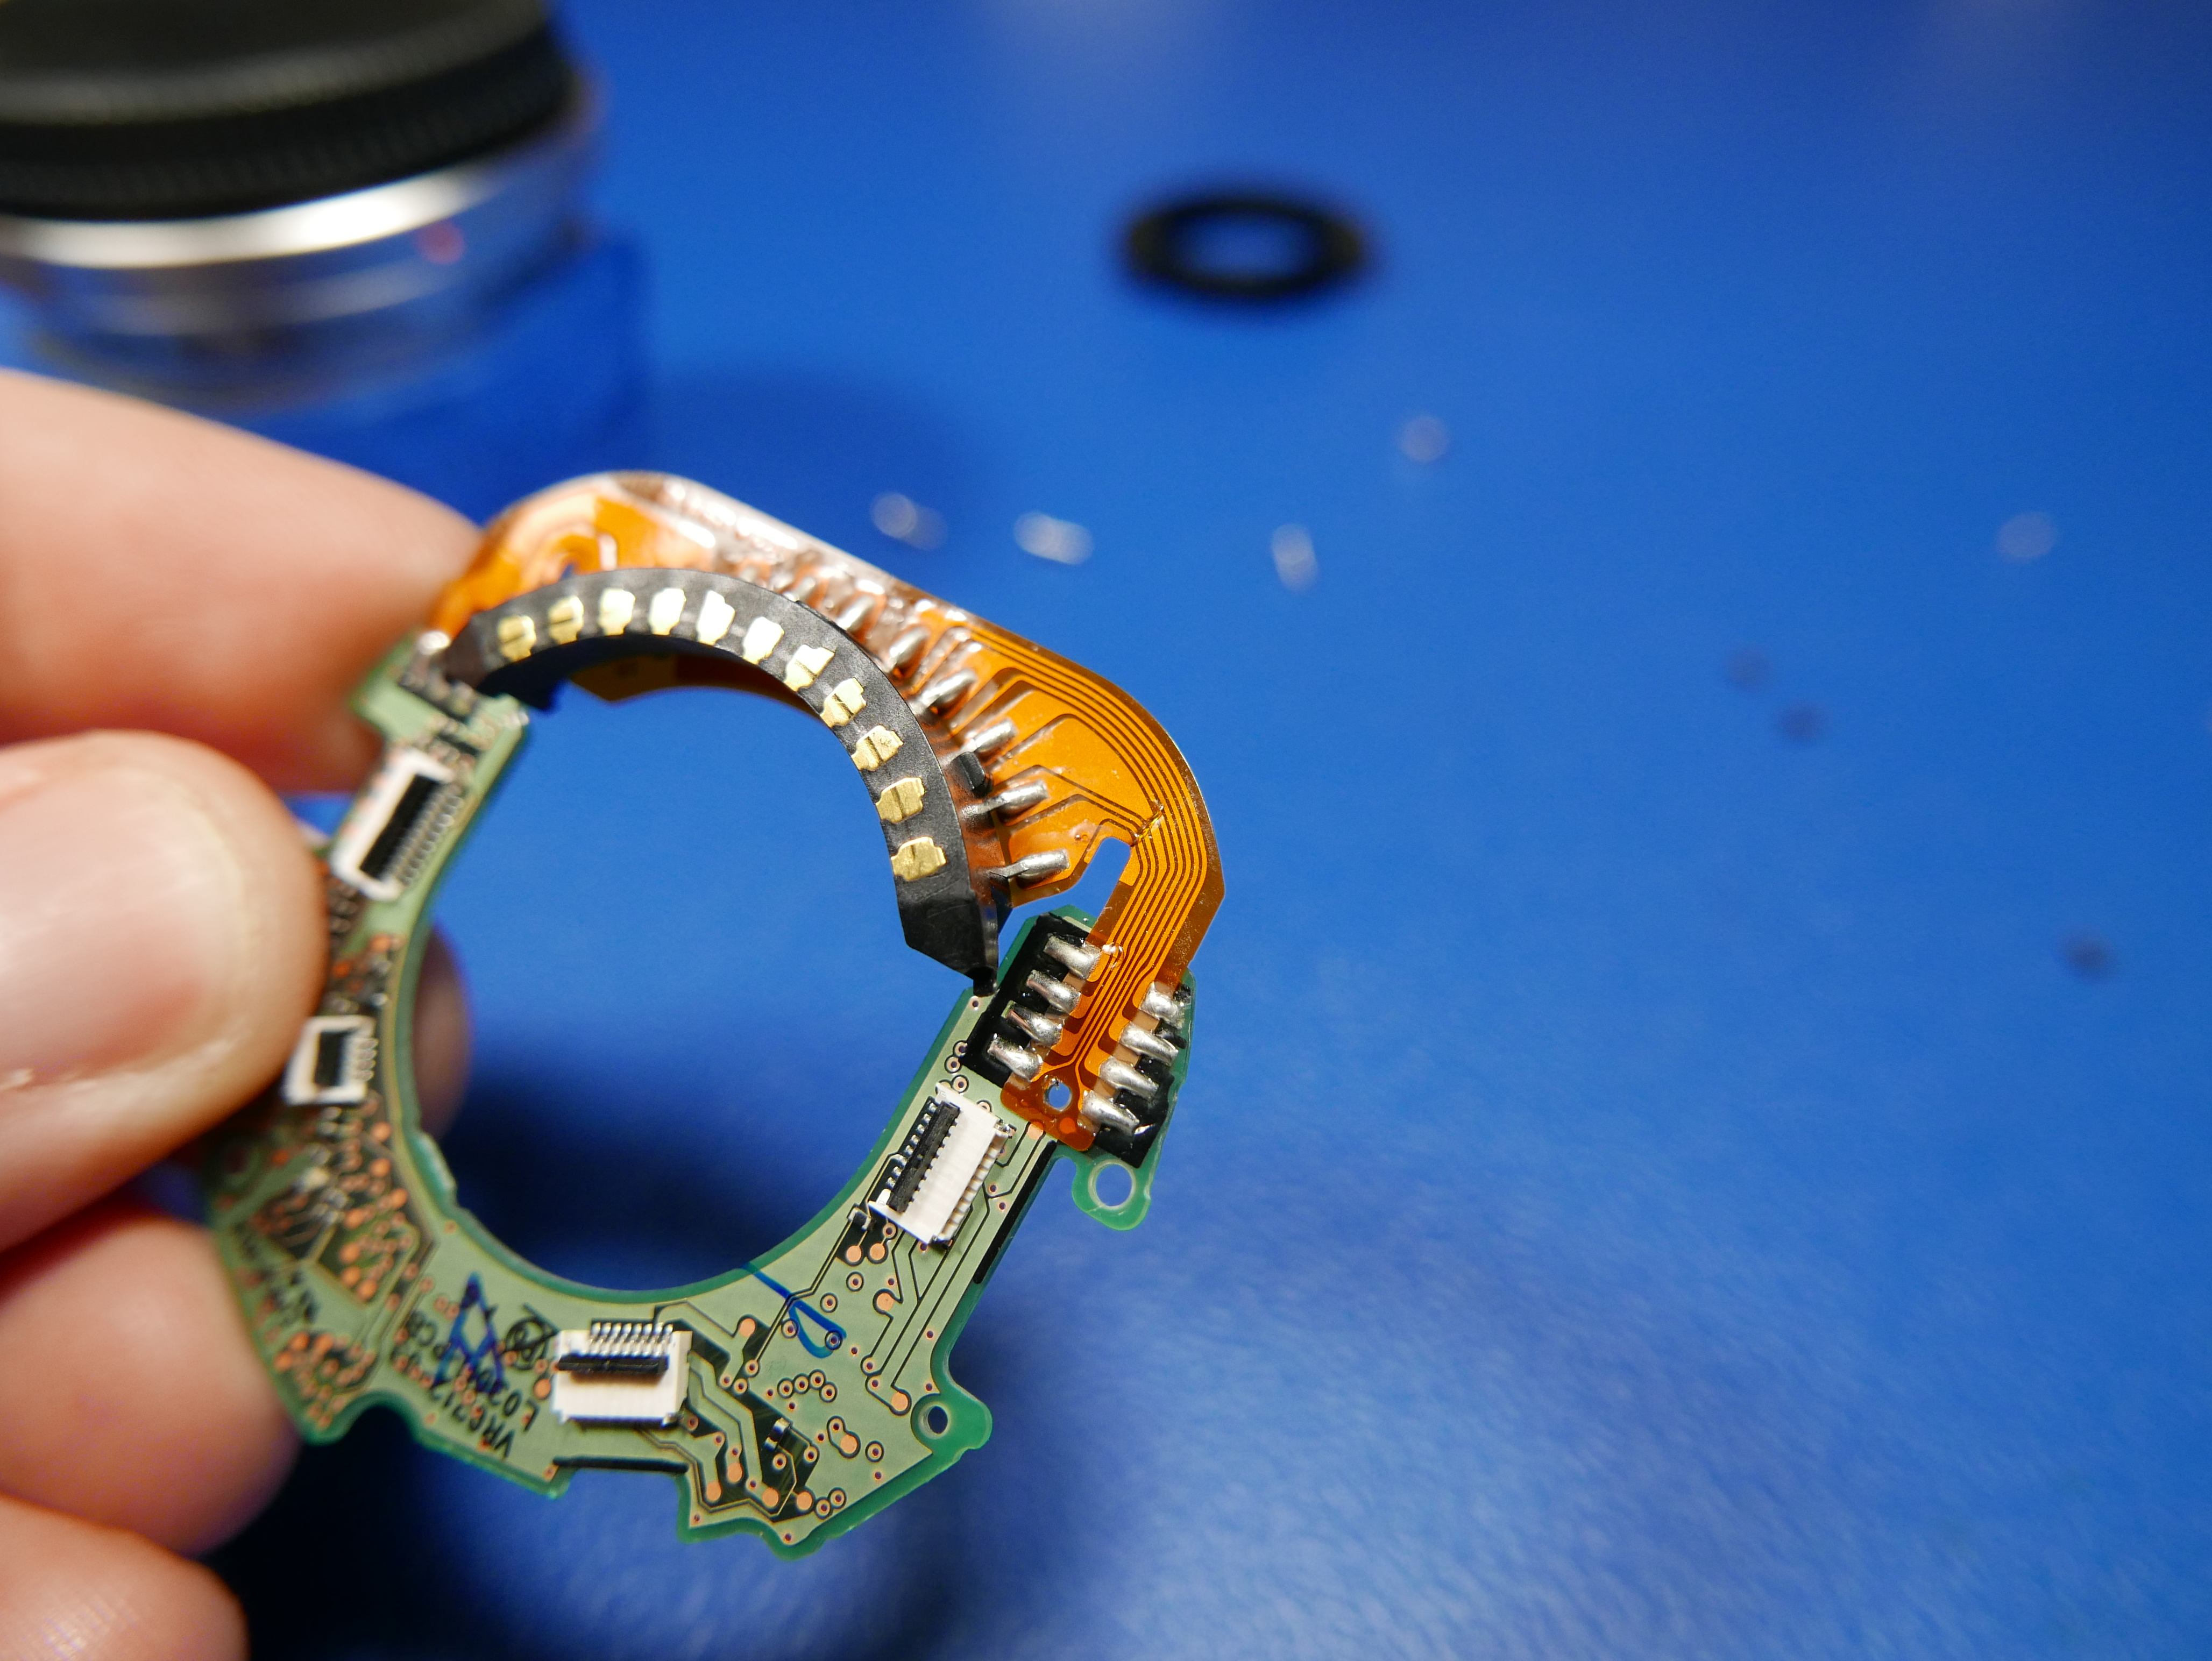
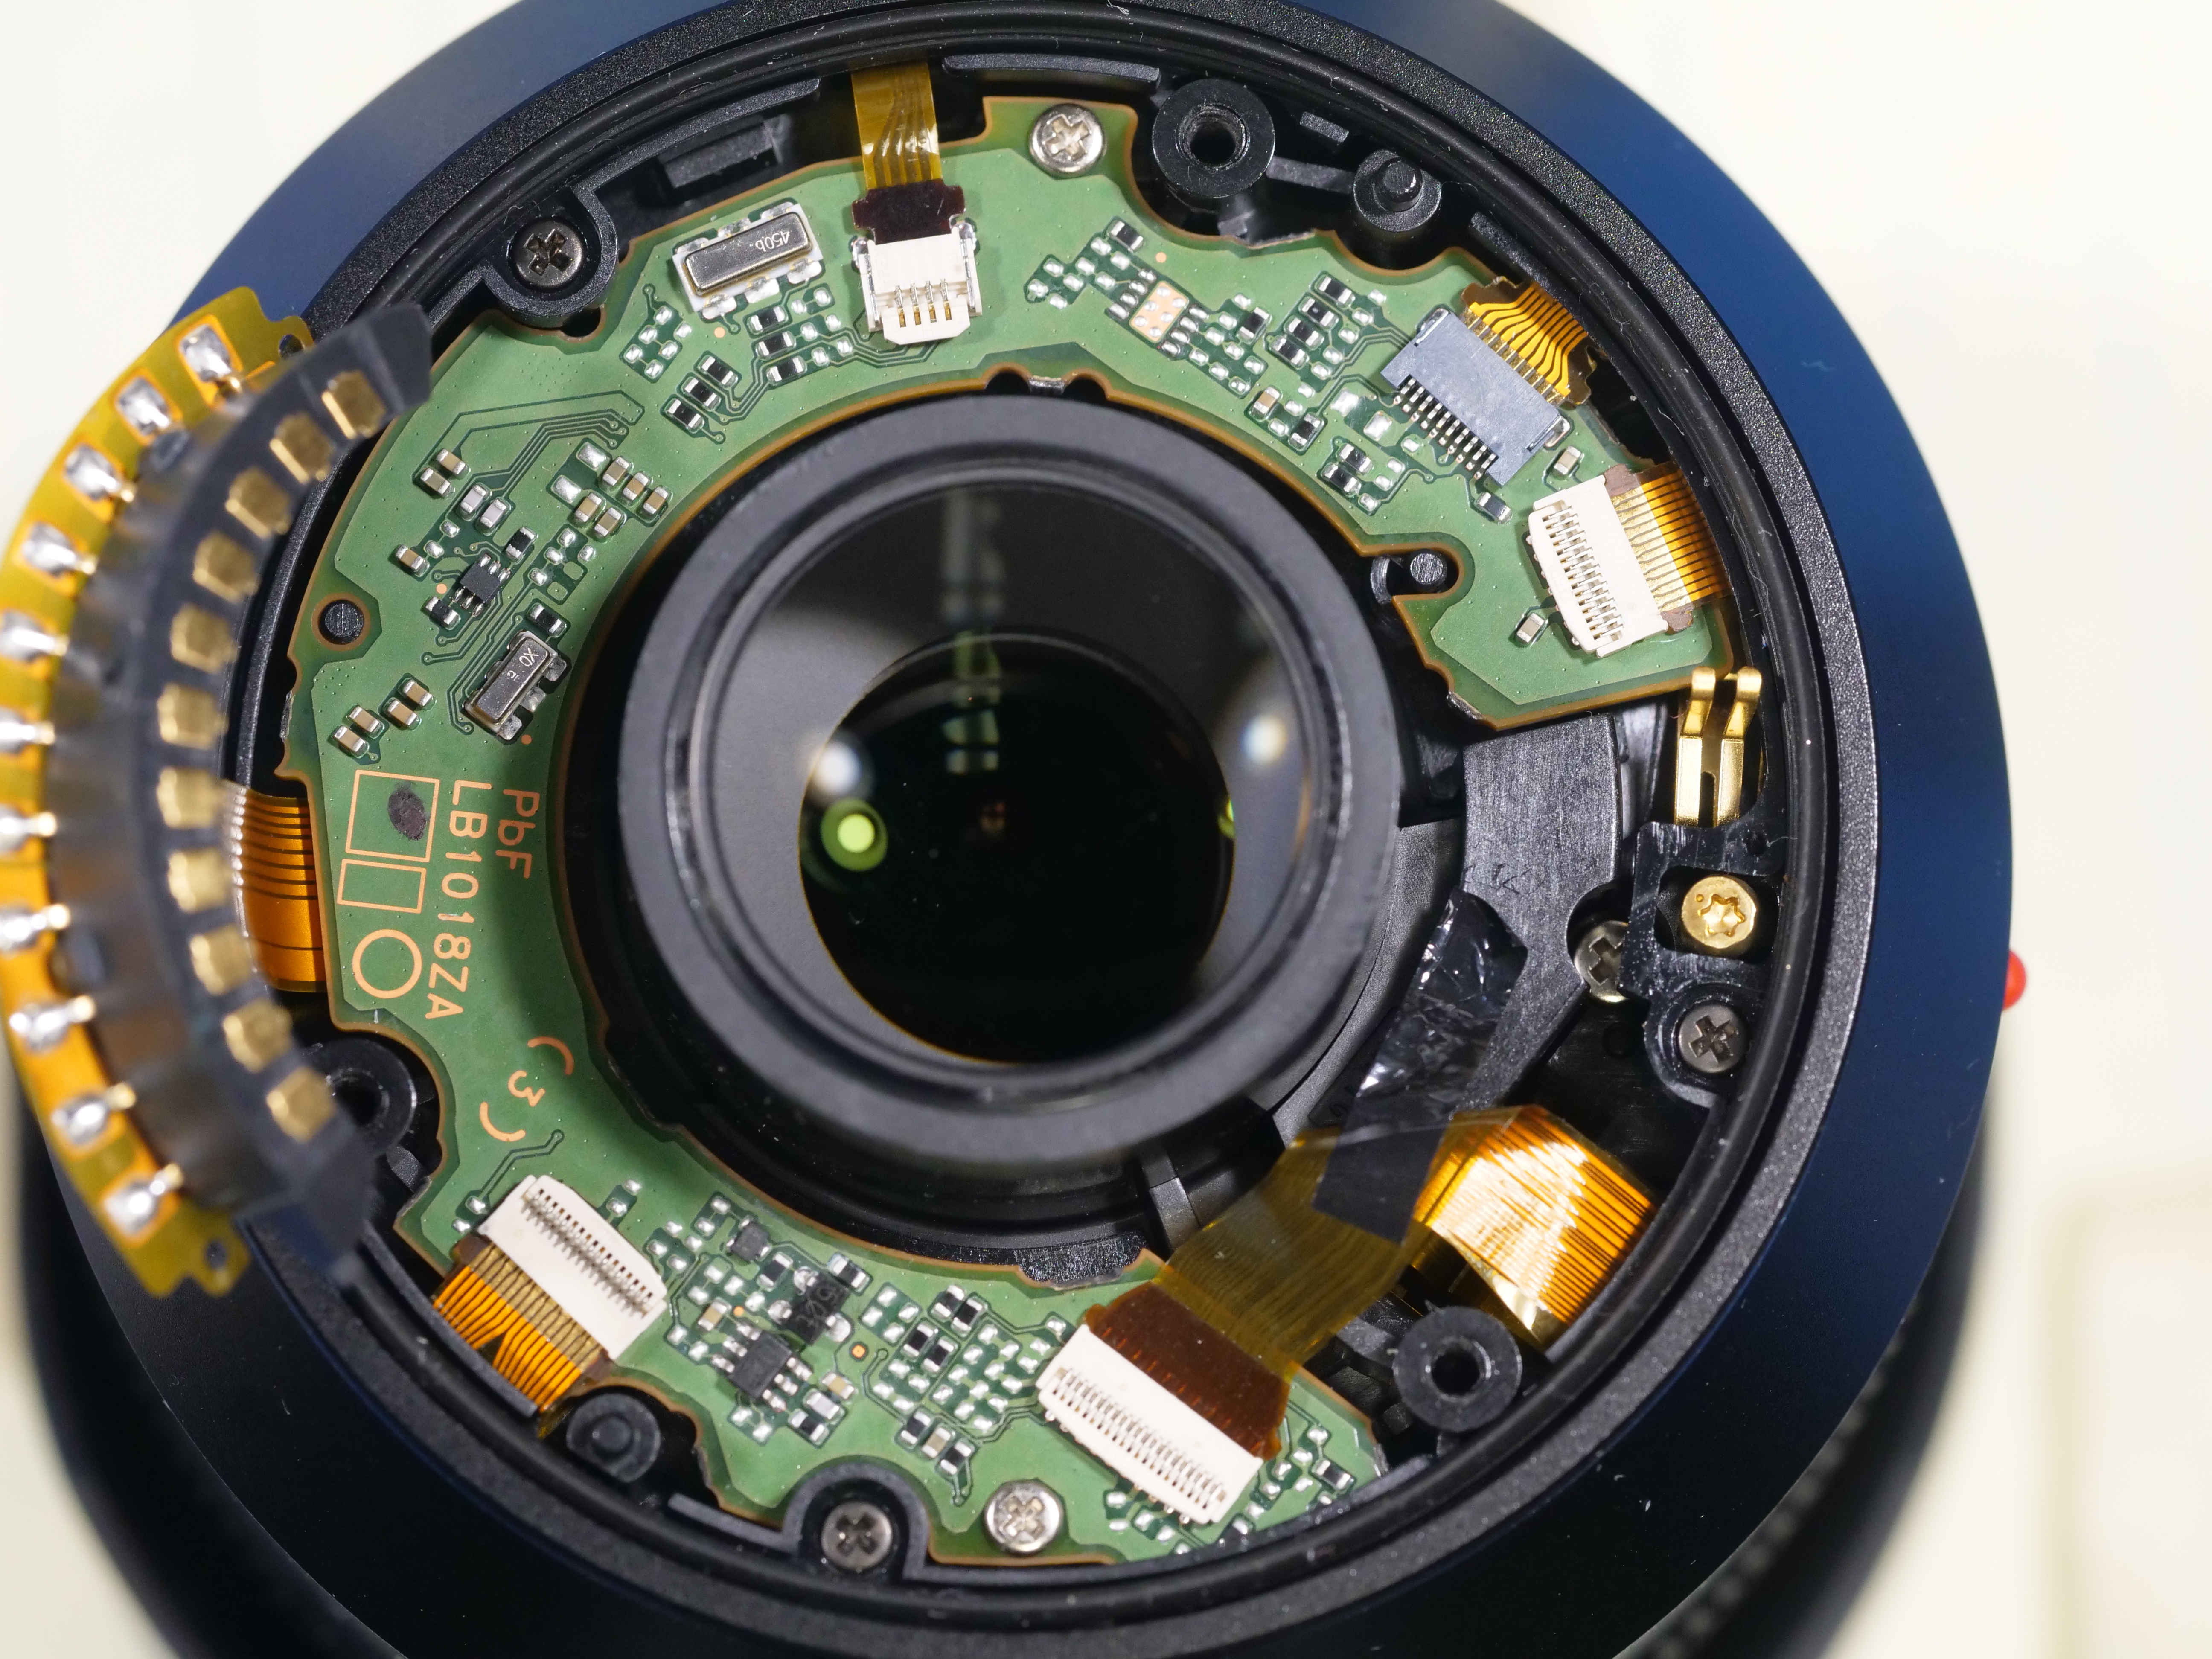
Lens PCB
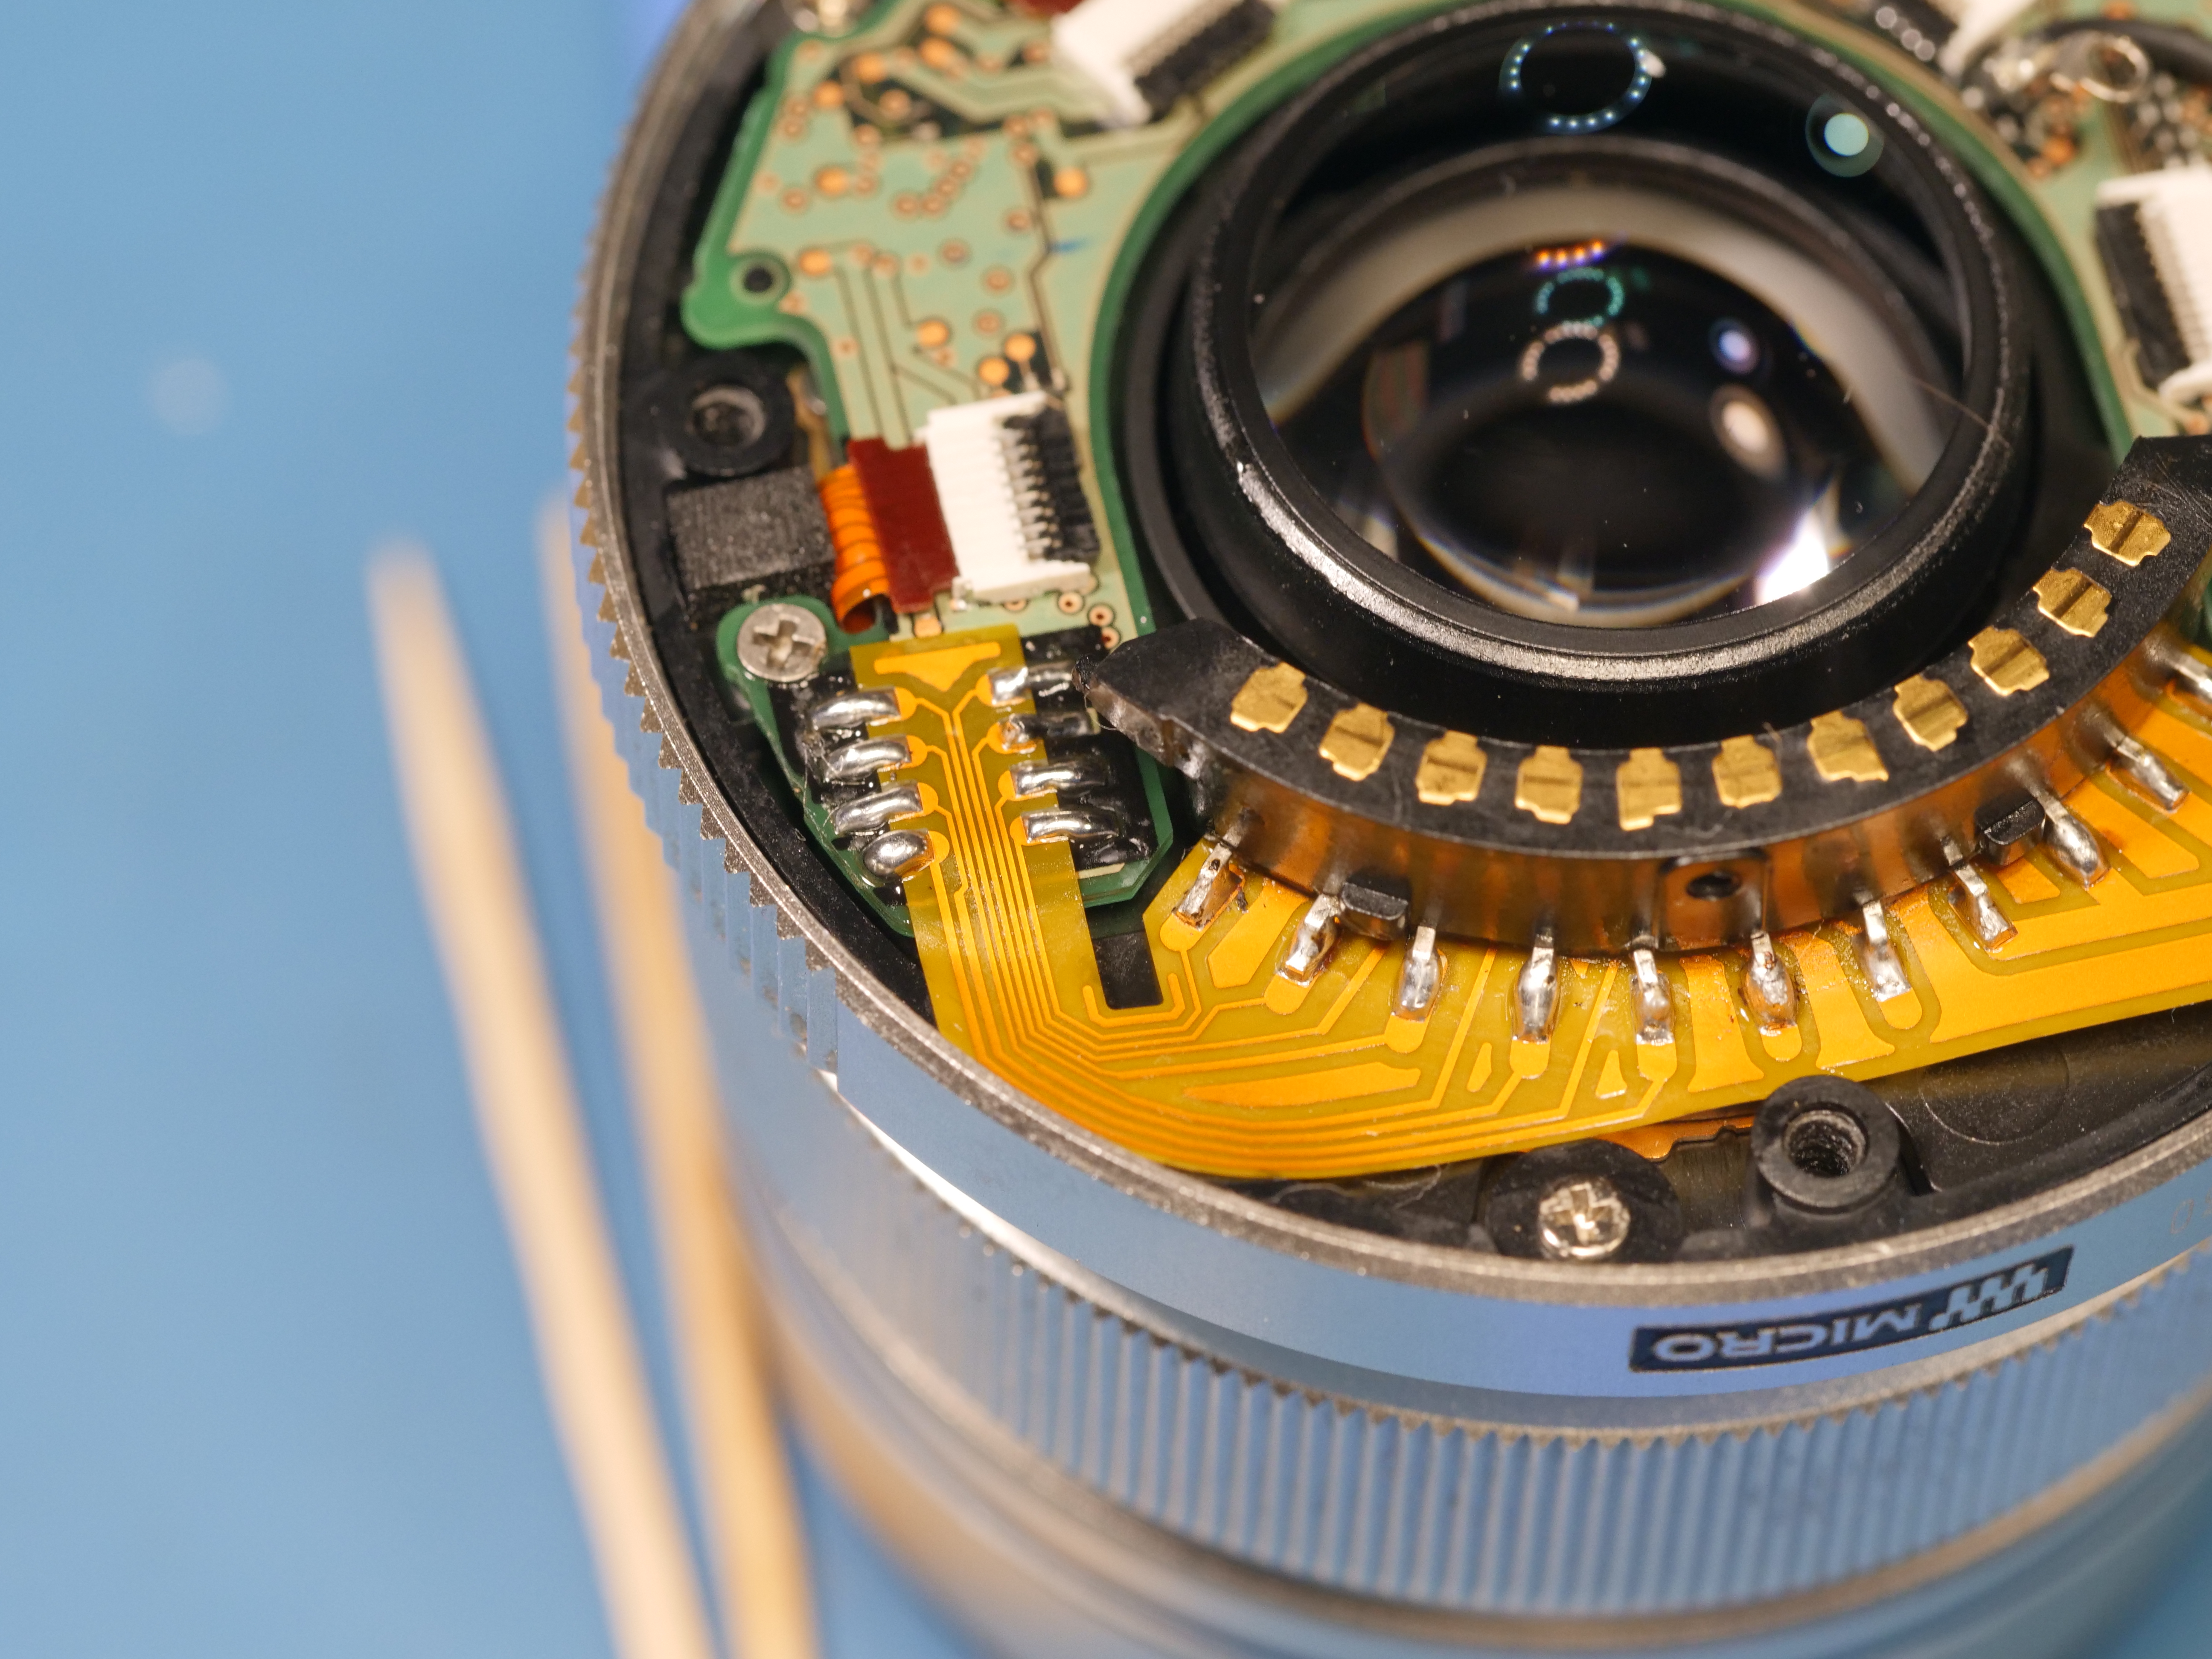
Most lens mount contact blocks feature a single flat flex cable and mate to the main control PCB with a latched FPC (Flexible Printed Circuit) connector. In a peculiar fashion, this lens uses a directly soldered-in flex cable to the main control PCB. For a greater chance at repair, the entire PCB should be removed to have greater access to the PCB pads. Don't forget to remove the small black ground wire before proceeding with the teardown.
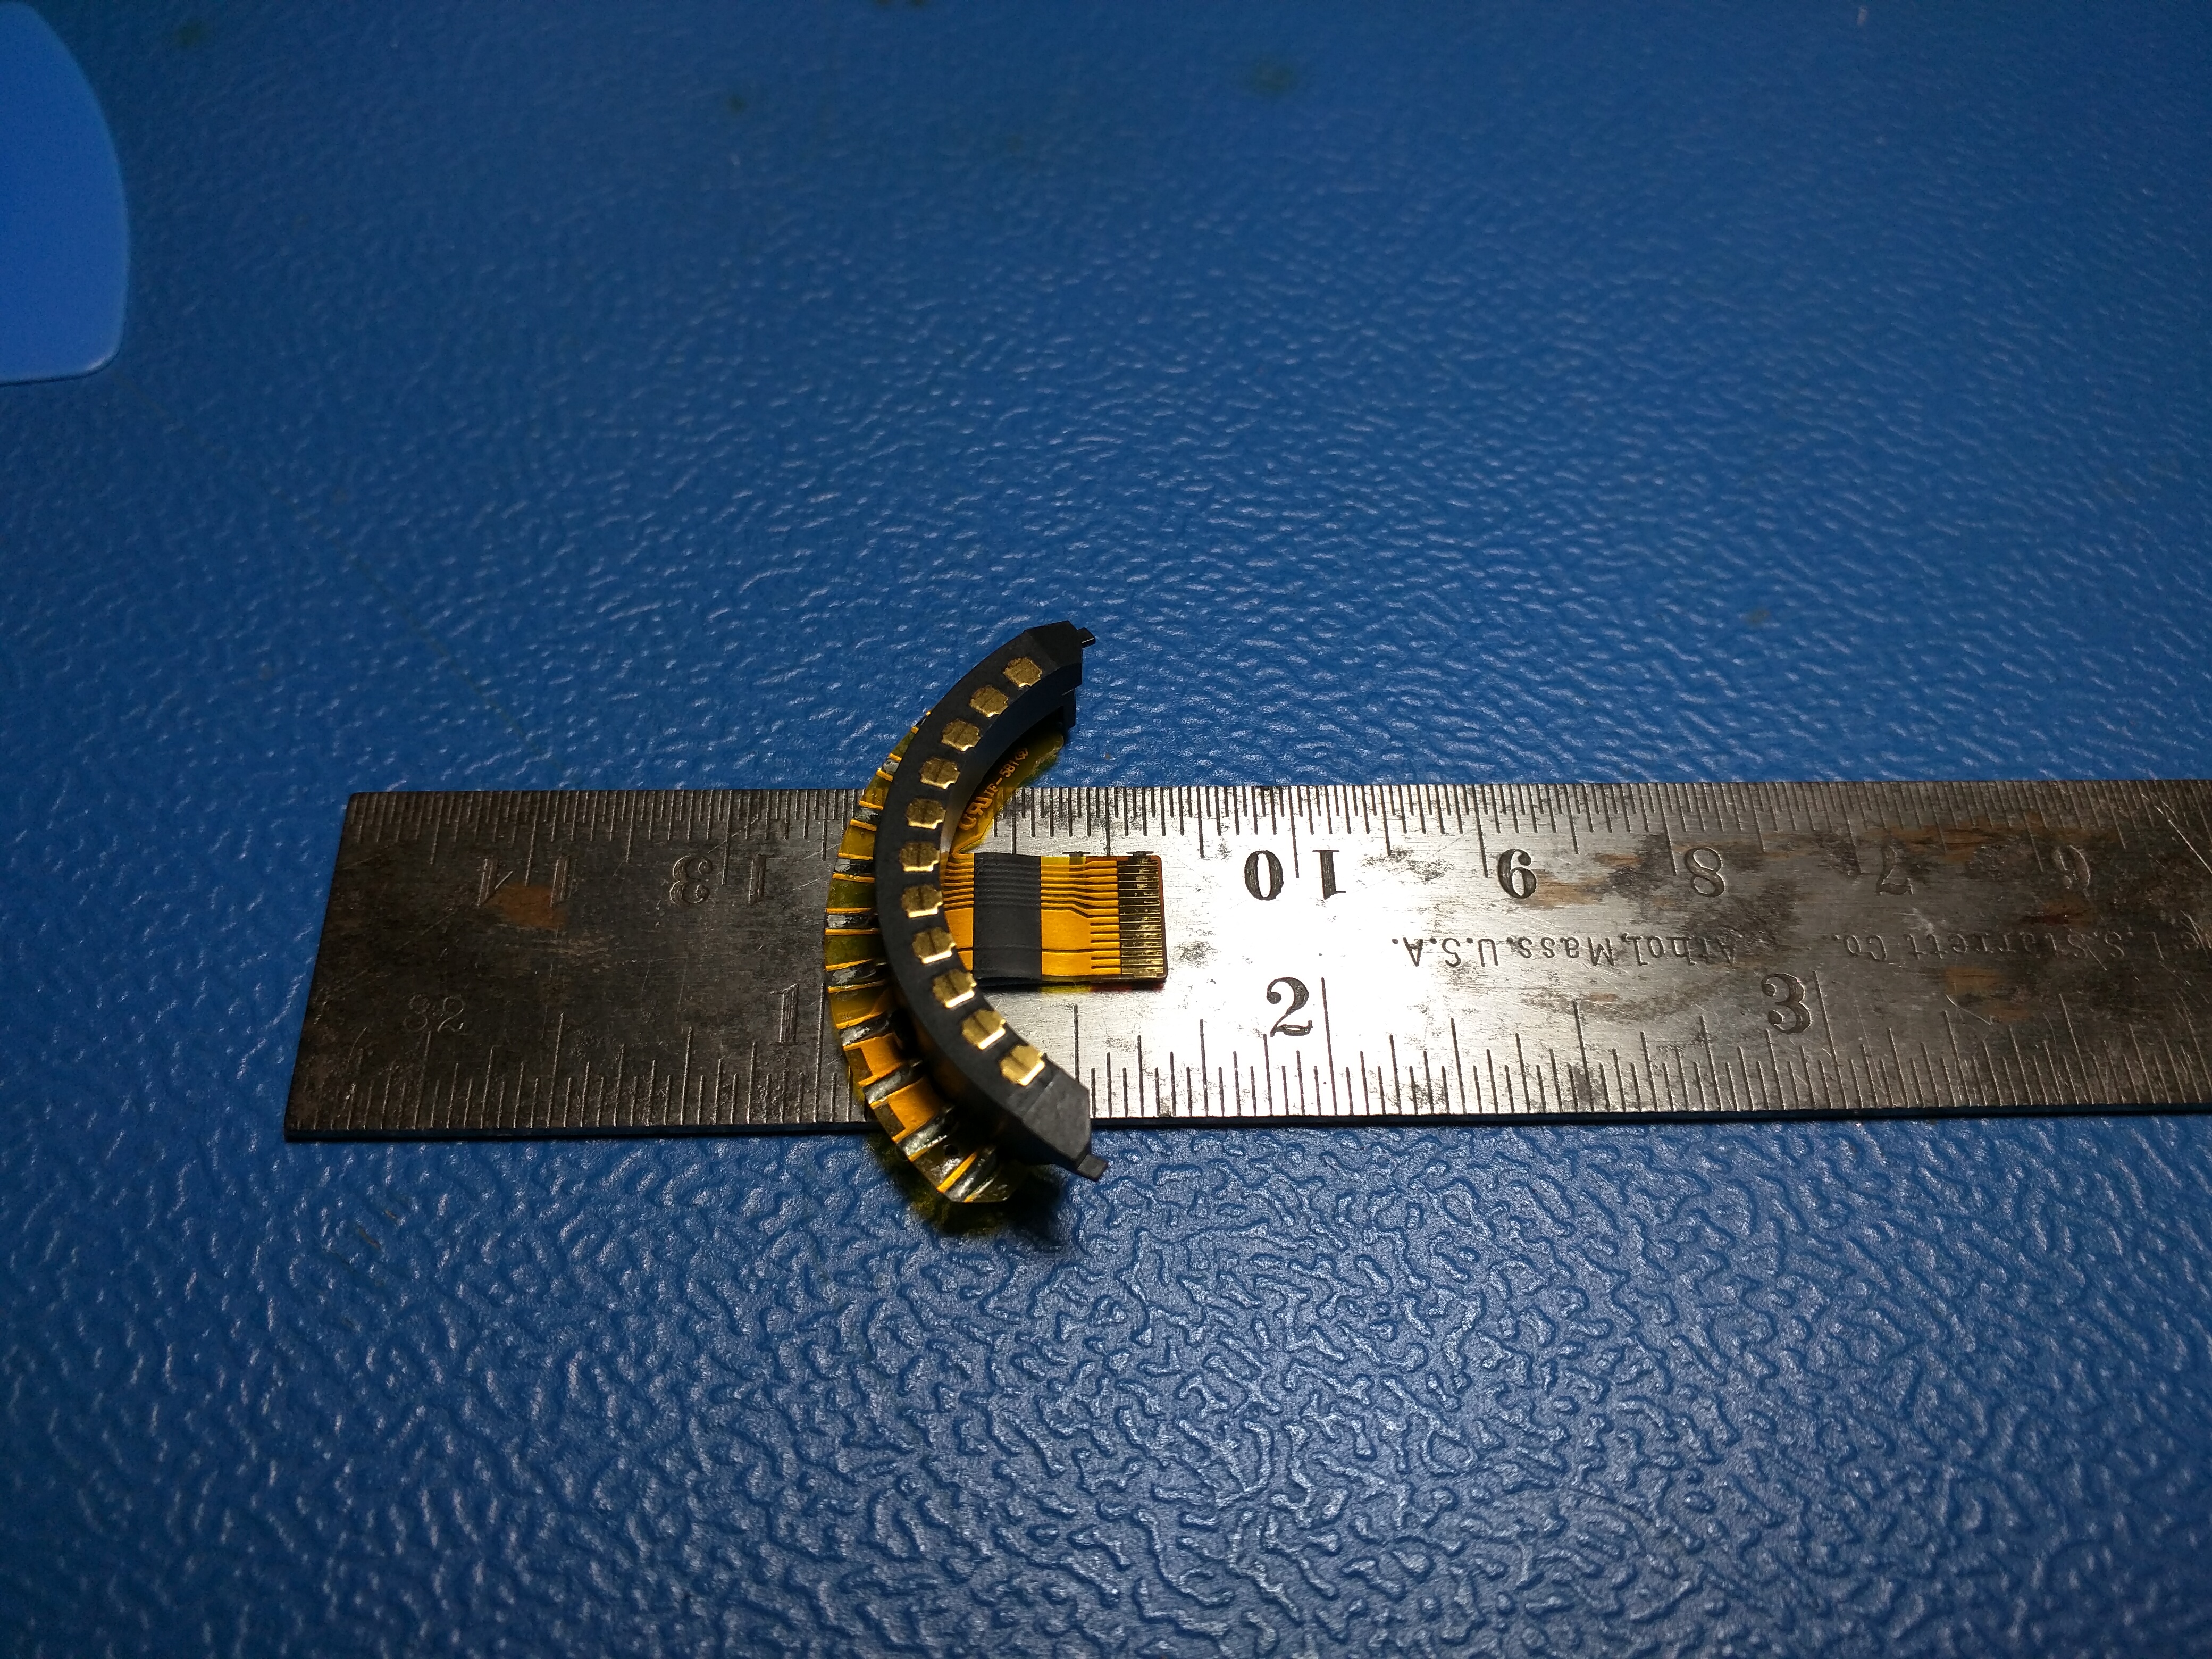
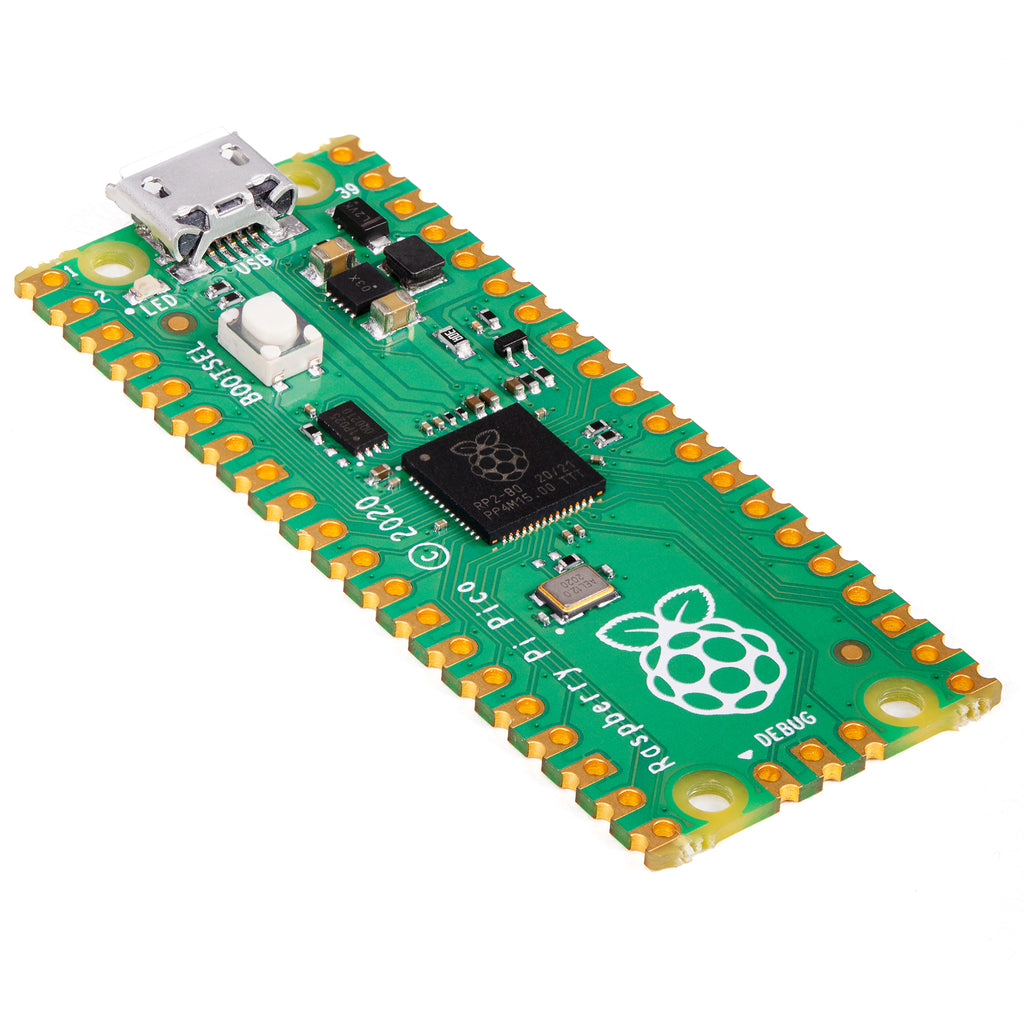
On closer inspection, the flex PCB has modern edge-exposed pads similar to the castellated pads seen on postage stamp sized wireless modules and Raspberry Pi Pico's. SparkFun has an excellent guide on castellated hole soldering. While it is interesting, I do wonder how repeatable edge soldering is on flex PCBs in terms of board rejects. I bet there's a pile of half good 12mm lens control boards somewhere in Asia.
I was debating whether a quick-and-dirty soldering job or a full flex PCB replacement would be a better way to repair this lens. After all, I could simply point-to-point solder some 28AWG bodge wire and have a working lens. I decided to do both. If I made a mistake tearing a flex cable upon disassembly with several years of lens repair under my belt, there is a good chance other folks will do the same. Knowing the closed nature of camera manufacturers, it would not hurt for a replacement part to exist in time and space, especially public domain.
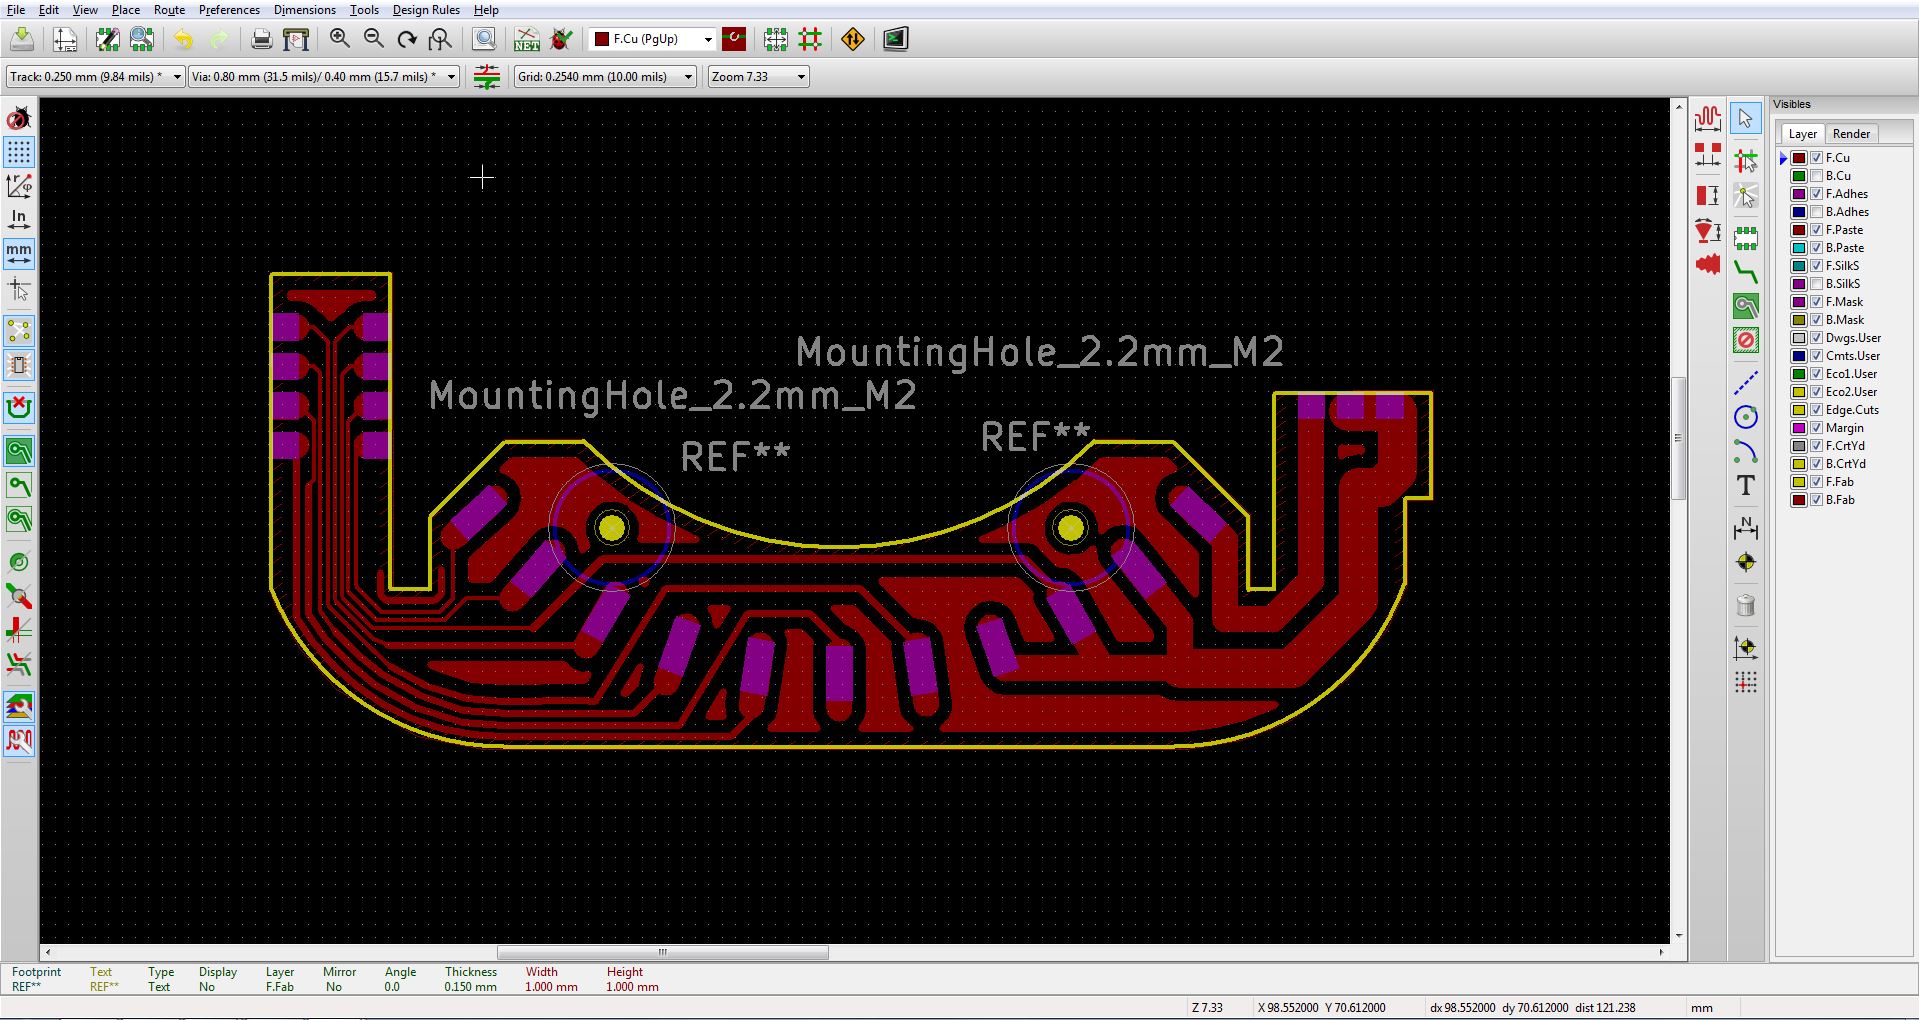
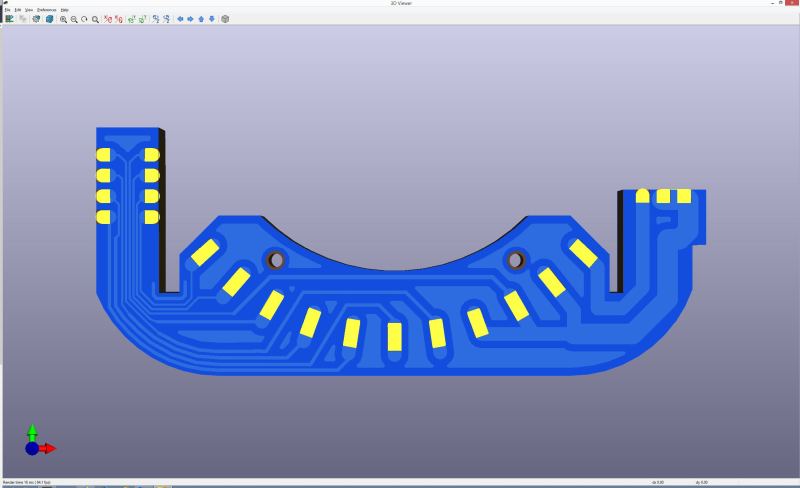
KiCad PCB screenshot
Keeping with the open nature of this repair, this flex PCB part was designed completely in KiCad, a fantastic open source PCB making utility that anyone can download and use. This flex PCB was designed in KiCad 5.0 and the KiCad file is free for anyone to use. The pad spacing is dimensionally correct, and a caliper was used to measure track spacing and trace pitch. Holes for the two positioning pegs in the micro four thirds lens mount contact block are present as well. These aid in the soldering of the contact block to the flex PCB during manufacture. The KiCad files are linked as a zip in the highlighted image below:
Olympus 12mm f2.0 KiCad Flex PCB Download:
While I was waiting for the flex PCBs to arrive, the 28AWG enameled wire worked a treat to bring the lens back to working order. My lens had no down time at all with this clever repair. The greatest risk was soldering to the lens mount contact block. The trick with soldering unknown temperature rated components is as follows: flux every leaded terminal, pre-tin the enameled wire, tin the solder tip, and then lightly press all three together very quickly. This reduces the time the metal leads inside the plastic connector are exposed to heat. It is very easy to use too much solder and deform the connector. This method yields minimal temperature fluctuation in the part and a greater chance of success.

Lens control PCB soldered with fine gauge wire
Fits like a glove. All buttoned up and ready for action! I would highly suggest keeping a spool of tiny gauge (26-30awg) enameled wire, also known as magnet wire, in your personal lab. It is incredibly handy for situations like these, especially as surface mount components become ever smaller.

12mm lens reassembled with hand soldered repairs
Repair, Not Buy?
The inquisitive amongst readers might think, why not just buy the repair part or buy another lens? Simple, the part doesn't exist! I could not find a single reference to this part and not a single Olympus service manual for this 12mm f2.0 lens. I did not just buy another lens because if you throw in the towel every time a challenge is faced, what is truly gained? Of course, the benefit to risk ratio always needs to be considered with every repair, regardless if it's a consumer lens or an Arri Master Prime. I repair lenses for leisure, so I didn't count the repair hours here.
There is a quite a bit of guesswork when it comes to disassembling camera equipment. Every lens technician needs to rely on their mechanical know-how and have a certain familiarity with manufacturing in order to properly and non-destructively disassemble a device. Since I was repairing this lens without the aid of any service manual, I wondered if camera repair was always this opaque. While it might be easy to argue that the distribution of service and repair information has been intentionally obfuscated over the past few decades under the guise of intellectual property, I was genuinely curious if service manuals were hush-hush even back in the film era days. I happen to live near an area that has two independent camera shops, both originating in the 1950s, so I placed some calls and inquired about their experiences in repairing cameras during the glory days of film.

Berger Brothers Camera. Credit: Berger Bros
I called up Berger Brothers, based in Syosset, NY and within seconds I was talking with Rich, who has been a part of Berger Brothers since its initial founding. He said that Berger Brothers has been repairing film cameras since the very beginning. He's worked on nearly every camera brand and has fixed a lot of Nikon, Canon and Leica film cameras in the past. He mentioned that at one point he could purchase parts directly from any of the camera manufacturers. As time progressed, not so much. What took me by surprise is that he mentioned service manuals were not common and that often most repairs were done based on personal knowledge. As certain film camera parts became harder to obtain, they resorted to parts harvesting from other film cameras, the same methods I take when repairing digital cameras of the same series today.

L&L Camera
Later that day I reached out to Lenny of L&L Camera, based in Huntington, NY. He mentioned that film camera repairs were a lot more common decades ago and that they took in a lot of film cameras in the 1960s, 70s and 80s. He mentioned that he kept a record of all the camera repairs and it was quite worthwhile for him during the film era. Parts harvesting was also very much alive and well during that time. As cameras became more advanced, they would send out for repairs as needed. What I found most interesting is that just like Berger Brothers, L&L did not have access to service manuals either.
One of the many benefits of the adoption of the World Wide Web was the uncovering of camera service manuals, some dating back into the 1950s. The truth is, camera service manuals have been available for many decades, but the distribution has been restricted. I bet an entire generation of film camera repair technicians would have killed for access to such a resource as the official Mamiya service manual I linked to in my Mamiya RB67 repair guide. s
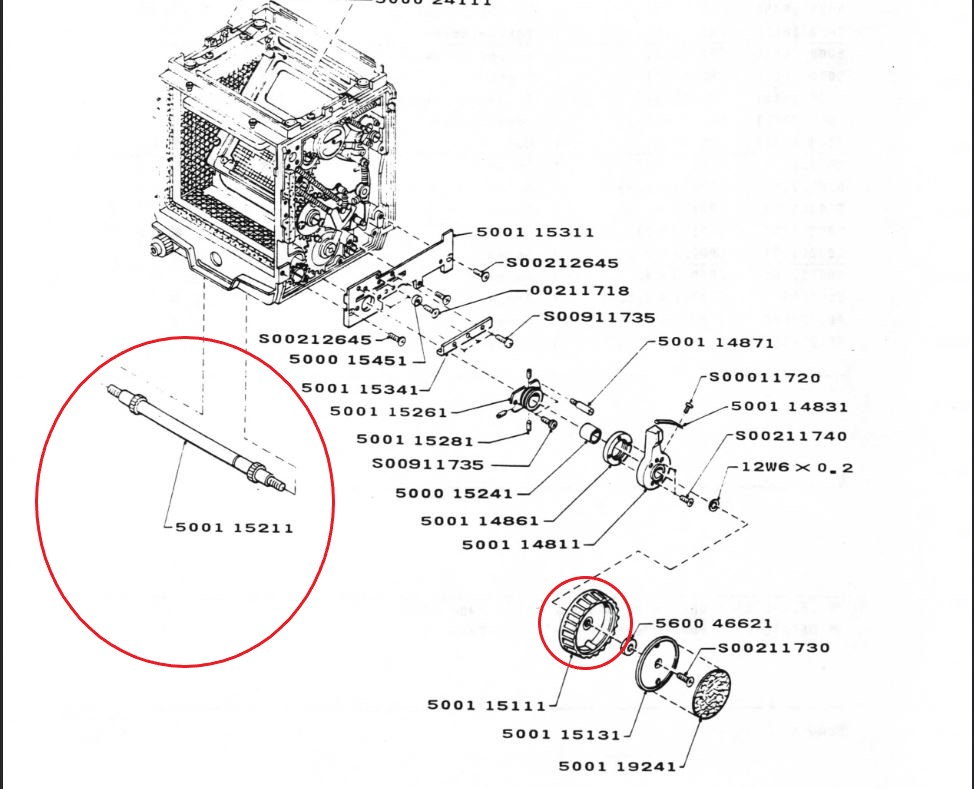
Mamiya RB67 parts diagram
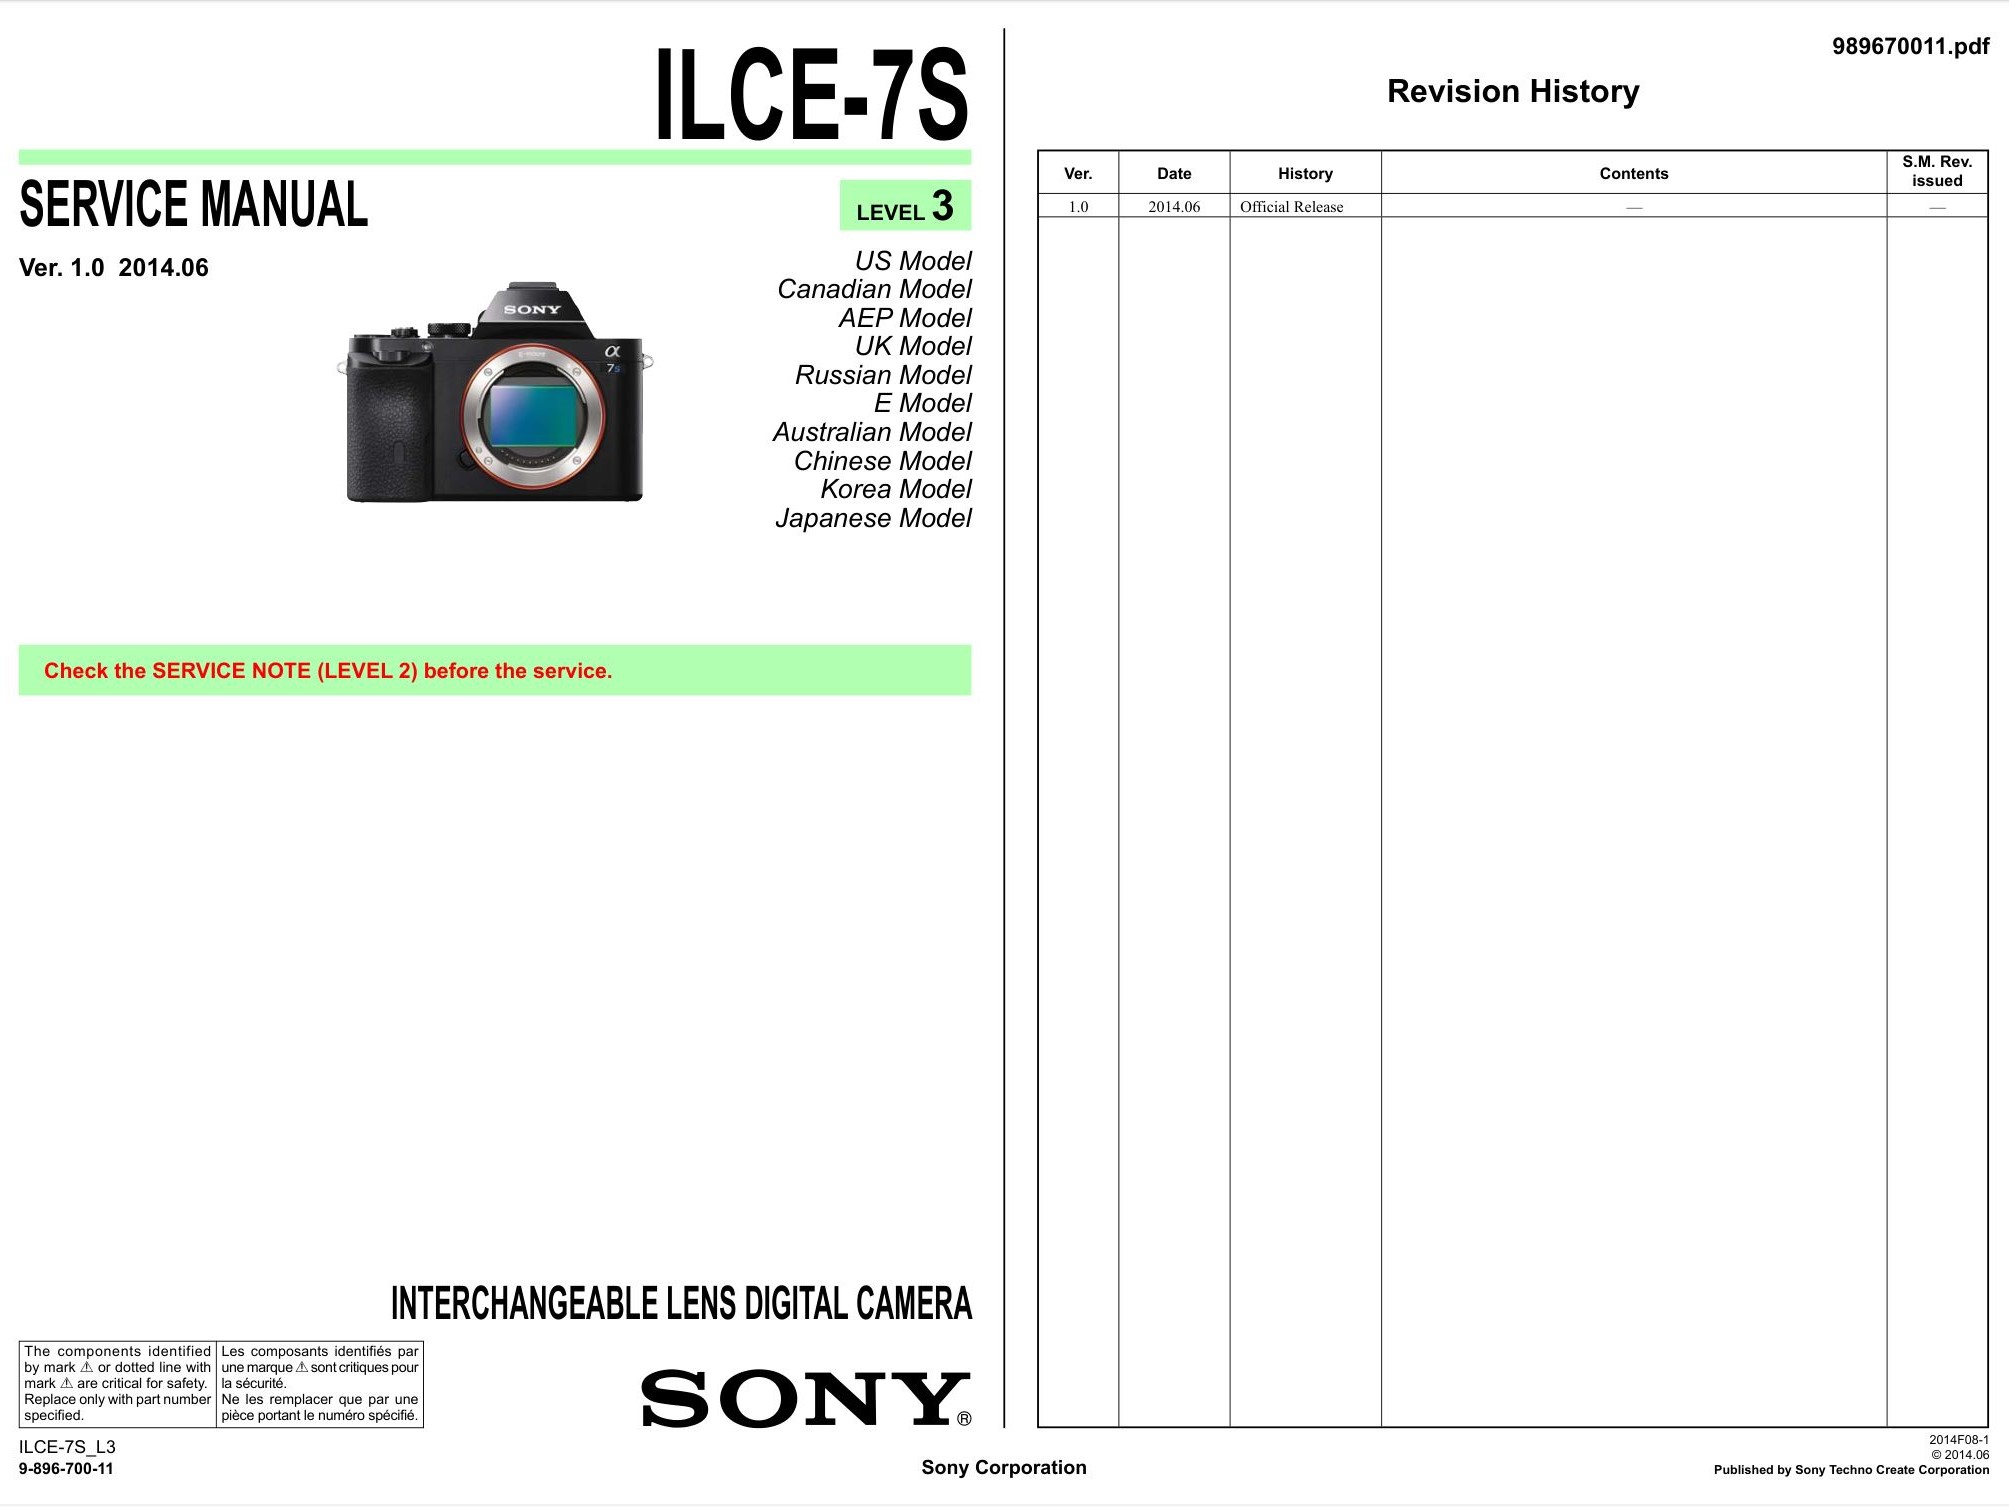
Service manuals very much exist for camera gear today. Here is an excerpt of the Panasonic 35-100mm zoom lens service manual along side one for the original Sony A7s. I am not going to elaborate on sources of manuals here, but they can be found if you look close enough on the web. What is truly baffling is why the existence of service manuals have been kept under wraps for so long. Why can you not request a service manual from a manufacturer without hesitation? As a resident of NY state I am pleased that the Right to Repair Legislation (Digital Fair Repair Act S4104-A/A7006-B) has passed.
The Digital Fair Repair Act (S4104-A/A7006-B) requires original equipment manufacturers (OEMs) to make diagnostic and repair information for digital electronic parts and equipment available to independent repair providers and consumers if such parts and repair information are also available to OEM authorized repair providers and servicers.
—Kathy Hochul, NY State Governor
While the ramifications of braking the law are incredibly meager at $500 per infraction, it is a step in the right direction. Hopefully there will be fewer road blocks toward obtaining repair information for residents in NY state.

Corporate defense lawyers argued against this legislation under the guide of safety, an oh so common blanket excuse to restrict information. If this legislation did not pass, and repair information was further restricted, how would I ever know that the rear element on the 12-35mm Lumix lens and the 14-140mm lens cannot be cleaned by a standard mechanical process? The service manual is the only place this is noted. Both lenses feature incredibly thin nano surface coatings that can only be cleaned with filtered compressed air, that means no industry standard Kimwipe and lens solution can be used. I can attest to this information, the nano surface coatings are easily scratched by these processes.
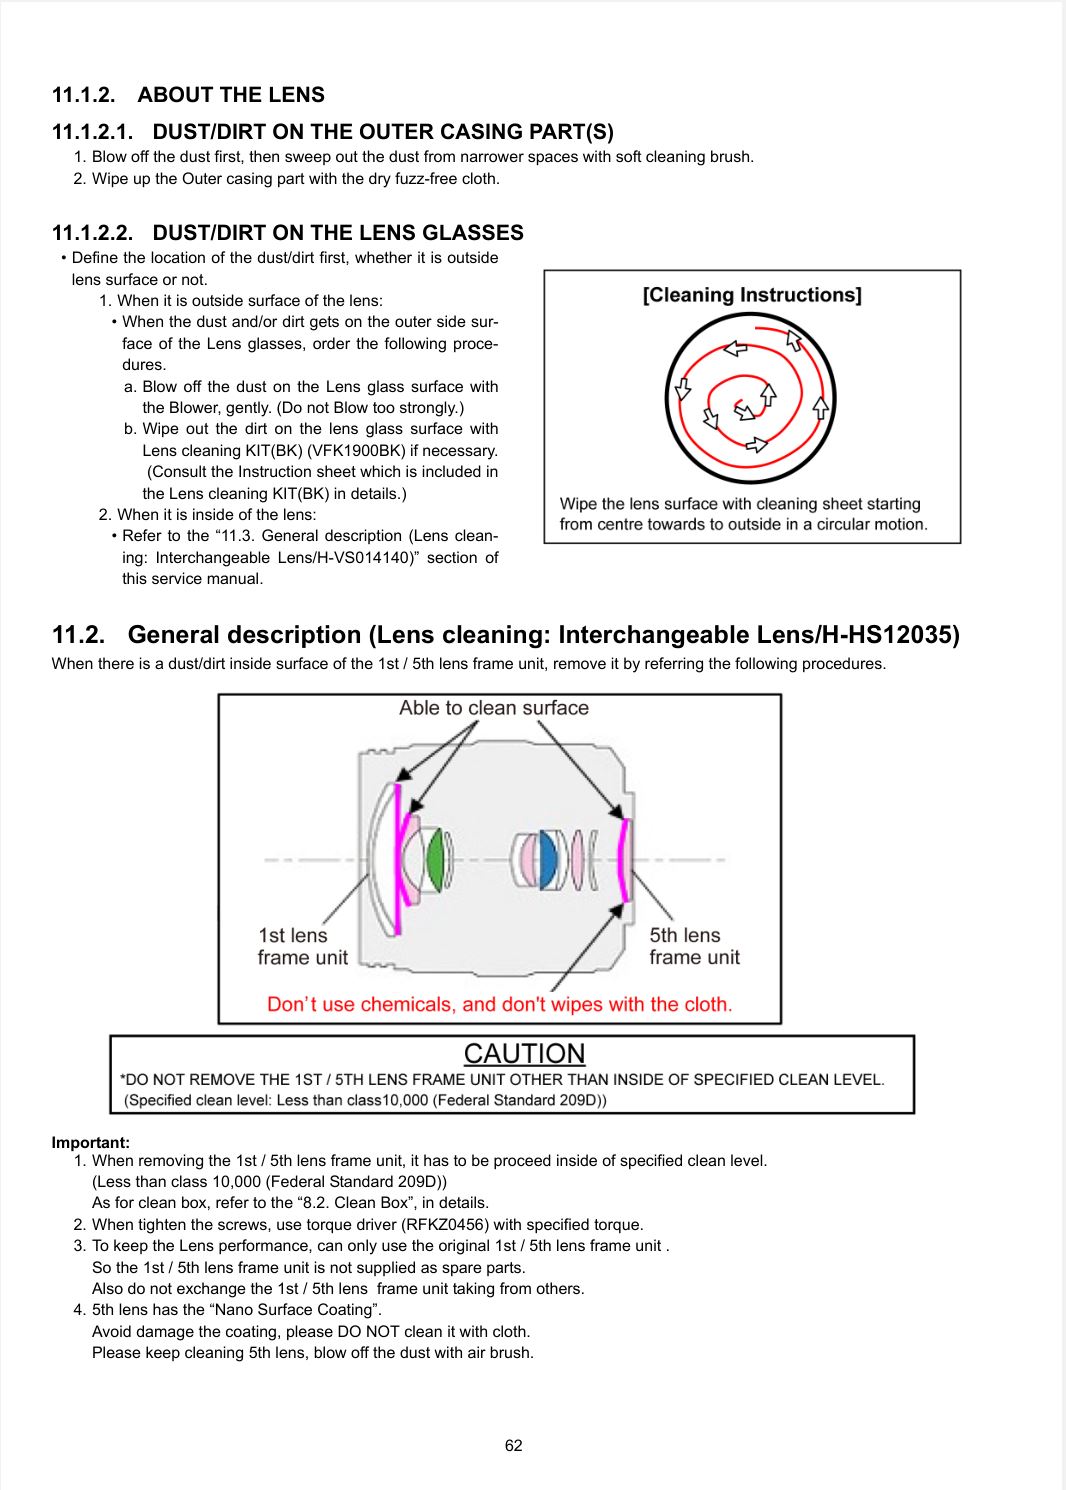
Lens coating warning
How would a rookie camera repair technician know about modern day lens beauty rings if they have only ever worked on film lenses that primarily feature threaded decoration rings with equal opposing lens spanner holes?
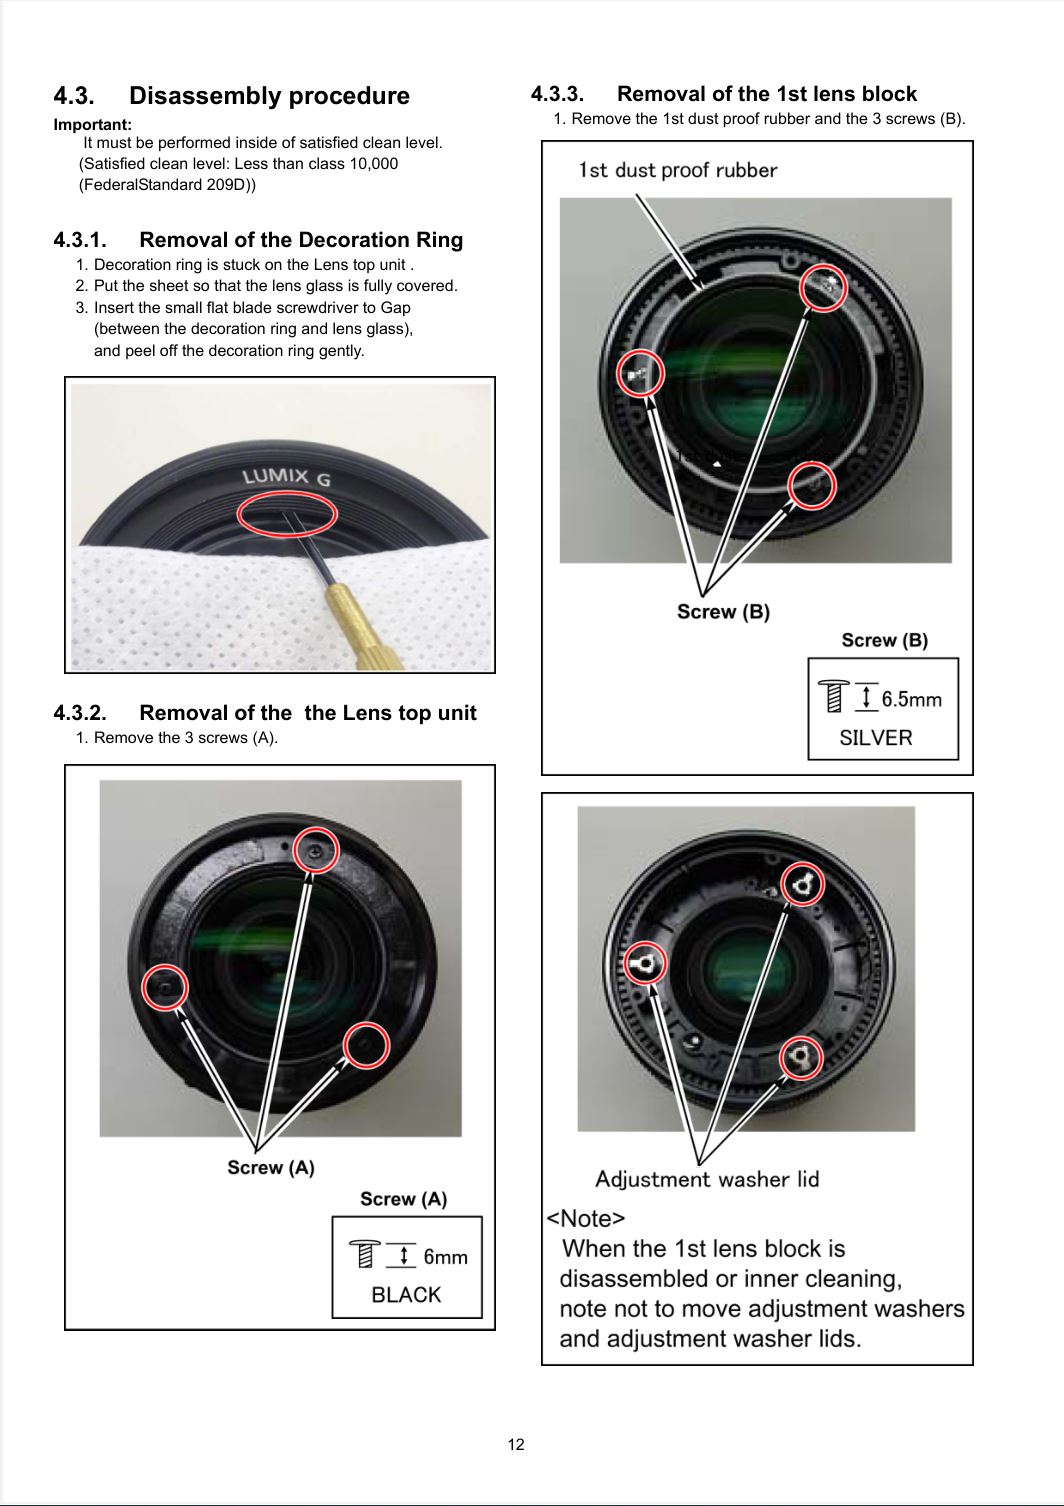
Lens beauty ring
With 13 years of experience repairing camera gear, if I made such a rookie mistake on a simple fixed lens teardown, imagine how complicated the teardown procedure is for a multi-lens group helical cam and follower zoom lens! Exactly. A service manual is worth it's weight in gold and should be freely available on request.

Internal lens helicoid
Sourcing Parts from China
With any camera repair, it is important to keep an open mind and have massive amounts of patience to avoid damaging incredibly scarce internal parts. Many parts are simply impossible to obtain, such as the very failure prone Lumix GH3 / GH4 LCD hinge cap. I wrote up an entire piece for iFixit about how I could not obtain the part even while the Lumix Gh4 was still for sale globally.
Lumix GH4 LCD end cap broken
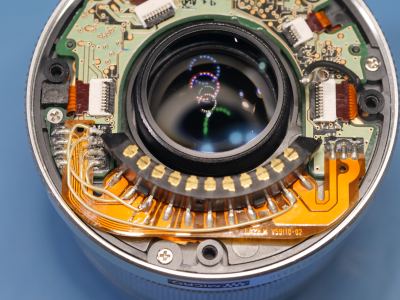
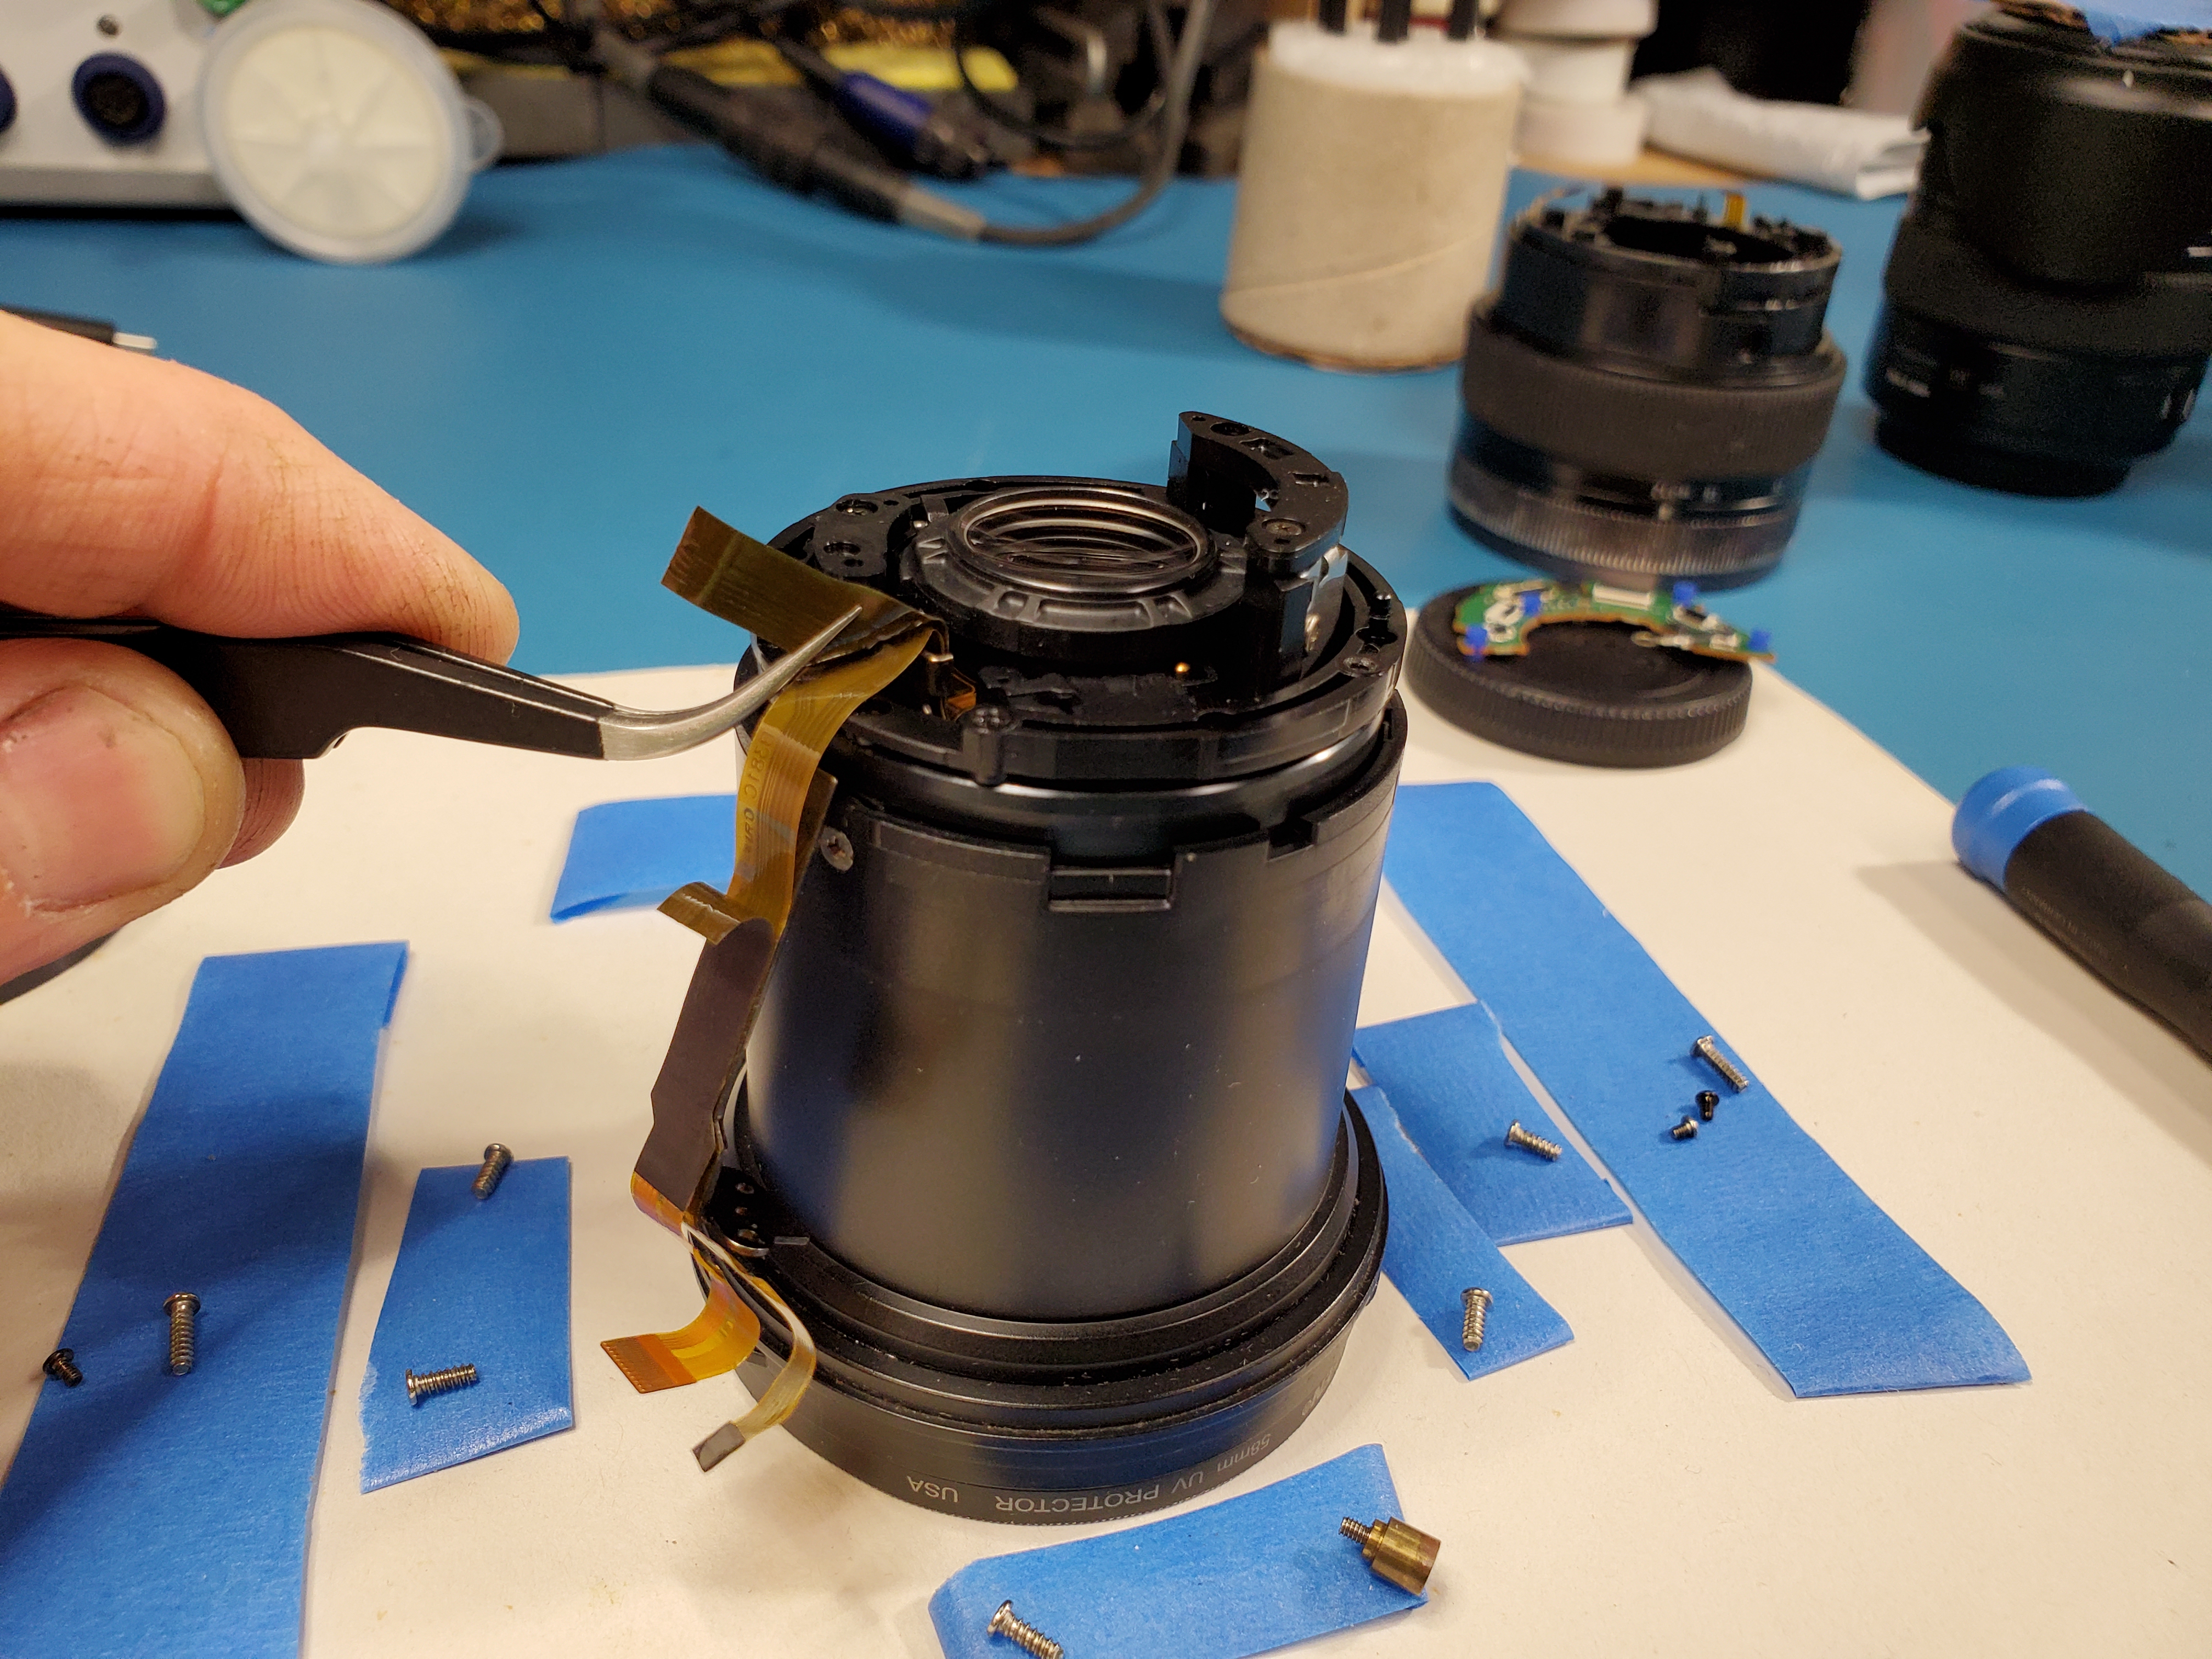
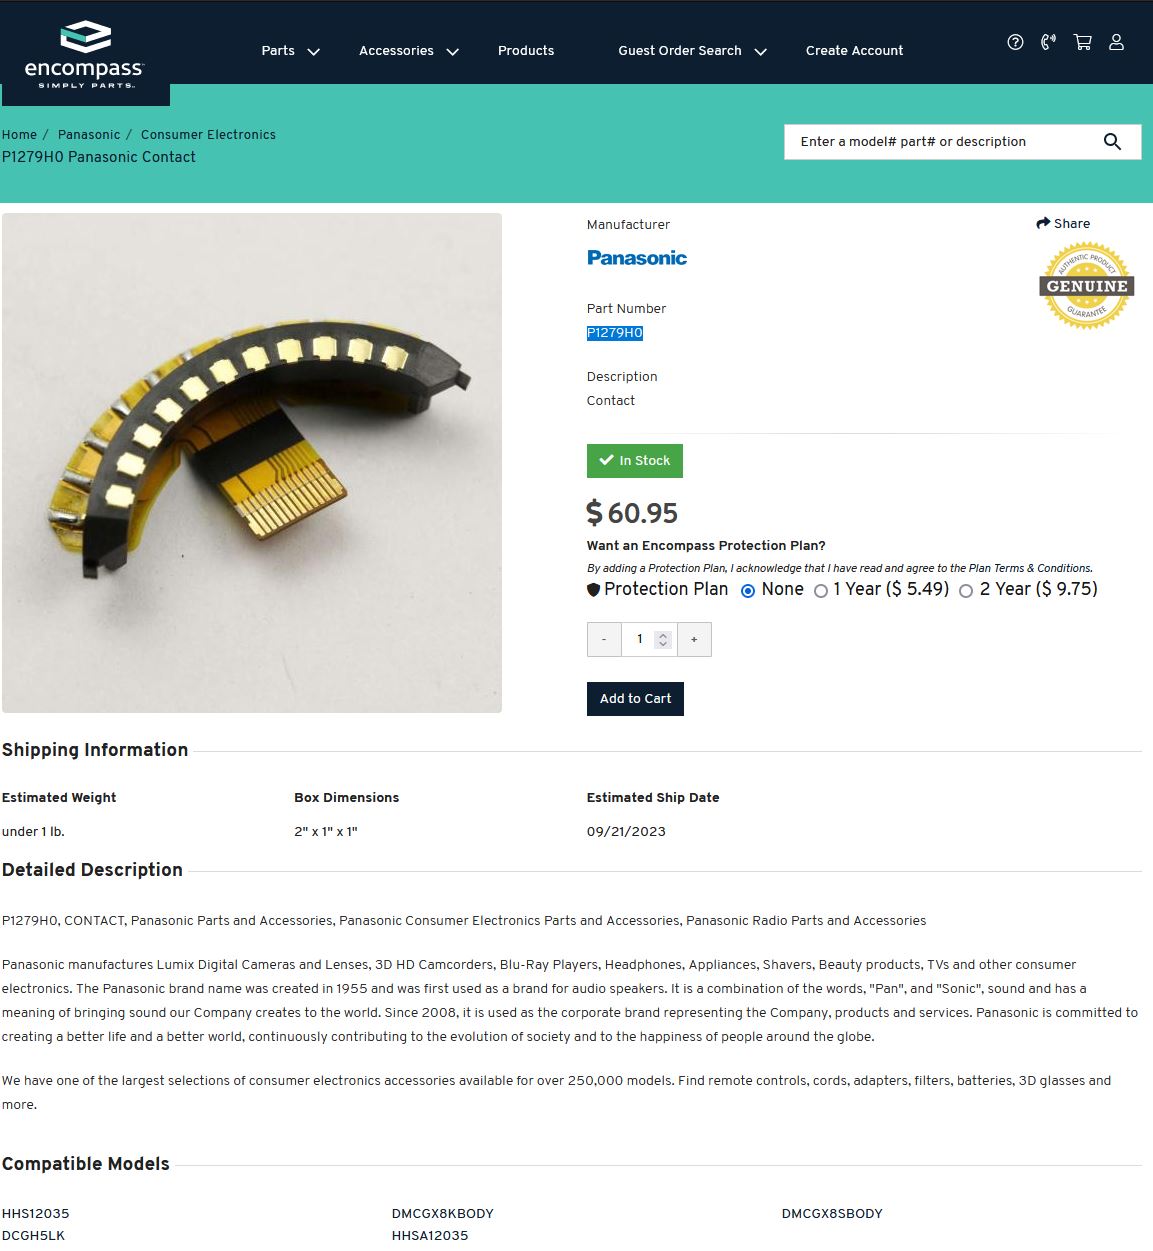
Some parts are easier to source, such as the Lens mount contact block. Since many micro four thirds lenses use the same contact block, they can be purchased from the one and only Panasonic / Olympus verified parts distributor: Encompass Parts. At $60.95, it's nothing to laugh at and can easily make a repair uneconomical. More down to earth pricing can be found on the various eastern market websites.
Disassembled lens with contact block
There are many, many eastern market sources for electronic goods. The two largest shopping conglomerates are Tencent and the Alibaba Group. Firstly, no company or seller has sponsored or funded this content in anyway. I'm going to focus on the products from the Alibaba group, as WeChat from Tencent is largely a mobile-first Leatherman-style application that does not work well in the western world. Even though it's incredibly convenient to have one application that does everything, a cramped interface that offers little to no multitasking is not conducive to finding camera repair parts of unknown nature.
WeChat Pay is not auto installed on the international version of the app so you'll have to go to the "me" section and toggle to settings. From there, navigate to tools and Weixin Pay, the local name for WeChat. Enter your name and passport number as well as international credit card details. You'll be prompted to verify your identity by uploading a photo of your passport.
—CNA Insider
The benefits of using the Alibaba group products (Alibaba, AliExpress, Taobao, and Tmall) are that I can sandbox these websites in a modern browser and pay with standard western payment sources. WeChat just finally allowed western credit card payment as of July 2023, but it requires the user to verify their identity to use such sources by uploading a photo of their passport. Knowing that all of these eastern market services are state owned, I did not feel comfortable handing over such information. Besides this, it seems that Tencent is not content in playing by the Apple and Google app store rules by forcing the user to enable a payment system not present in the stock app. This seems like a brazen way to circumvent the Apple and Google app store fees for handling transactions.
Of the four Alibaba group sites, Alibaba and AliExpress are targeted towards English speaking customers while the remainder are targeted toward the mainland China market. I'll discuss the English market sites first as the others require an entirely different set of tools and methods to navigate.
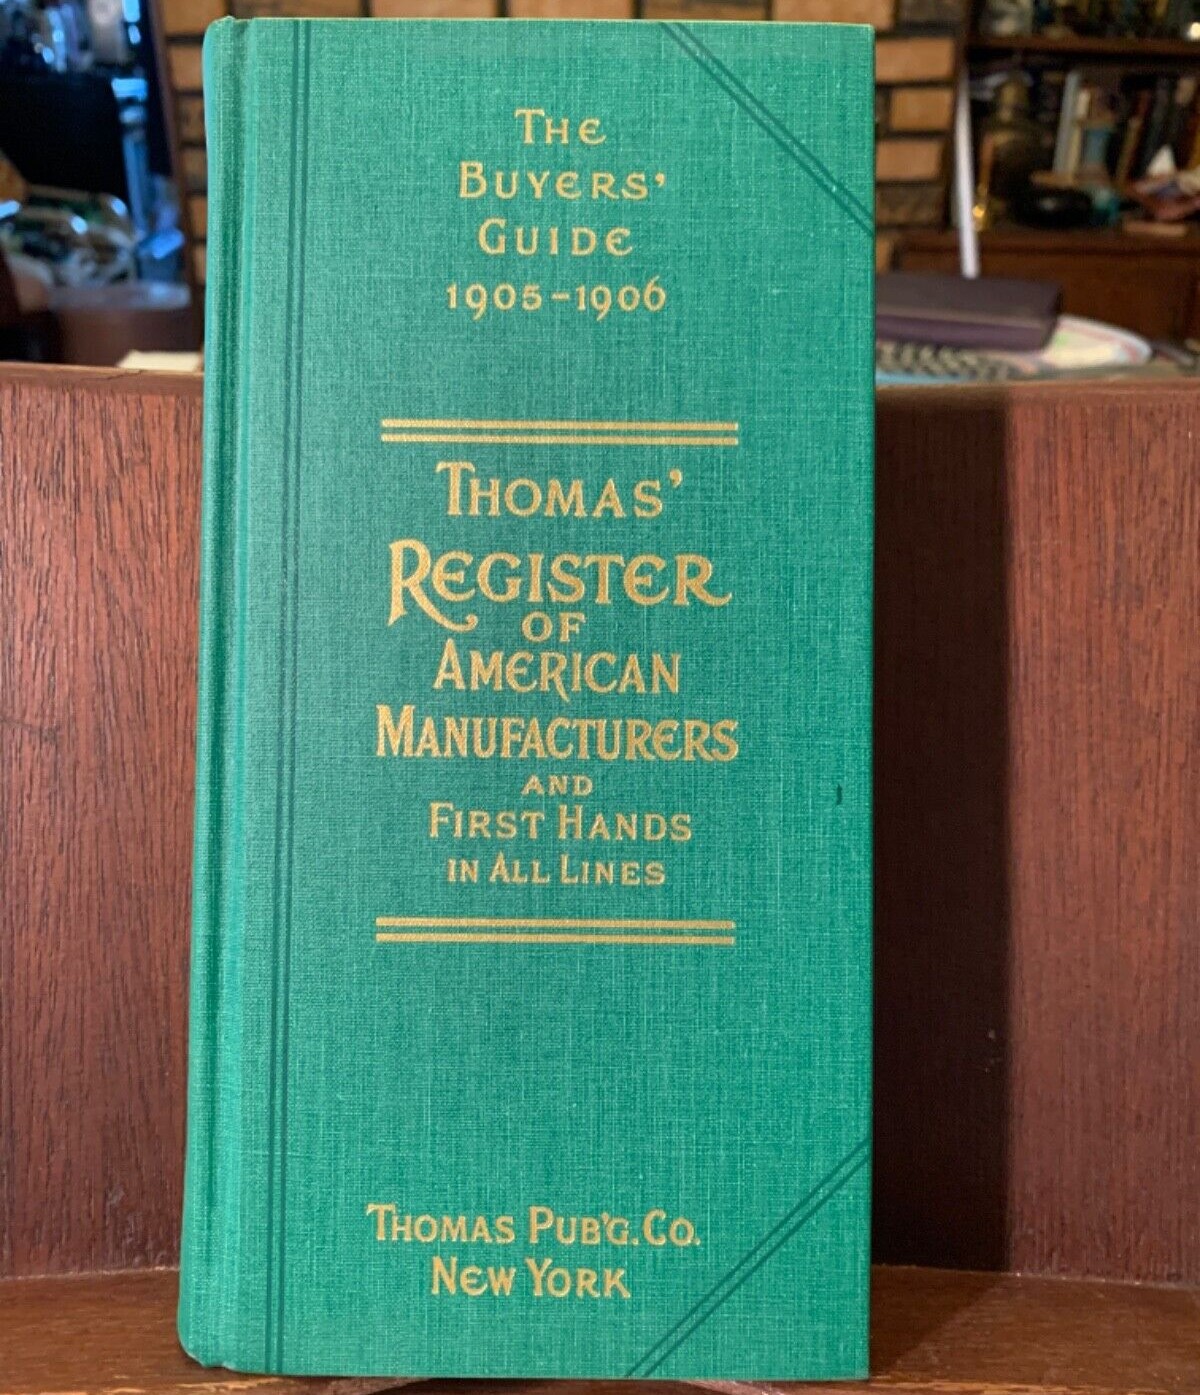
Thomas' Register preceded ThomasNet. Credit: eBay seller jwi2011
Alibaba is a website that was originally intended to work very much like ThomasNet. ThomasNet is a search engine specifically designed to aid businesses and entrepreneurs in finding manufacturing services, part sources and suppliers. While ThomasNet is very professional and reminiscent of an online searchable Yellow Pages, Alibaba is more of loose cross between Yellow Pages and eBay. You can buy products directly from Alibaba, but most vendors are not looking to sell one or two of an item. They are looking for businesses who want to source parts or products in volume. They want consistent sales in quantities of hundreds, thousands or more. AliExpress is essentially a clone of Alibaba but it's targeted toward western market consumers and small quantity sales. Many shady drop-shipping operations rely on Alibaba and AliExpress sellers to perform 99% of the actual business operations. Because of this obvious cross between Alibaba and AliExpress, some sellers can be found on both platforms.
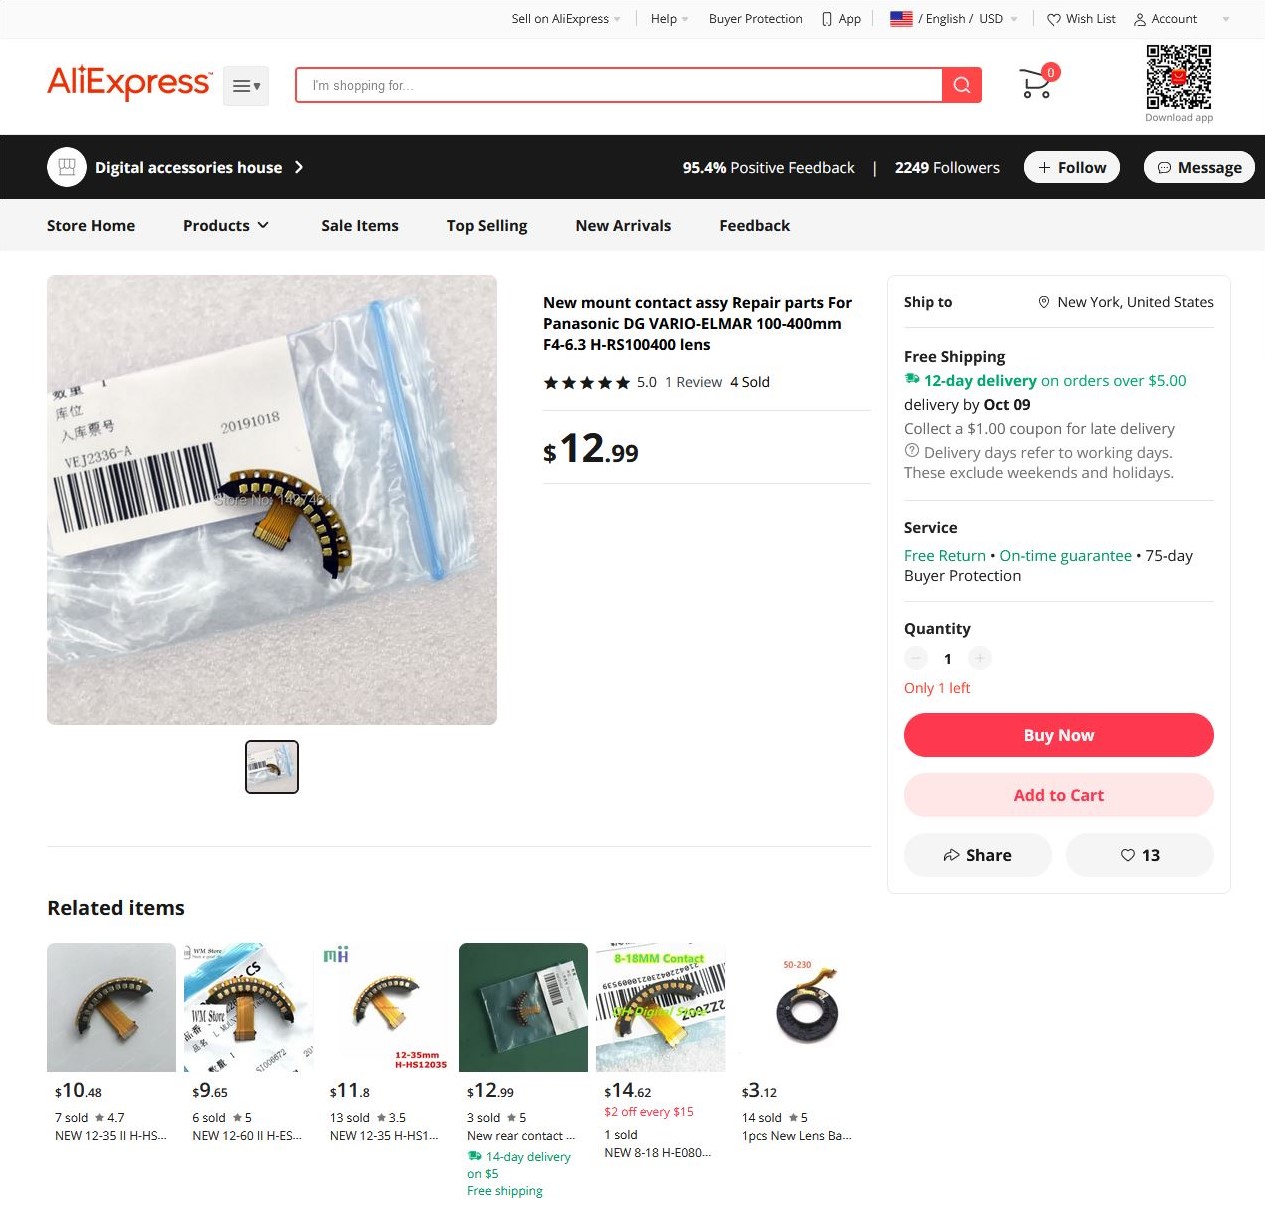
You can use Alibaba and AliExpress like eBay. Both search engines work flawlessly with English terms but the results tend to show up with relevance closely matched by Facebook marketplace. Key words like "Lens Contact FPC Bayonet Mount Connect Cable Flex PCB" and the official Panasonic part#, P1279H0, reveal that the lens contact block sells for 1/5th of the price as encompass parts. Quite a savings.
Origin of Parts
The parts and assemblies listed on eastern market sites are often times identical to the ones found inside the cameras. From first hand experience, they truly are identical. It leads one to believe that they are sourced from the same factories that make the parts. If you are unfamiliar with some of the intricacies of manufacturing, this might seem like a shocking violation of trust, but this is just simply a cost of doing business. Manufacturing is never a perfect process. Mistakes will be made, either out of human error of machine failure, and the resulting product quality will suffer. Everyone's time is valuable, and production time is not free from these rules. Let's consider a batch of 100 shutter button assemblies are produced as a multi-part assembly where components are aligned, screwed and glued into place. If the glue machine falters and dispenses too much glue on the specific part, it can ruin the entire assembly. If this batch of 100 assemblies all have the identical issue, a cost analysis needs to be considered on the time it will take to rework the failed assemblies or start from scratch.
Oftentimes, it is simply easier to fix the machine, write off the faulty components and move on with production. Chrissy Meyer discusses this issue in detail on the Amp Hour Podcast where she clues into some of the issues behind glue machine down time on the Apple iPhone production floor. Apple, being Apple, likely has the defective components jettisoned off the production line and sent into a shredder. Less strict companies may simply not bother with defective items, which is why parts show up on these eastern market websites. While these parts could be clones, it more likely that they are left overs from an ended batch run or were harvested from another failed assembly that was written off.
This same reasoning also applies to circuit board assemblies. However, a circuit board related part may not be a "leftover" but reworked. In the same principle as above, if there is an error with a pick-and-place machine and a component was soldered onto a PCB outside of the designated footprint, bridging nearby traces and failing AOI (Automated Optical Inspection), the PCB will be set aside. Depending on the amount of errors, the board may be reworked or simply trashed. I experienced this first hand when I needed a spare Panasonic Lumix GH5 motherboard. One of my GH5's would not boot and even after finding the schematics, I could not deduce a solution to why the power-on circuitry had failed when there were no problems with the wake-on-boot circuitry. Here is a part of the schematic and the chip under consideration.

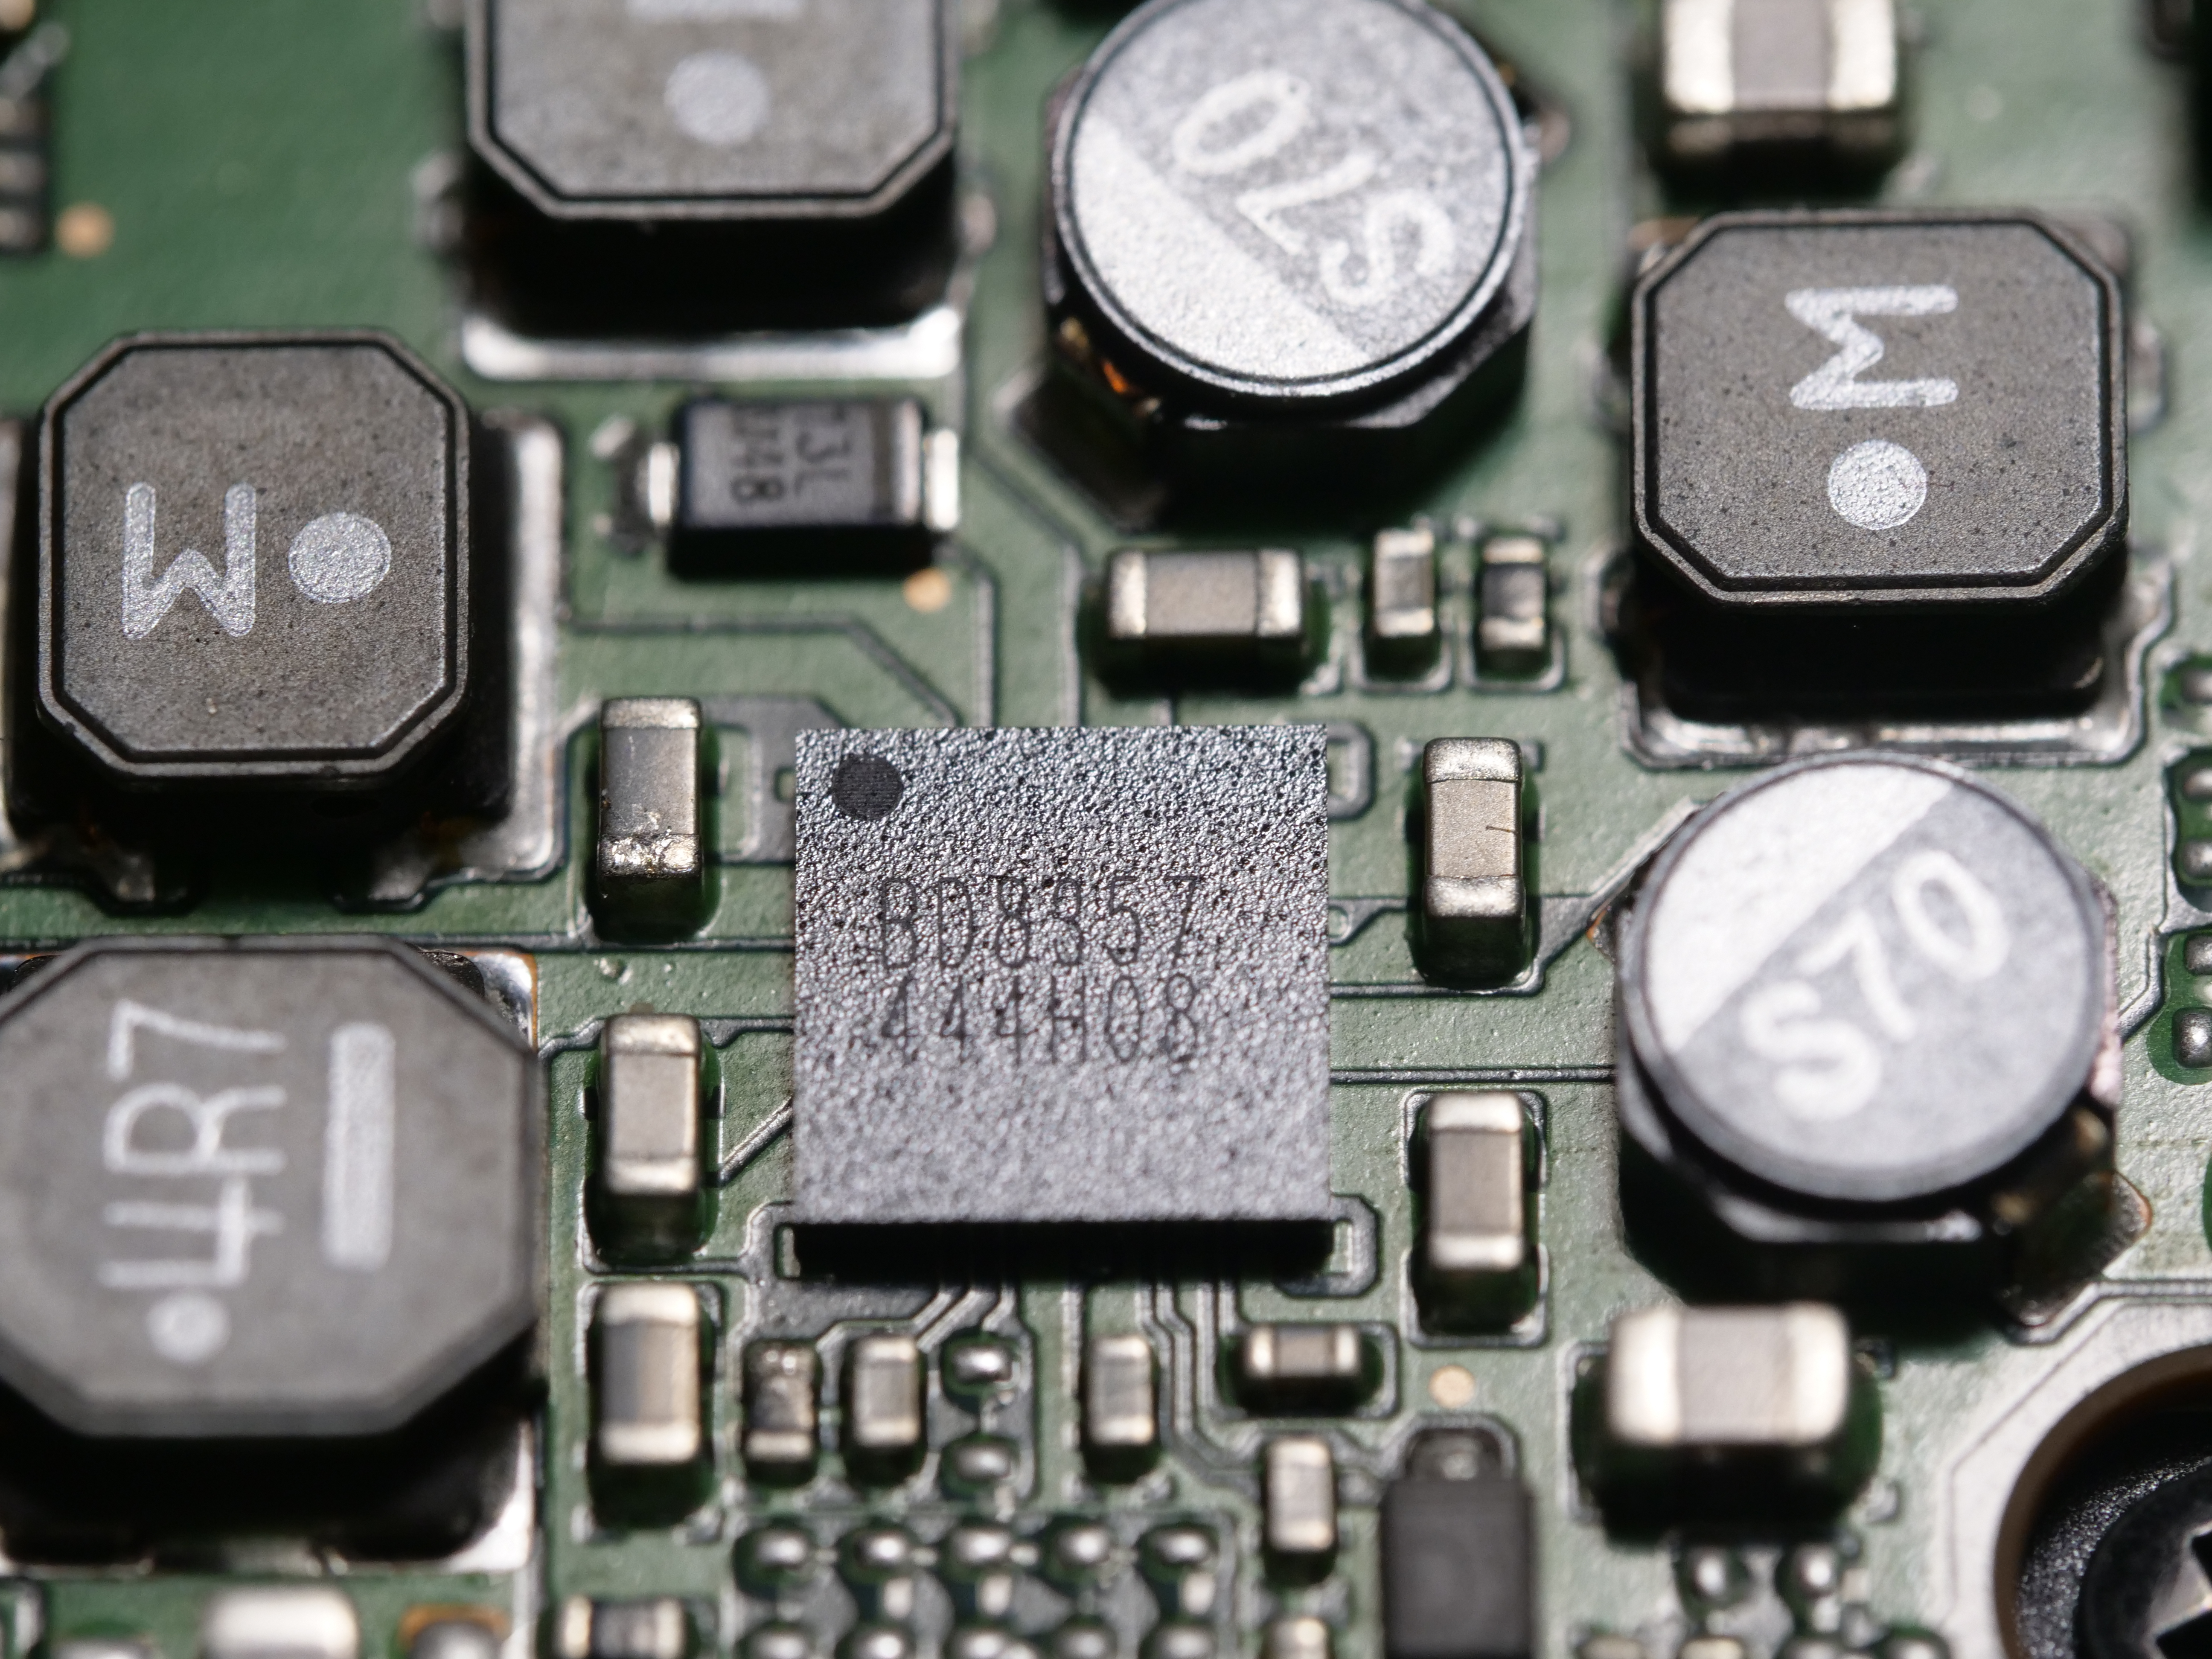
I probed around and tried replacing the exclusively produced IC1001 chip, but that did not resolve the issue. There were several GH5 motherboards for sale on AliExpress, so out of desperation, I purchased one.
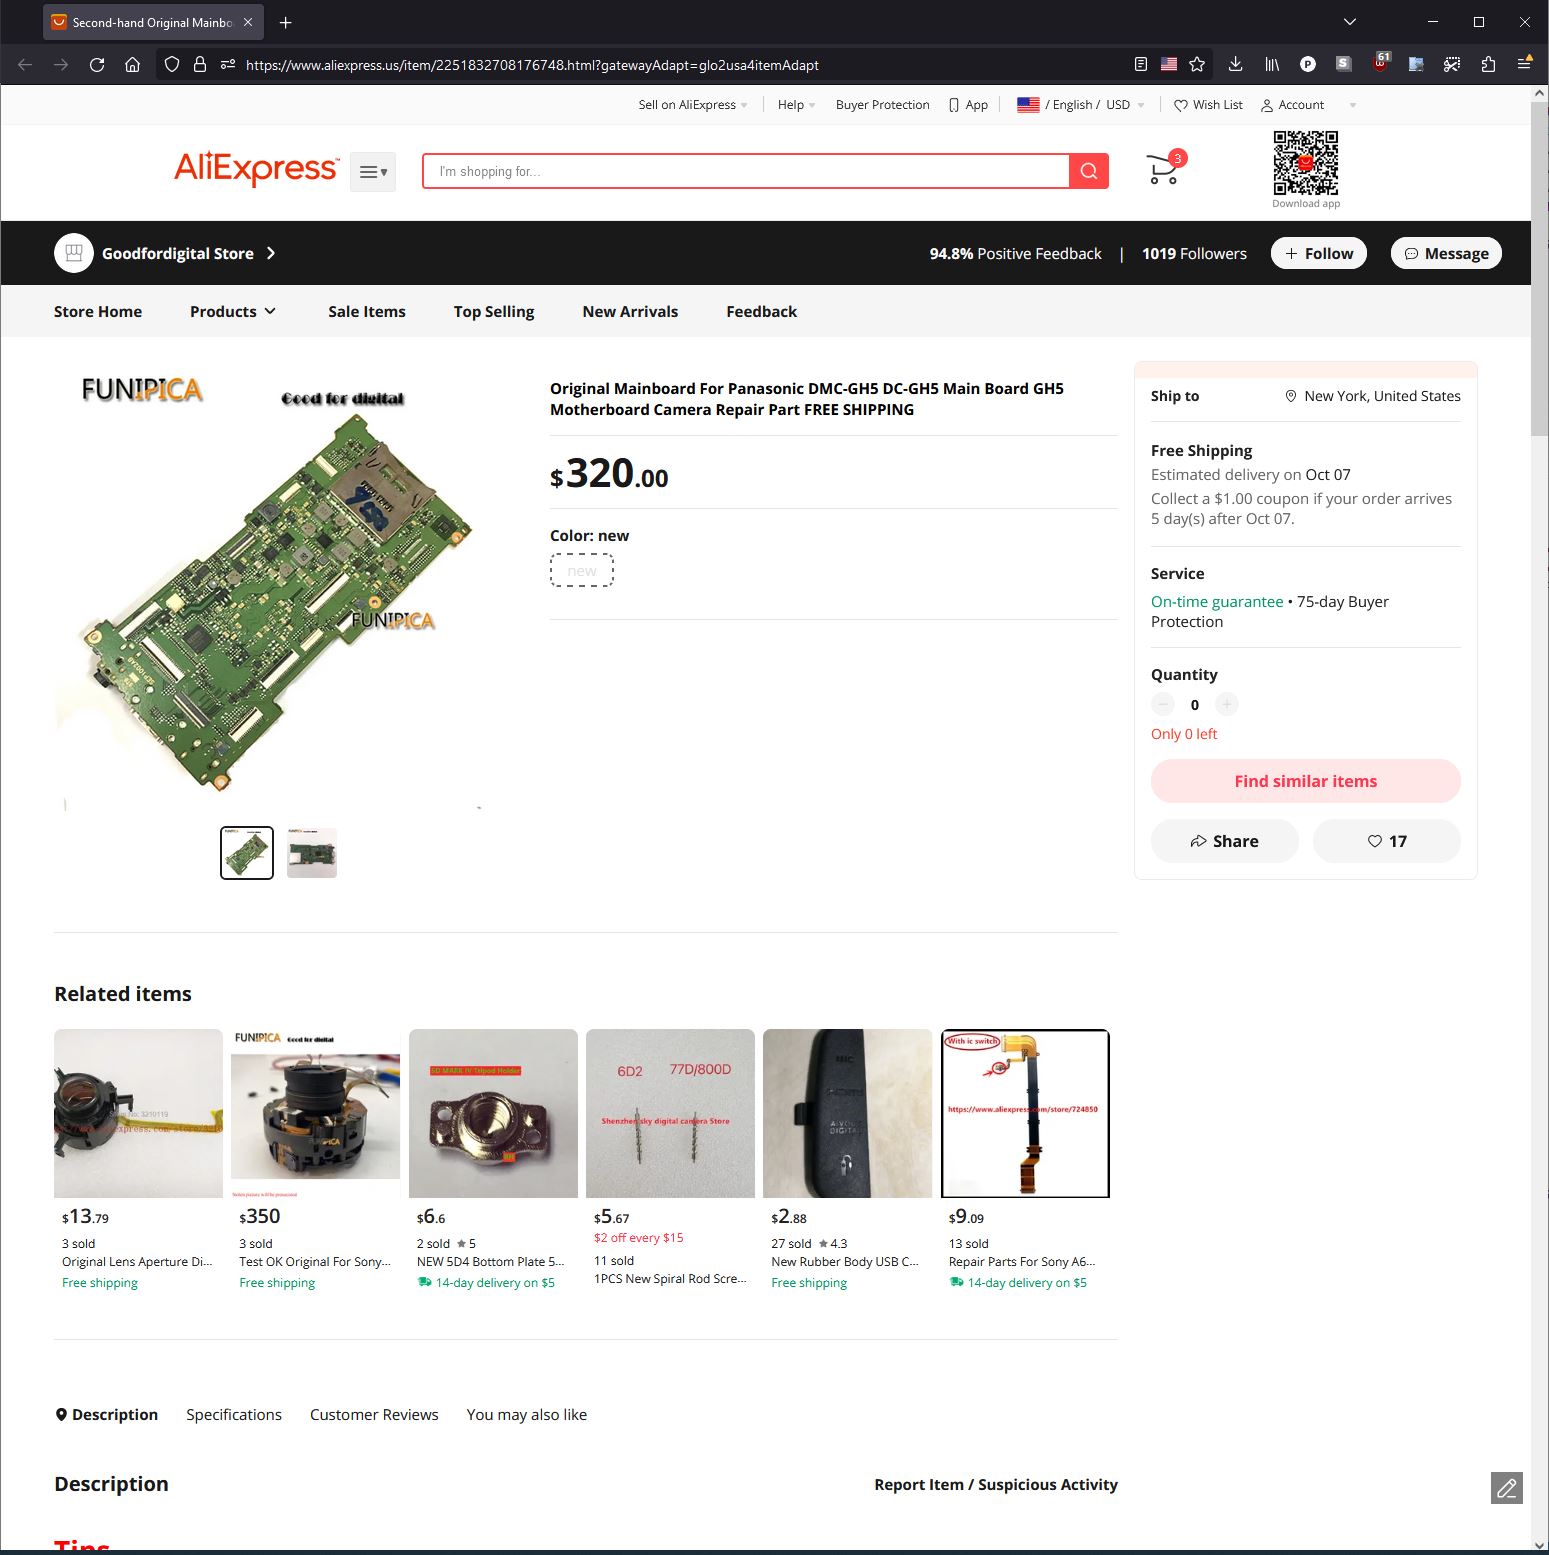
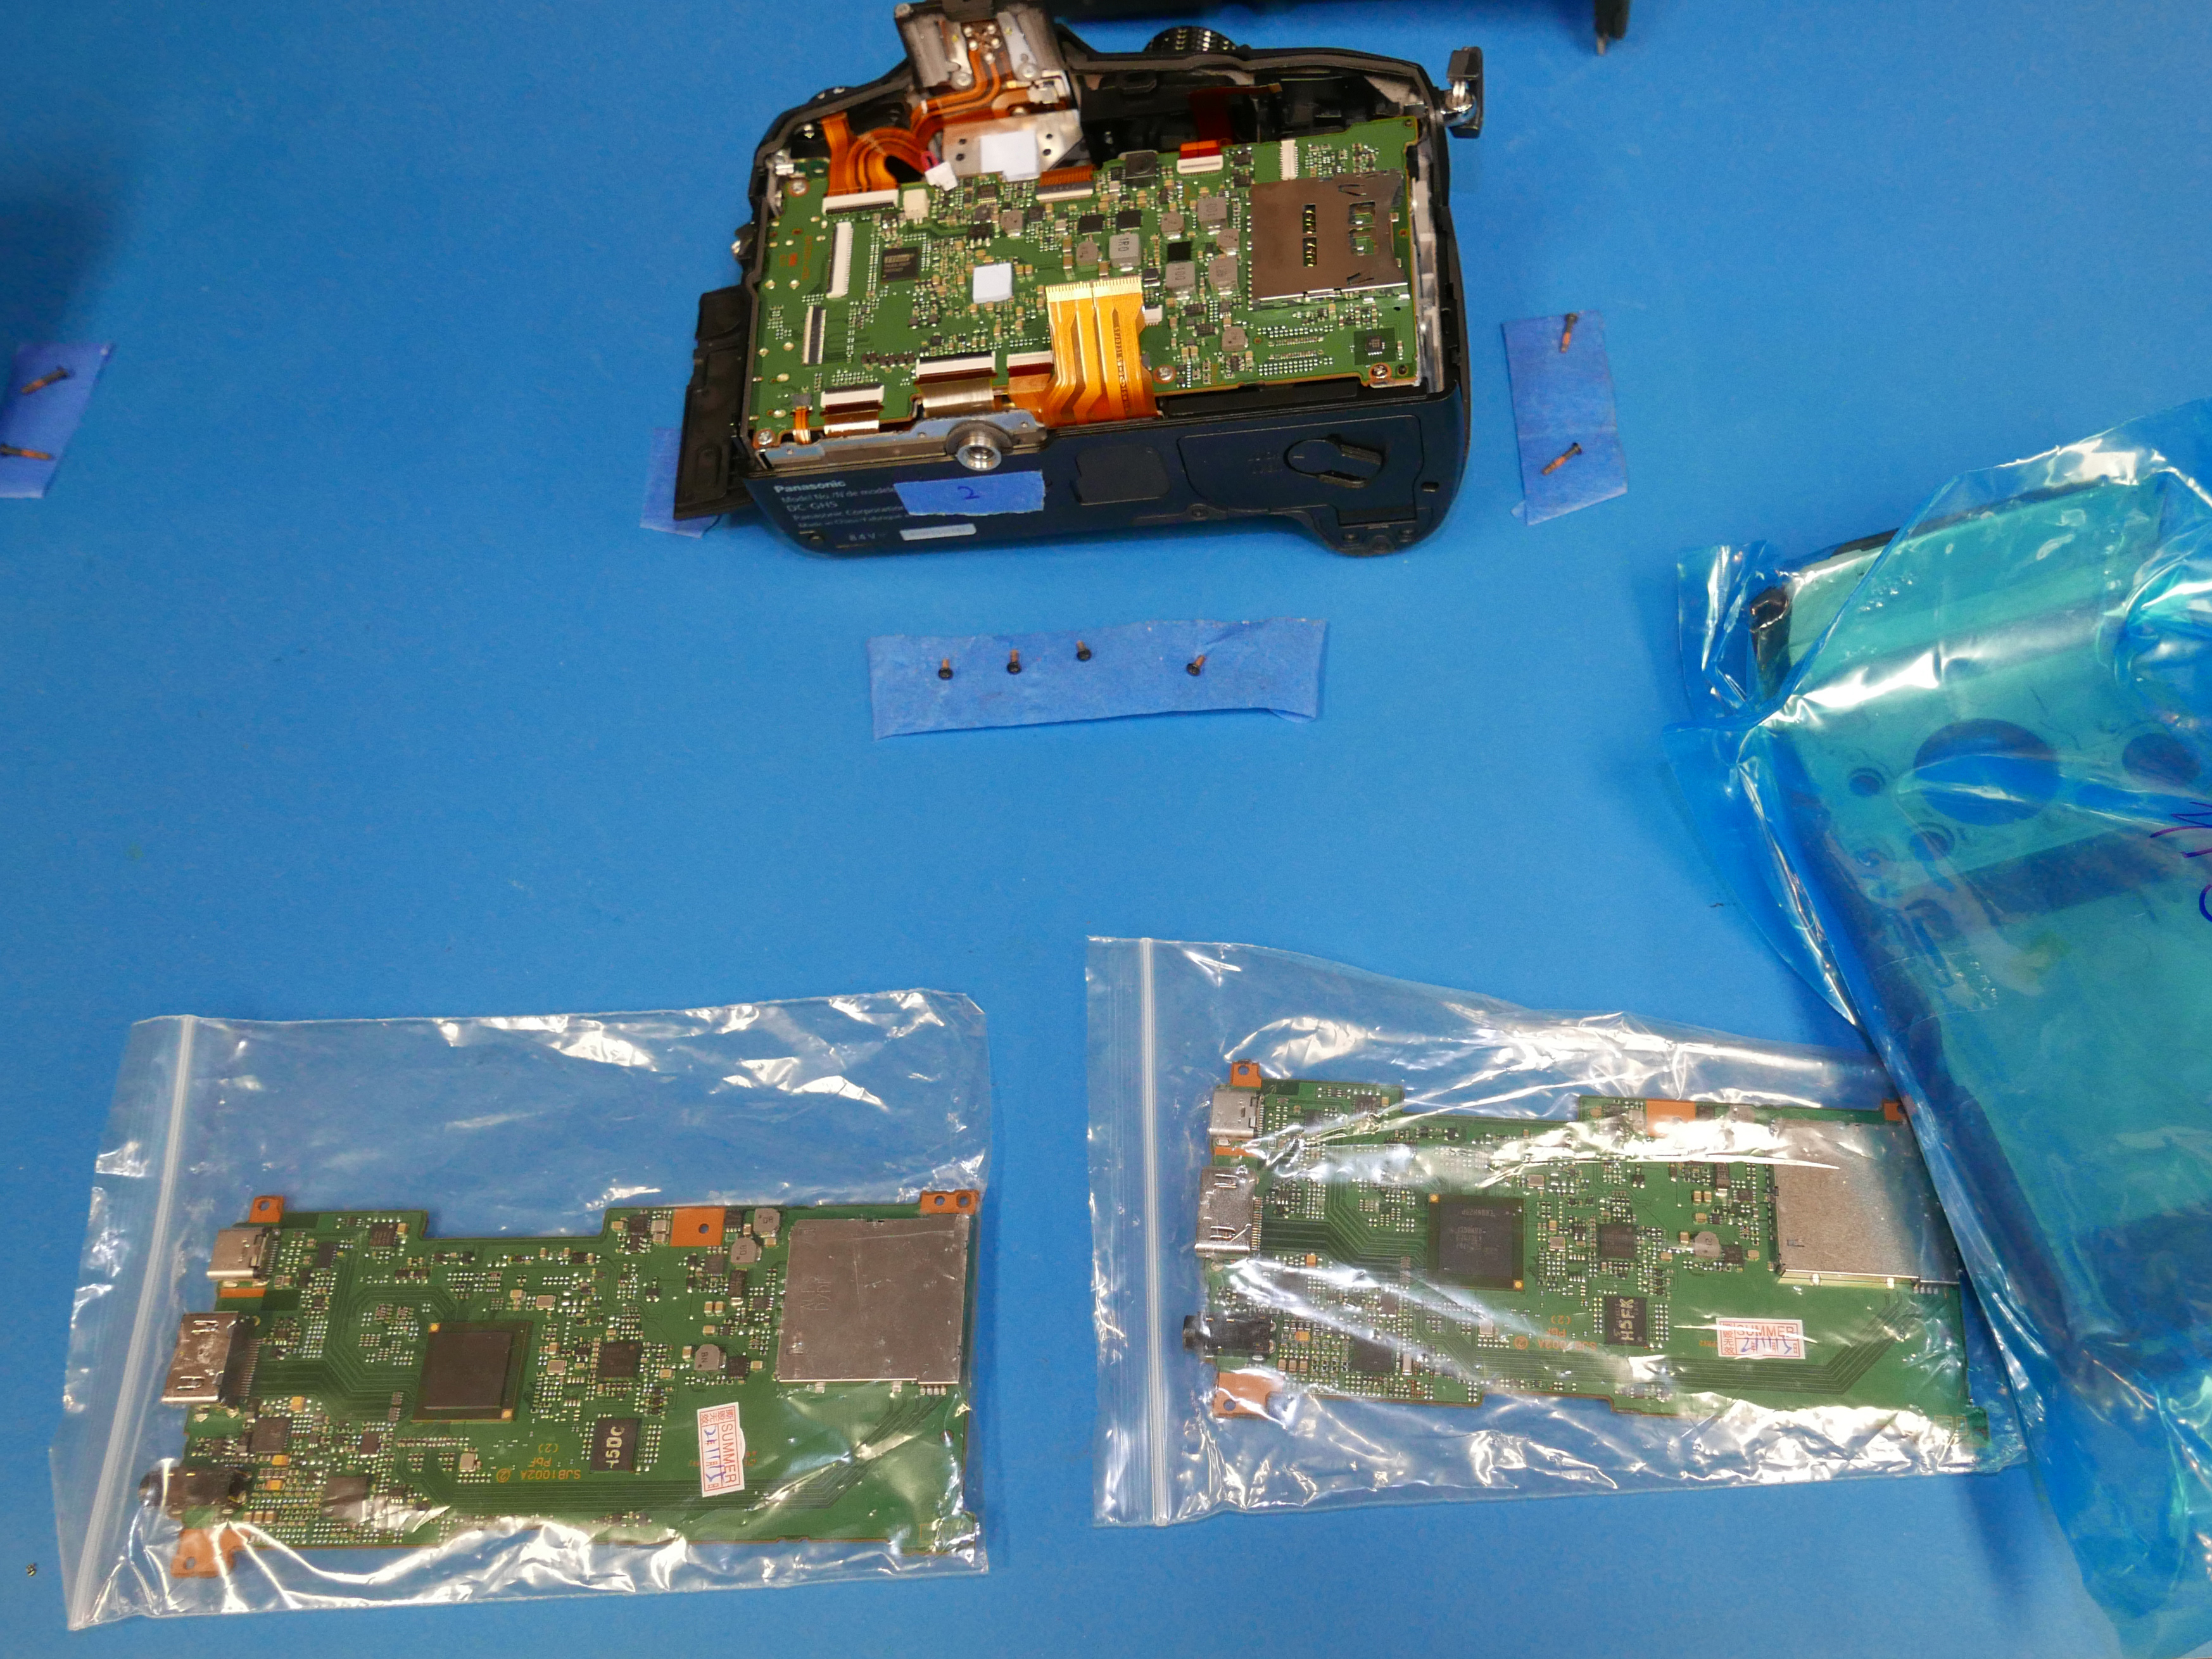
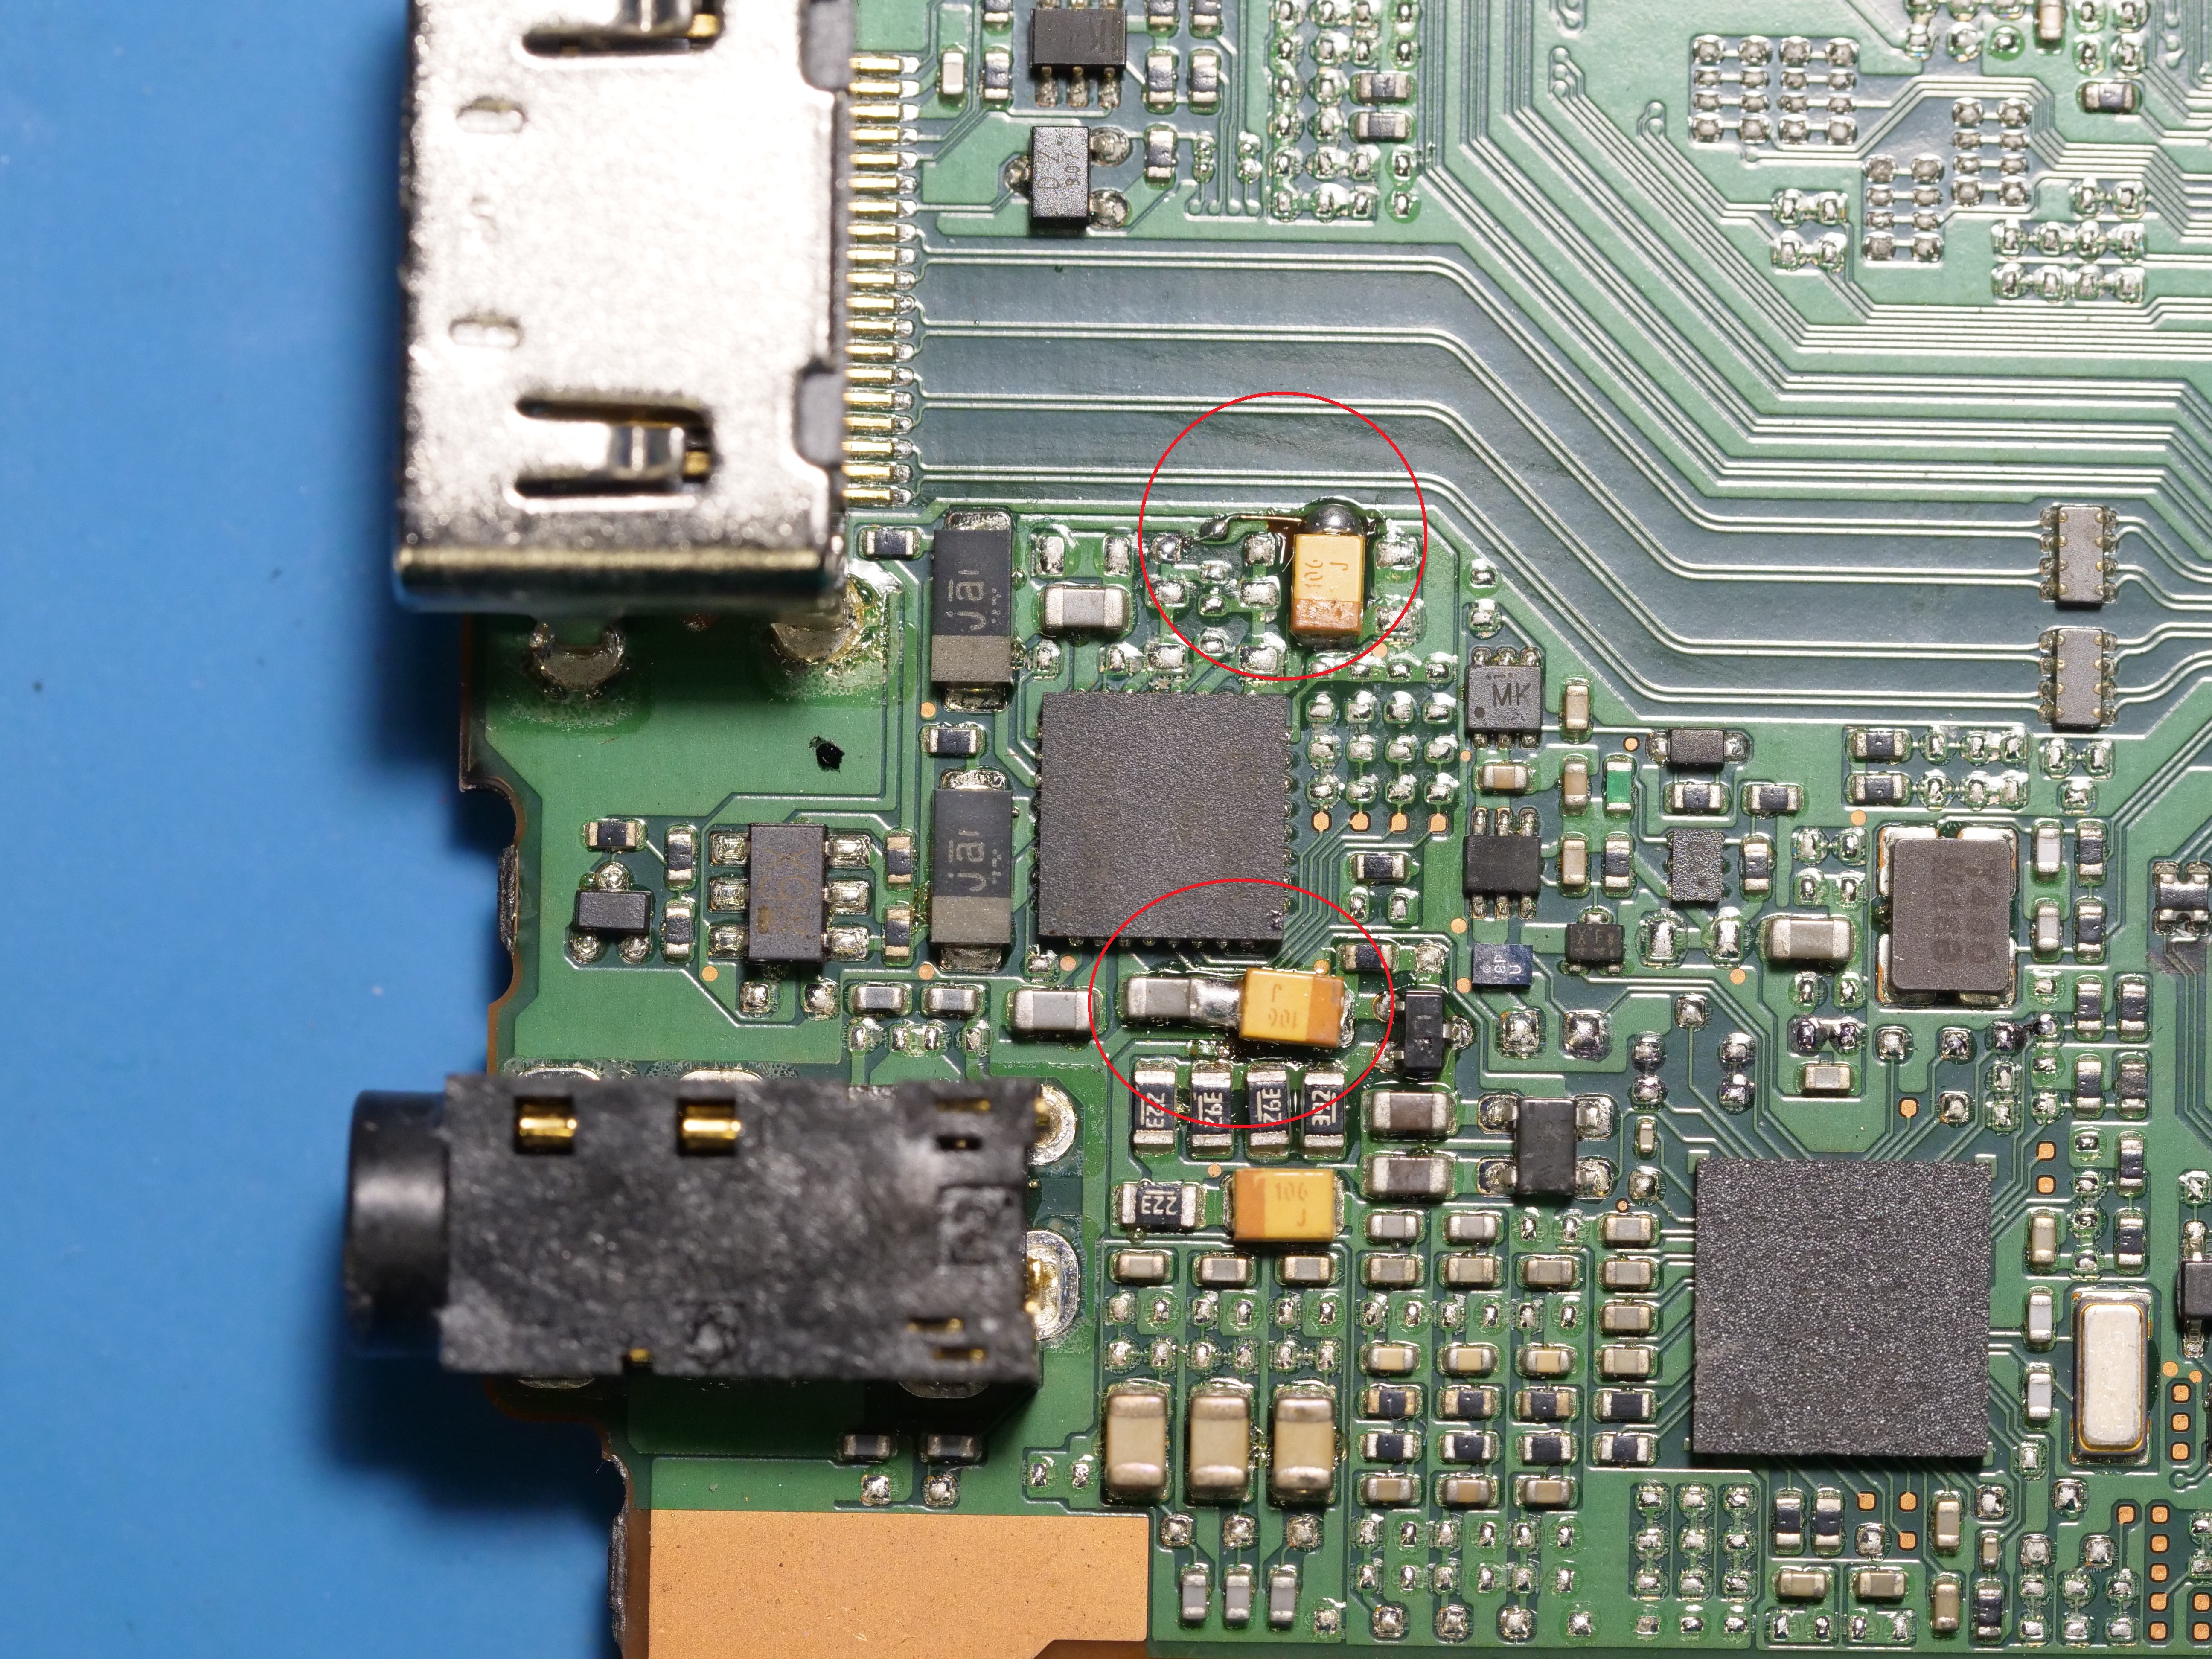
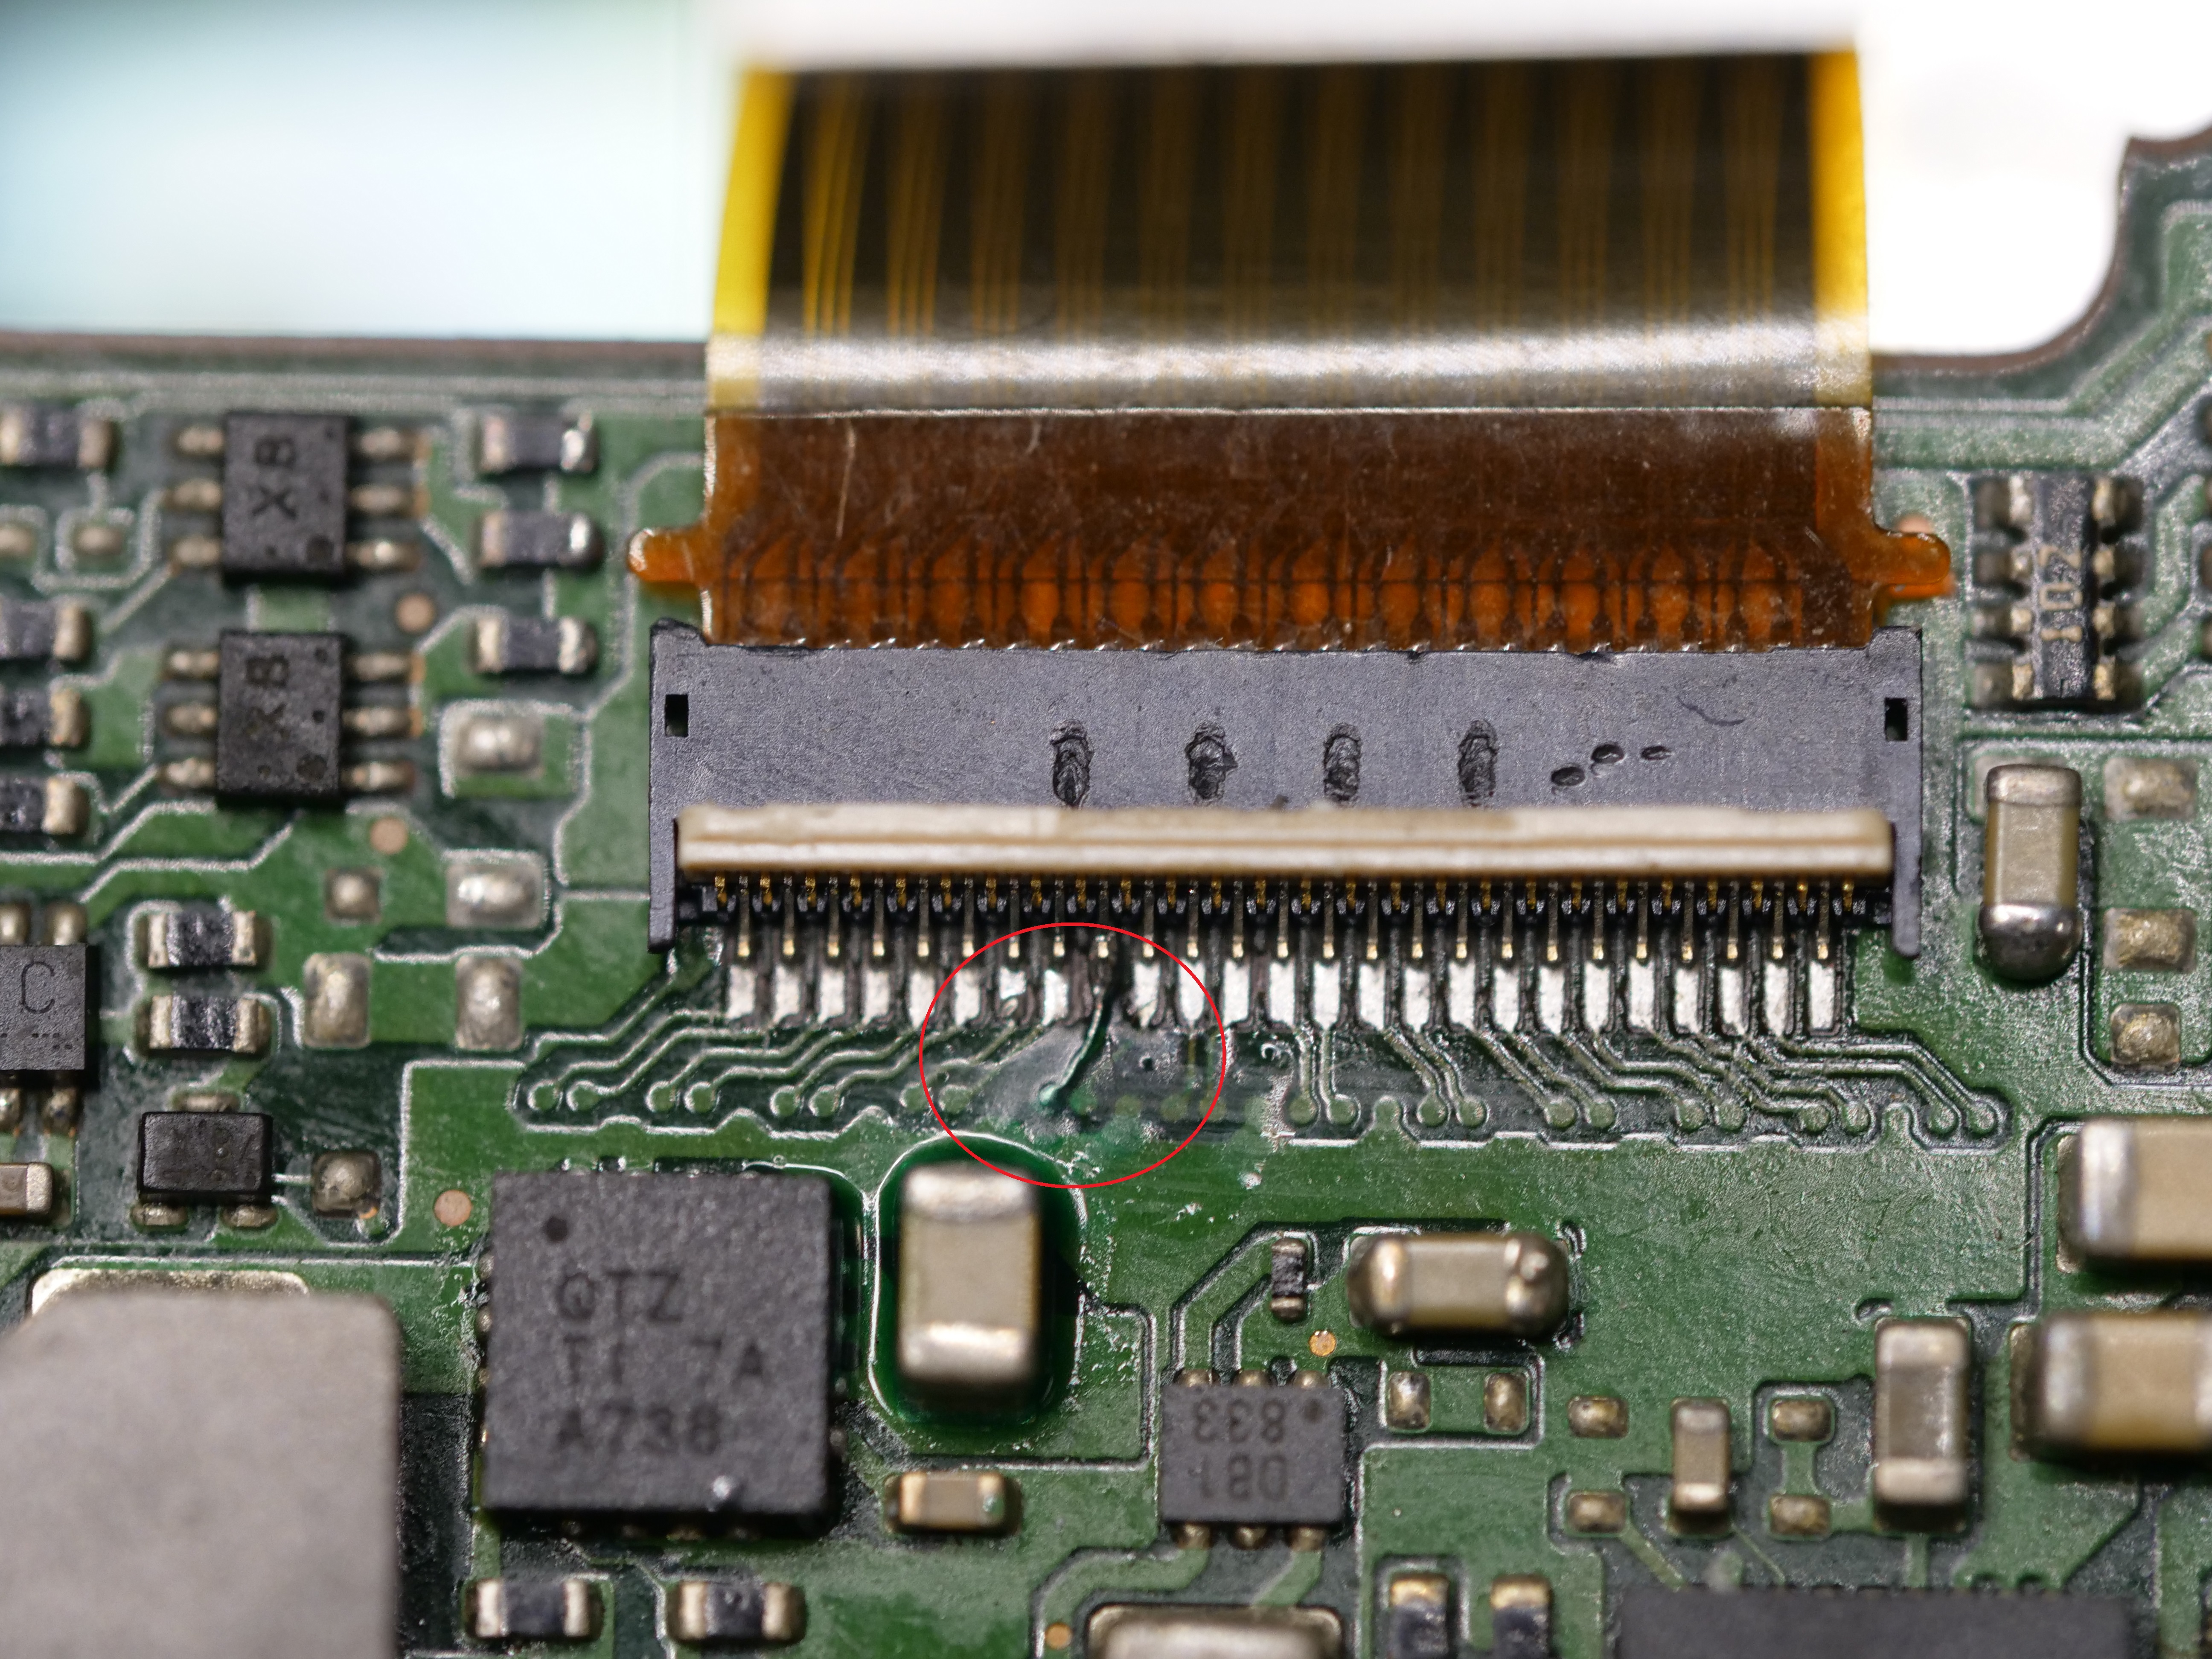
Little did I know that the "new" condition board was actually a reworked PCB. The original listing made no note of being used or reworked. The GH5 PCB I received featured manufacturing defects during PCB production where traces were not properly etched on the top layer. This board was truly a manufacturing reject and someone resolved all the issues by hand under optical assistance then resold it to me. Quite audacious indeed.
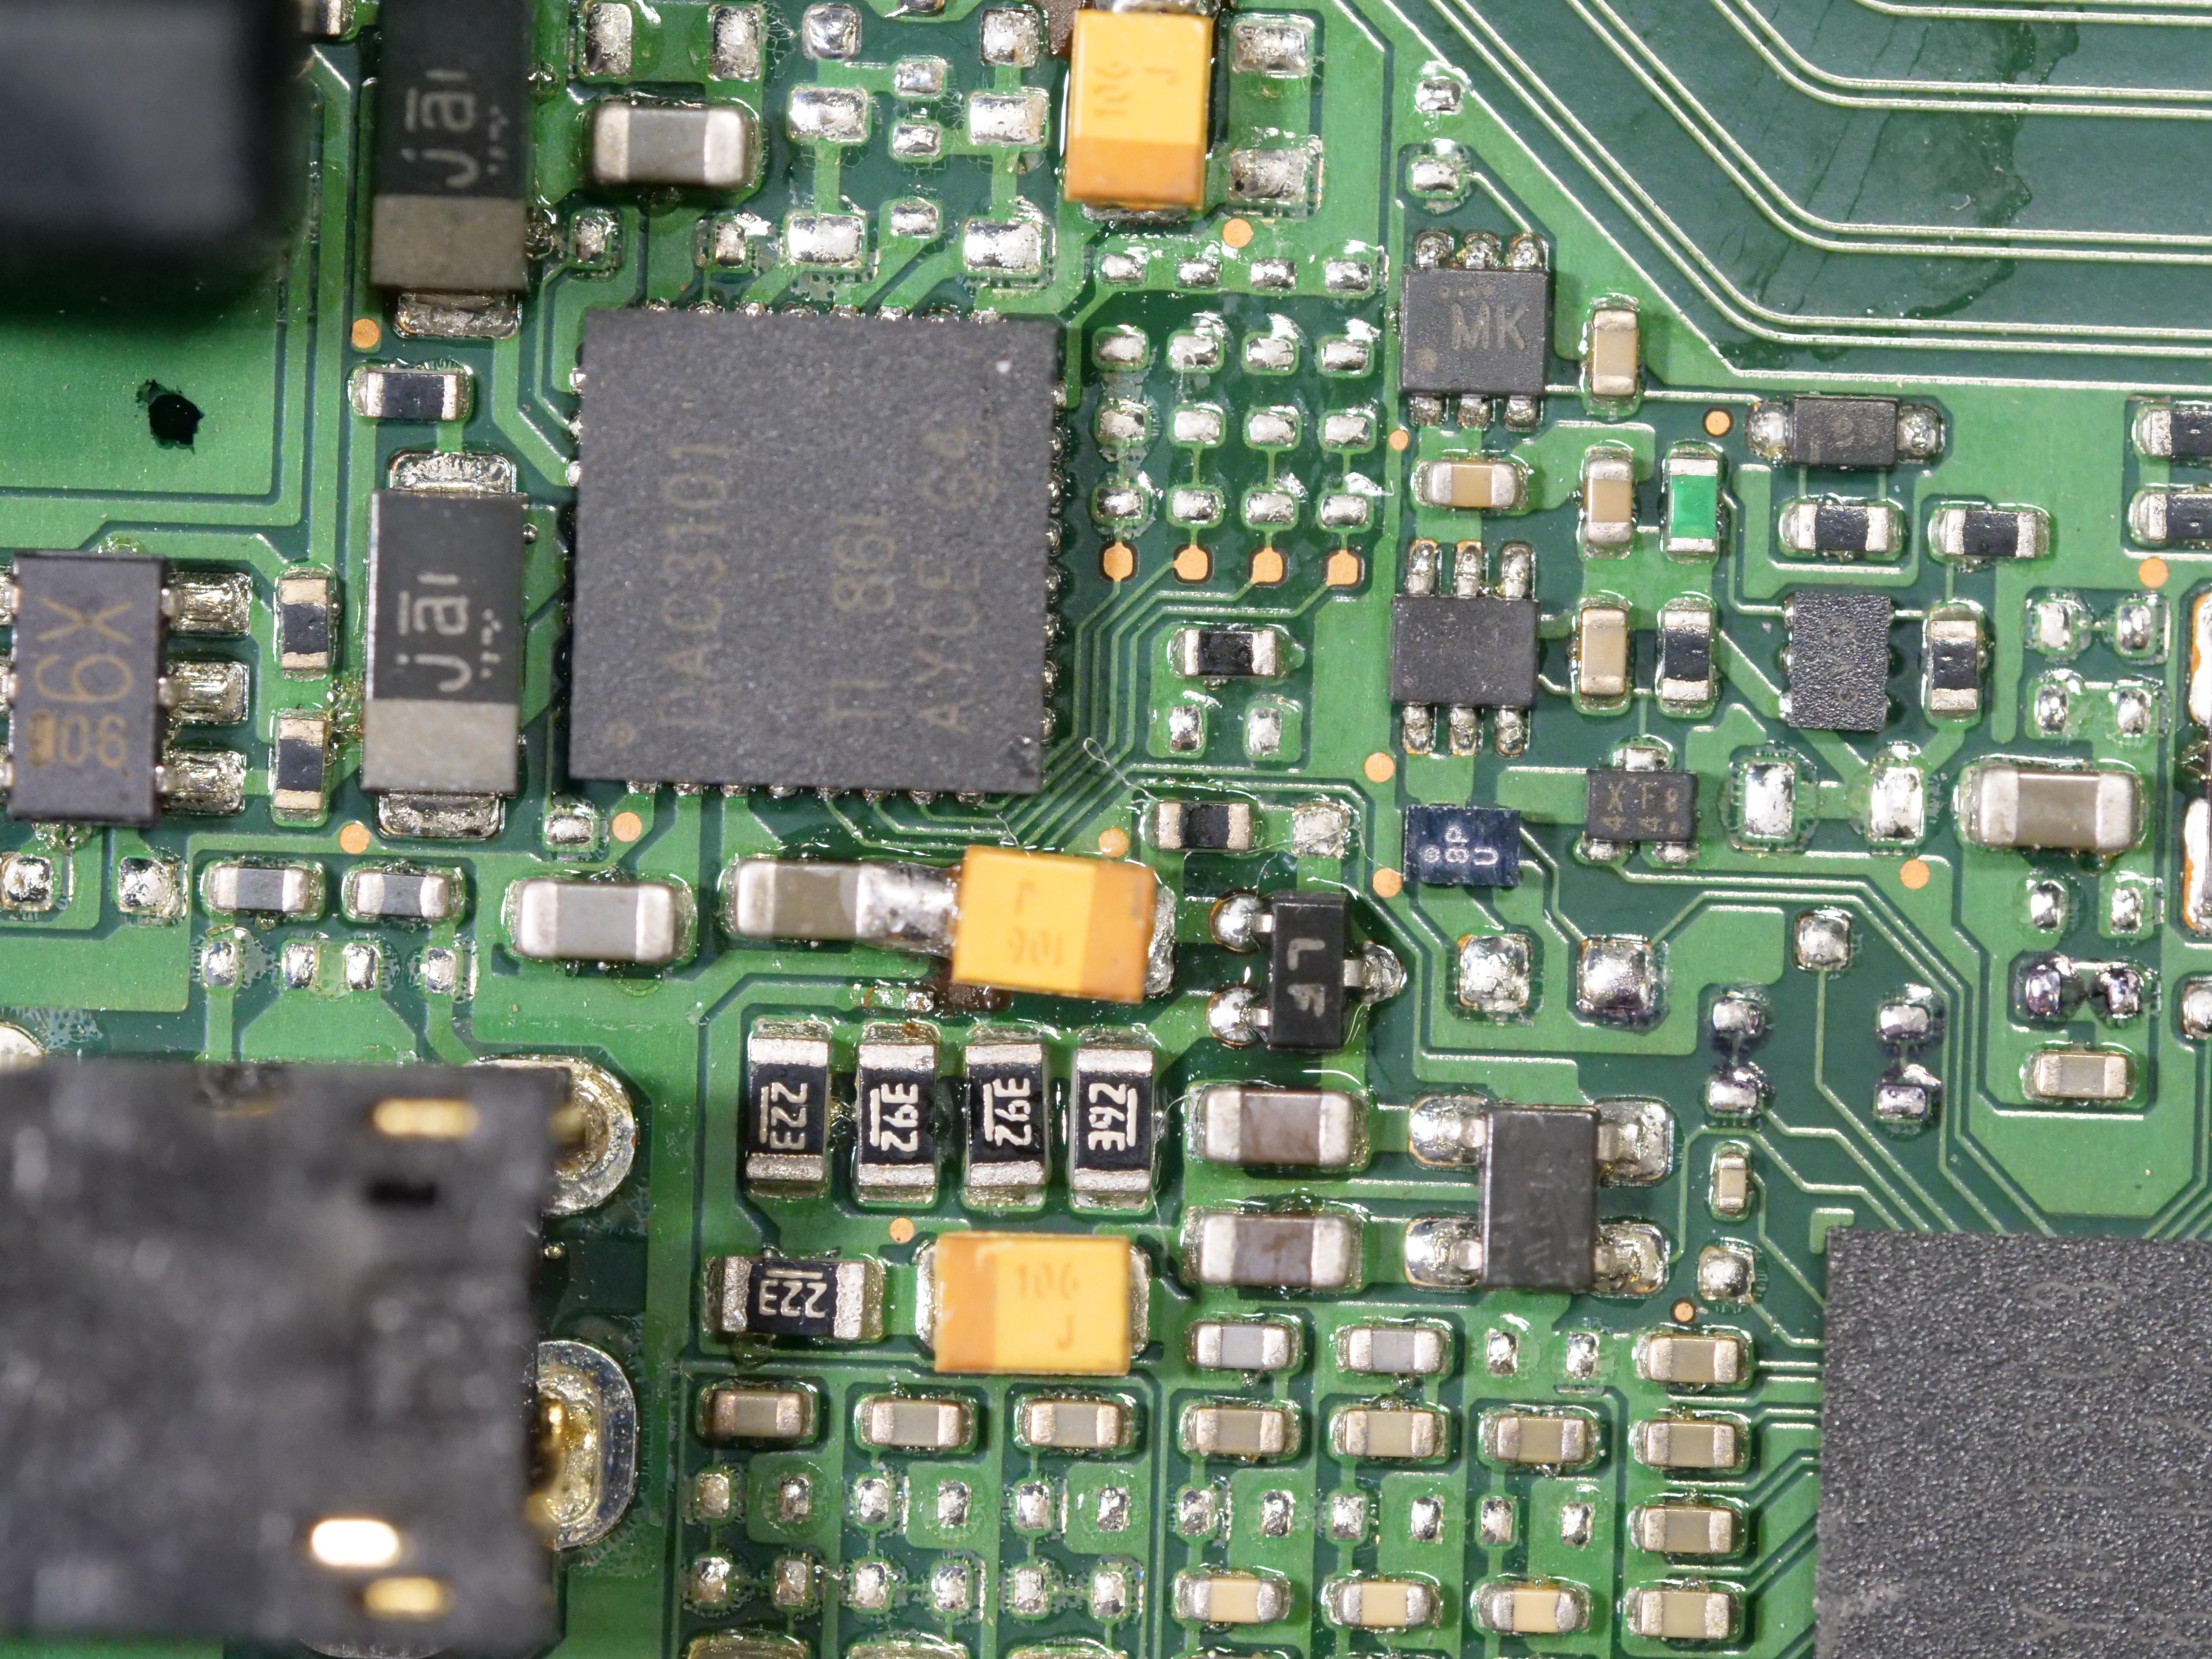
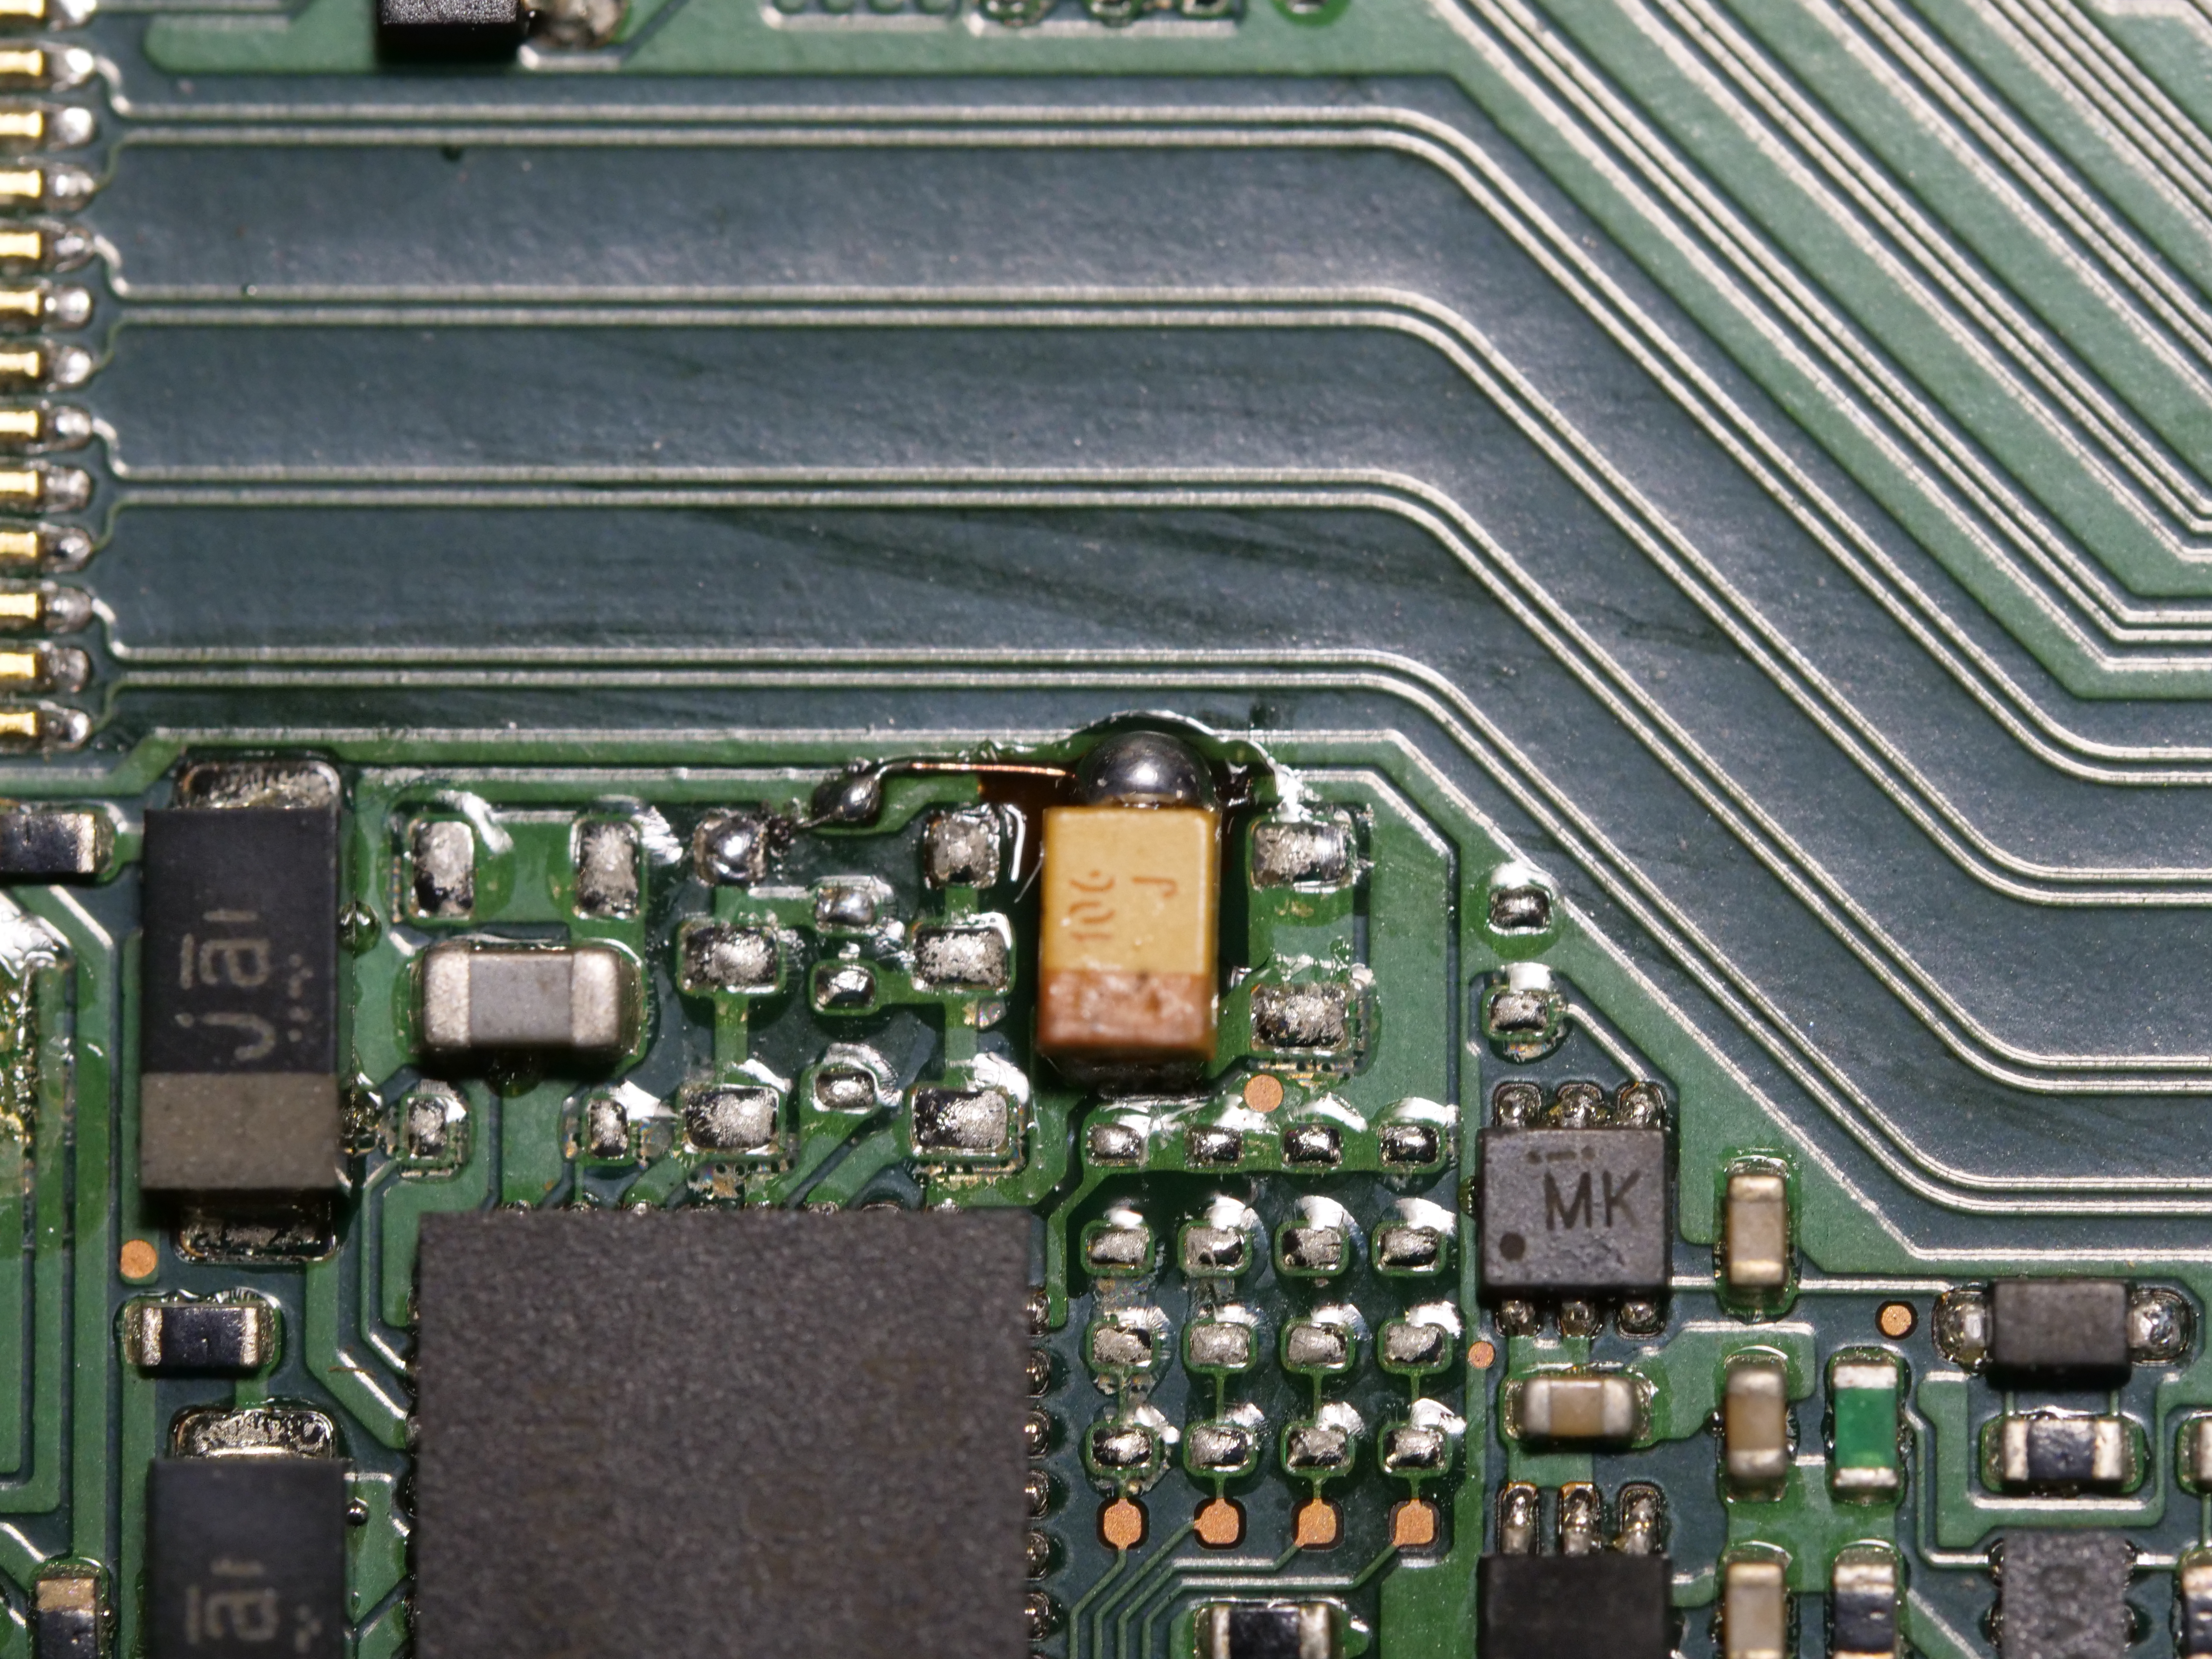
The litany of problems included: solder blobs serving as replacement traces, a power rail enameled wire bodge job near the HDMI connector, and physically missing traces from the EVF LVDS pairs bodged in with wire of mismatched length. Surprisingly, the GH5 board worked decently well and the micro soldering repair work was actually quite tidy, but any high speed communication, like LVDS, needs to be trace matched. The EVF bodge job worked, but I'm sure the trace was way out of specification and the EVF did not perform identically to a stock GH5 camera. Regardless, I would have never purchased the board knowing it was reworked. I ended up selling the camera as parts and cutting my losses.
These are the kinds of risks taken when purchasing repair parts online from various eastern market websites. The difference with using English marketed websites like AliExpress and Alibaba is that I could have refuted the purchase with the shopping service or requested a charge back through PayPal, but I did neither in this case. If I purchased from Taobao or someone through WeChat, the entire process would have been a lot more painful.
Taobao is a different animal entirely. The search engine is geared toward mainland china, and English terms do not yield useful results. A translation website is a must. Here's a comparison of the same search query "Lumix GH4 Shutter" in English and Mandarin.
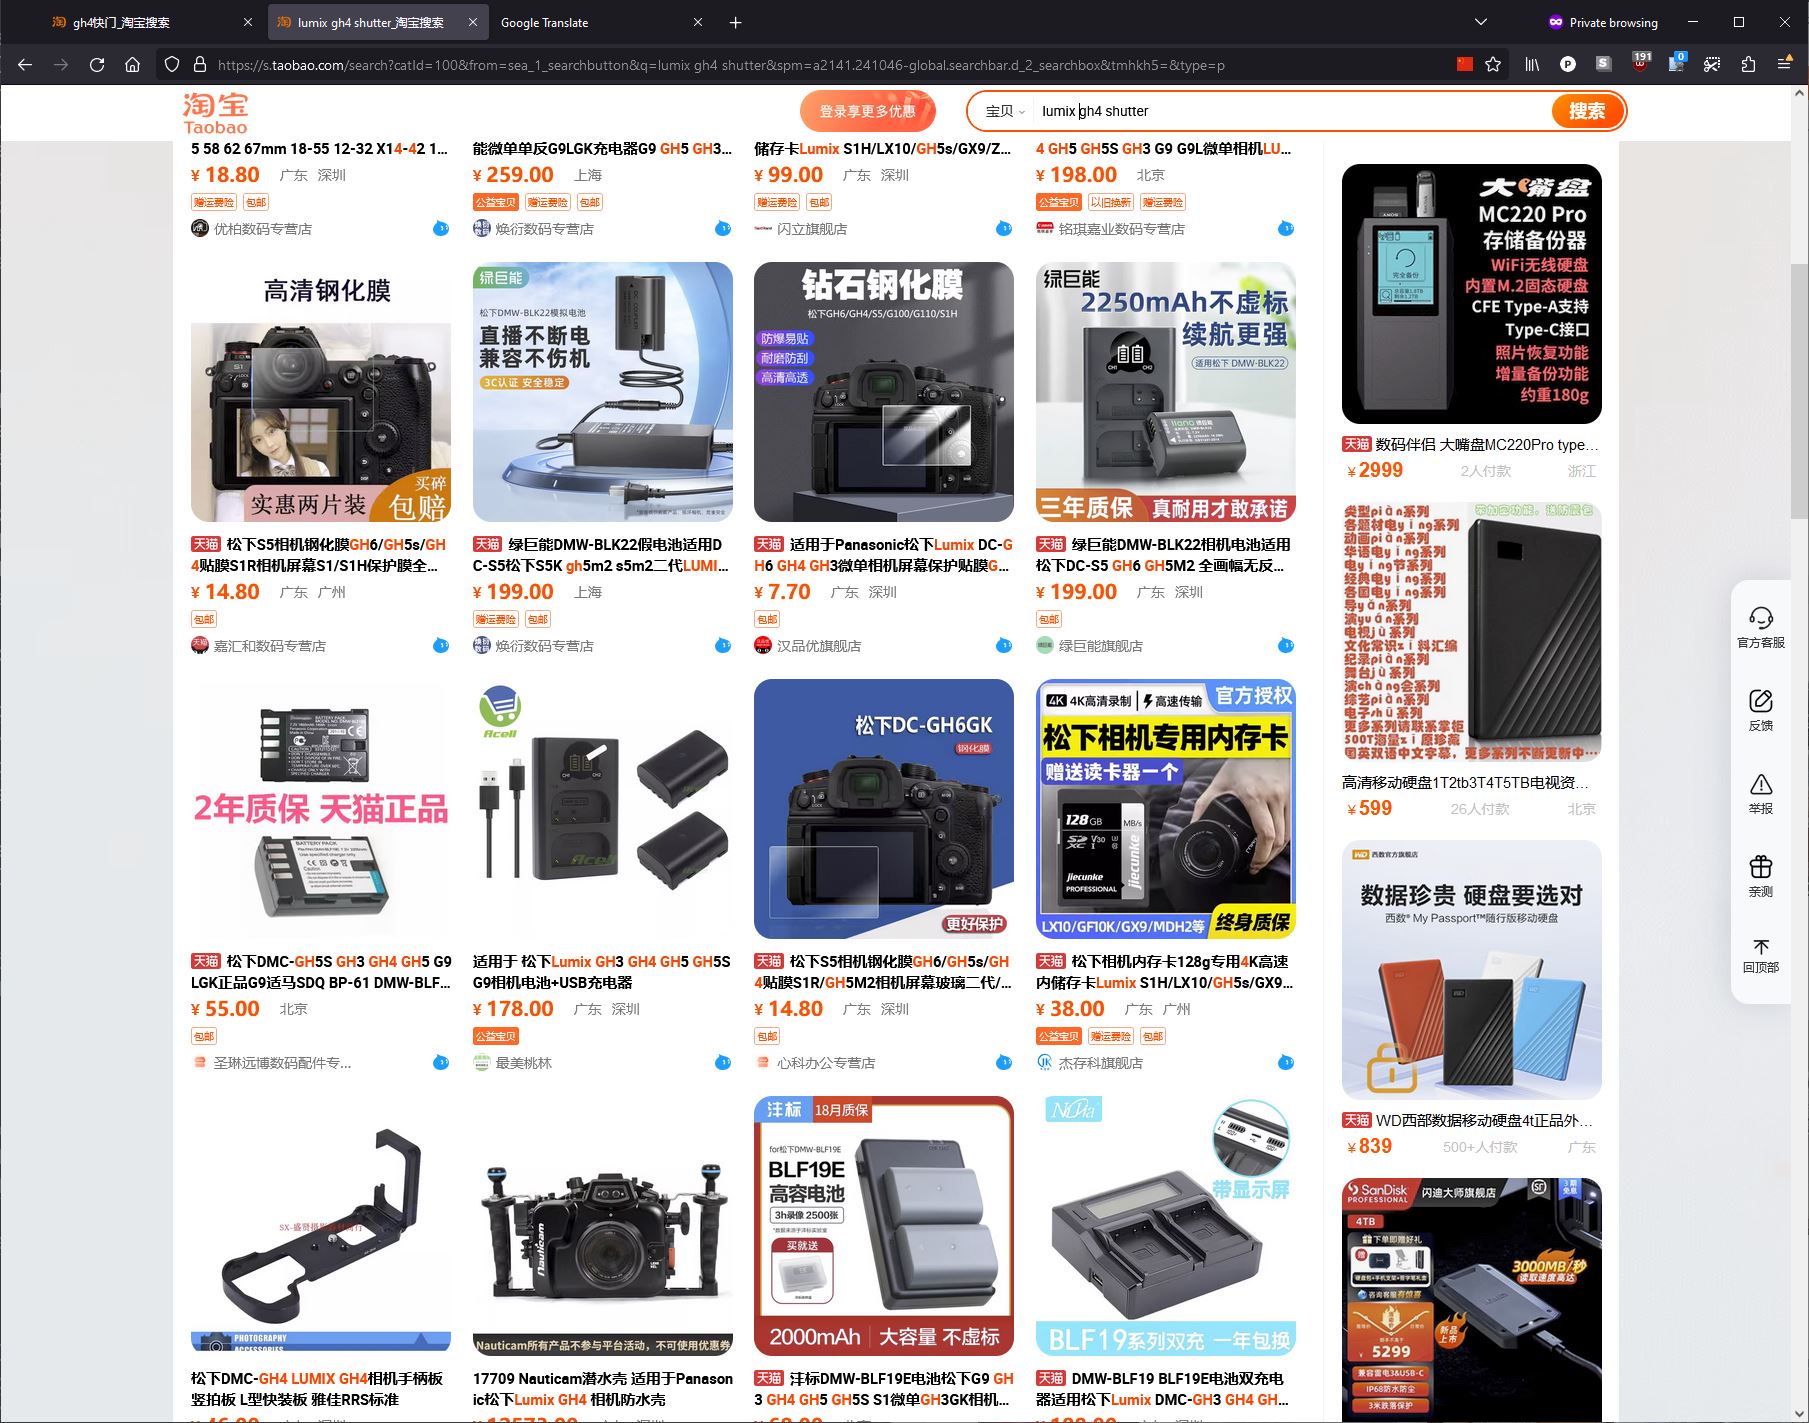
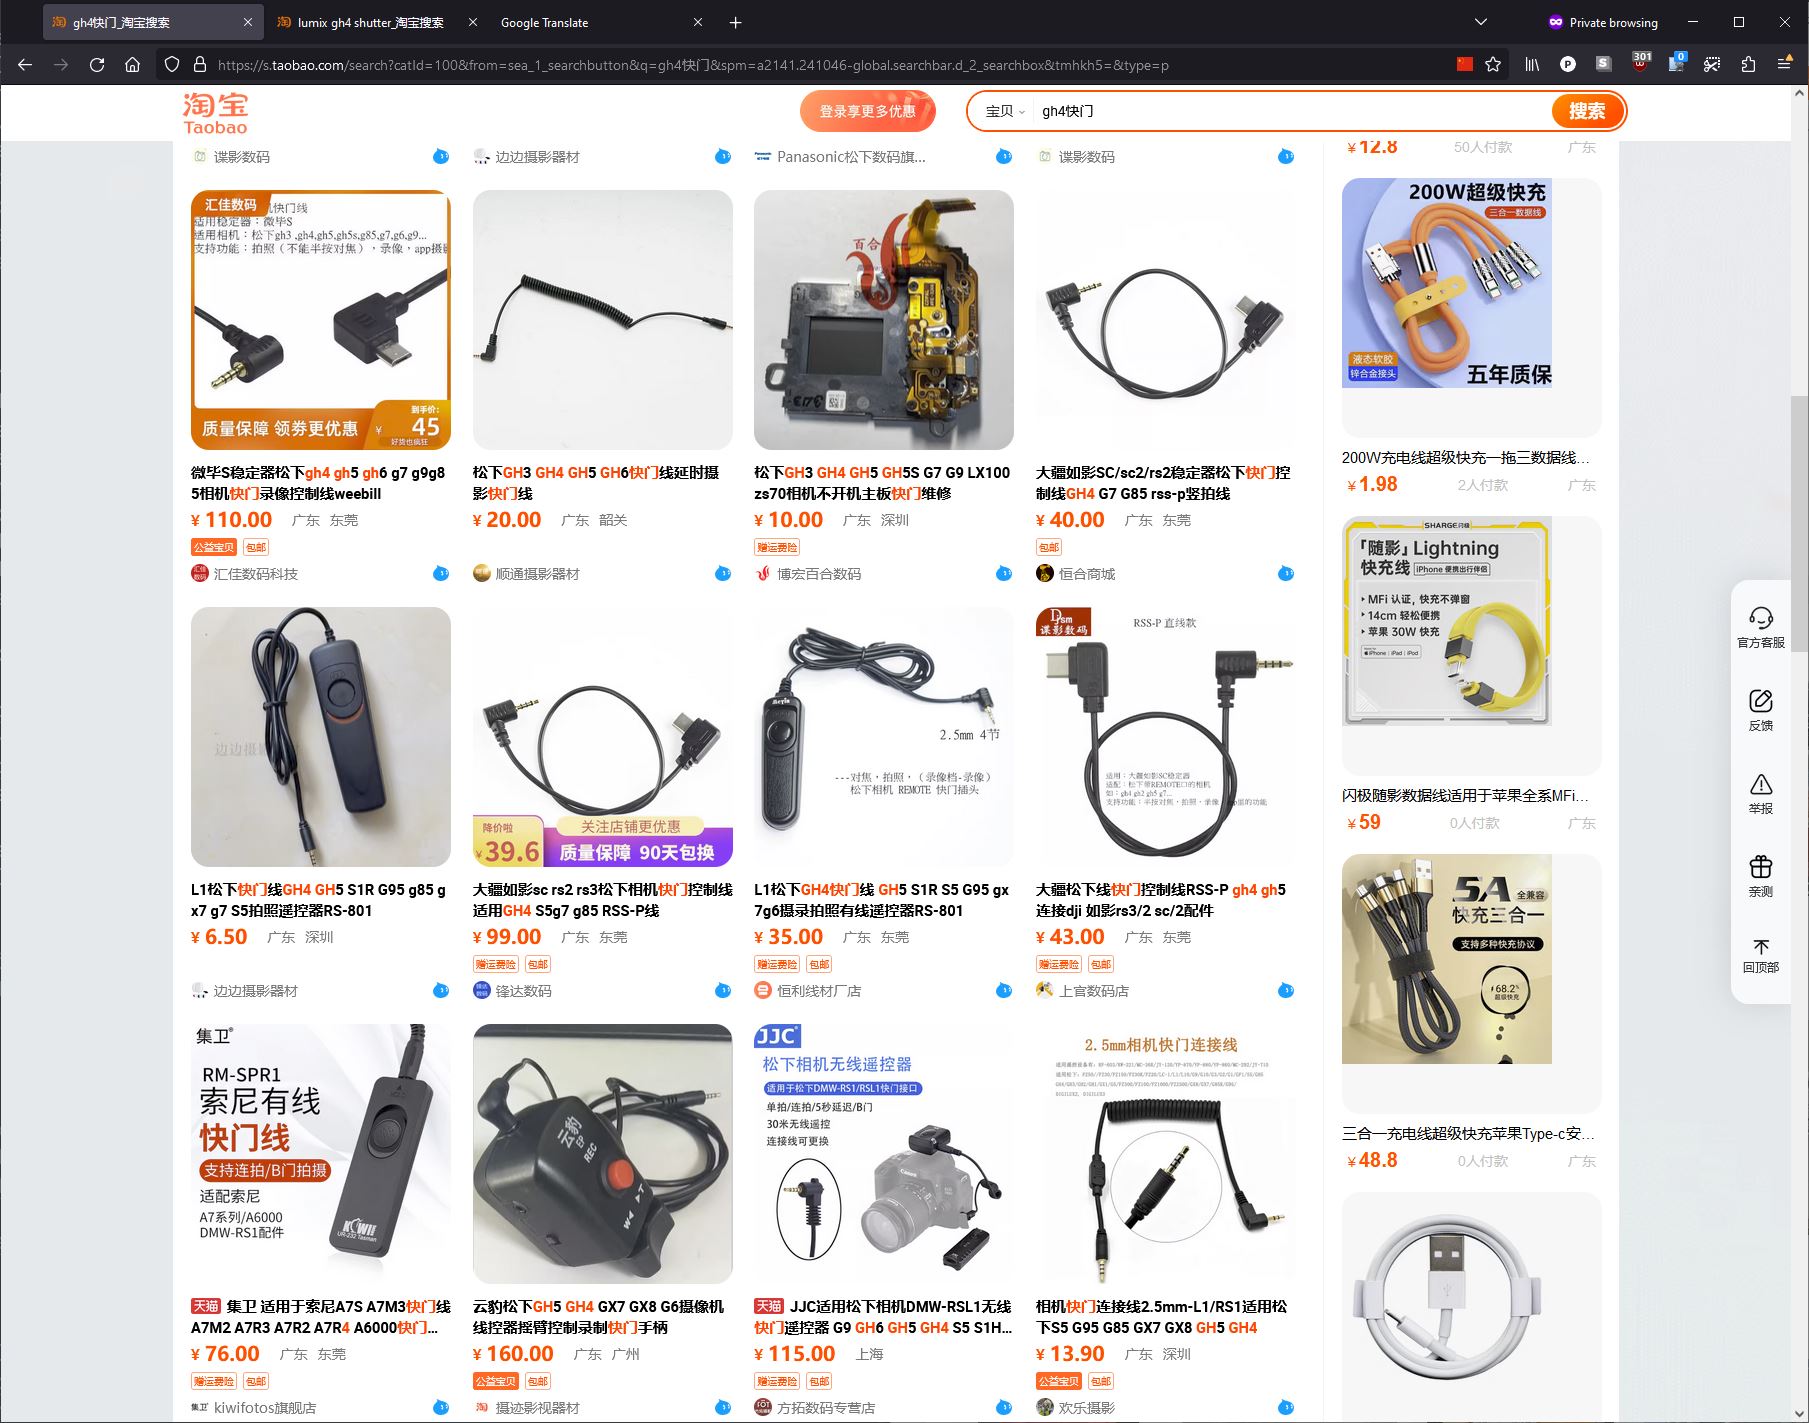
I seldomly recommend the chrome browser, but it simply works the best for using Taobao due to built in translation. The Taobao interface also loves to randomly boot you off the website if you query too much from a western country. Tmall is a near identical clone of Taobao and the two websites often link back to each other. If you decide to buy parts from Taobao, you will need a China sourcing agent, or a glorified middle man. There are many companies that offer this kind of service. CssBuy, SuperBuy, EngTaobao and PandaBuy are the most advertised services. You pay them a fee, they reach out to the Taobao seller, purchase the part on your behalf, package the part up for you and ship it your way. This method of acquiring parts is more drawn out, but it can yield some of the least expensive means of acquiring peculiar camera parts.
Electronics Markets

Huaqiangbei markets. Credit: Mx. Granger
Of course, if you know someone who happens to live near Shenzhen, there is no better way to acquire electronic parts than to physically shop in the Huaqiangbei markets or the electronics markets of Shenzhen. These markets exist for one reason only: connect businesses with suppliers and spur production. Traditionally, filming was forbidden from the Huaqiangbei markets, but over time these rules were eased. Having never seen the markets myself, YouTube videos and Bunnie Huang's excellent book, The Essential Guide to Electronics in Shenzhen, were the only ways I could experience the markets first hand. The Huaqiangbei markets, however, are not saturated with bleeding edge components. From my searches, these markets thrive off selling legacy standardized components, unclaimed components from warehouse clean-outs, local china market ICs like display drivers and spare parts from mass produced goods that "fell off the truck." You are not going to find a spare grip for a 2023 Nikon Z9 at the Huaqiangbei markets. The Nikon Z9 is simply too new. However, the chances that you will come in contact with a seller that can acquire such goods is most definitely non-zero. There is an undeniable benefit to a large specialized marketplace that transcends just being able to touch and feel panel-mount knobs, switches and dials. The confluence from in-person communication yields business relations that get products to market faster.

Crowd of people in front of Radio Row
The Huaqiangbei market of today is an organized and modern version of what used to be in the heart of lower Manhattan: Radio Row. My grandfather actually shopped for vacuum tubes there in person. From 1921 to 1966, a 13-block stretch going north-south from Barclay Street to Liberty Street, and east-west from Church Street to West Street, was a thriving modern-day equivalent of a small Digikey merged with a makerspace. Unfortunately, the area was seen as a "blighted" neighborhood of NYC and was eventually bulldozed by the NY port authority to make way for the original World Trade Center.

Akihabara Electric Town in 2016. Credit: Tomi Mäkitalo
Akihabara Electric Town in Akihabara, Tokyo was also very much aligned with the principles of Radio Row. This area was originally home to the sale of all kinds of electronic home goods, black-market sales and electronic parts. You could buy a TV, microwave, mixer or purchase some vacuum tubes all within the same city block. As technology advanced, you could find any standard electronic component, ranging from transistors and ICs to passive components and switches. Within the last few decades, the focus of this region has shifted more toward finished consumer electronic goods, computer parts, video games and anime / manga. The section of Akihabara Electric Town most relevant to electronic components and repair is still around and kicking, it has just migrated.

An Akihabara shop in 2001. Credit: Ldelouw
Near the Akihabara train station and under the tracks you can still find many small shopping stalls with electronic components, soldering equipment, test equipment and various electronic lab components. With the tremendous amount of cameras produced in Japan during the 1960s-2000s, I do wonder if Akihabara Electric Town was once a mecca for camera parts. If anyone has lived near this region during that time, I'd love to hear from you!
Flex PCBs to the Rescue!
The enameled wire repair held up swimmingly for about 2 years until I finally caved in and gave the proper flex PCB repair solution a go. Other projects became more of a priority and I pushed off ordering the flex PCBs because I forgot that the lens was even repaired! Traditionally, flex PCBs are considered an unnecessary added manufacturing cost and are excluded from many consumer electronics designs. It cost far more to produce circuits on flexible polyimide film and copper than a rigid FR4 fiberglass and copper medium. This lens design requires the lens mount contact block to be installed in a flexible manner in order to properly seat into the lens mount cutout while providing clearance for the rear lens and control PCB. A rigid PCB solution would mechanically not work. When I originally tore the flex PCB back in 2017, I considered a redesigned flex PCB solution, but I barked at the cost and the lens sat around for some time. The push for ever smaller electronic devices must have driven the cost of flex PCBs down considerably in the last few years. What was once $40-$50 per flex PCB became <$1 USD. This change in pricing makes flex PCB repair an affordable option for the first time in history.
12mm lens with new flex PCB besides manual repair
My flex PCB design measures roughly 1.74" x 0.71" = 1.2354 square inches, so I hunted around for production prices. OSH park charges $10/sq-in for 3 flex PCBs, so that's 12.35/3 = $4.12/flex PCB. They are also manufactured in the USA. That's not too shabby, but wait - there's a 3 week turn around. That's great for restocking extra parts for a known working design, but that's a lifetime for repair or production work. A complete show stopper. I shopped around and I ended up placing an order through JLCPCB. This project is in no way sponsored by JLCPCB, they just happened to be the least expensive vendor for flex PCBs at the time of purchase. My total cost including express shipping to my door was $48.74 for 50 pieces. I only needed one. The cost of five, the minimum quantity, was ~$44. This is incredibly cheap and leads me to believe that the clone-zone PCB manufacturing markets of East Asia are being heavily subsidized by government forces. I vaguely remember a quote from the CEO of a Canadian PCB manufacturer that stated the raw materials for manufacturing cost him more than the entire completed product from the East Asian PCB markets. Strange times indeed.

JLCPCB order
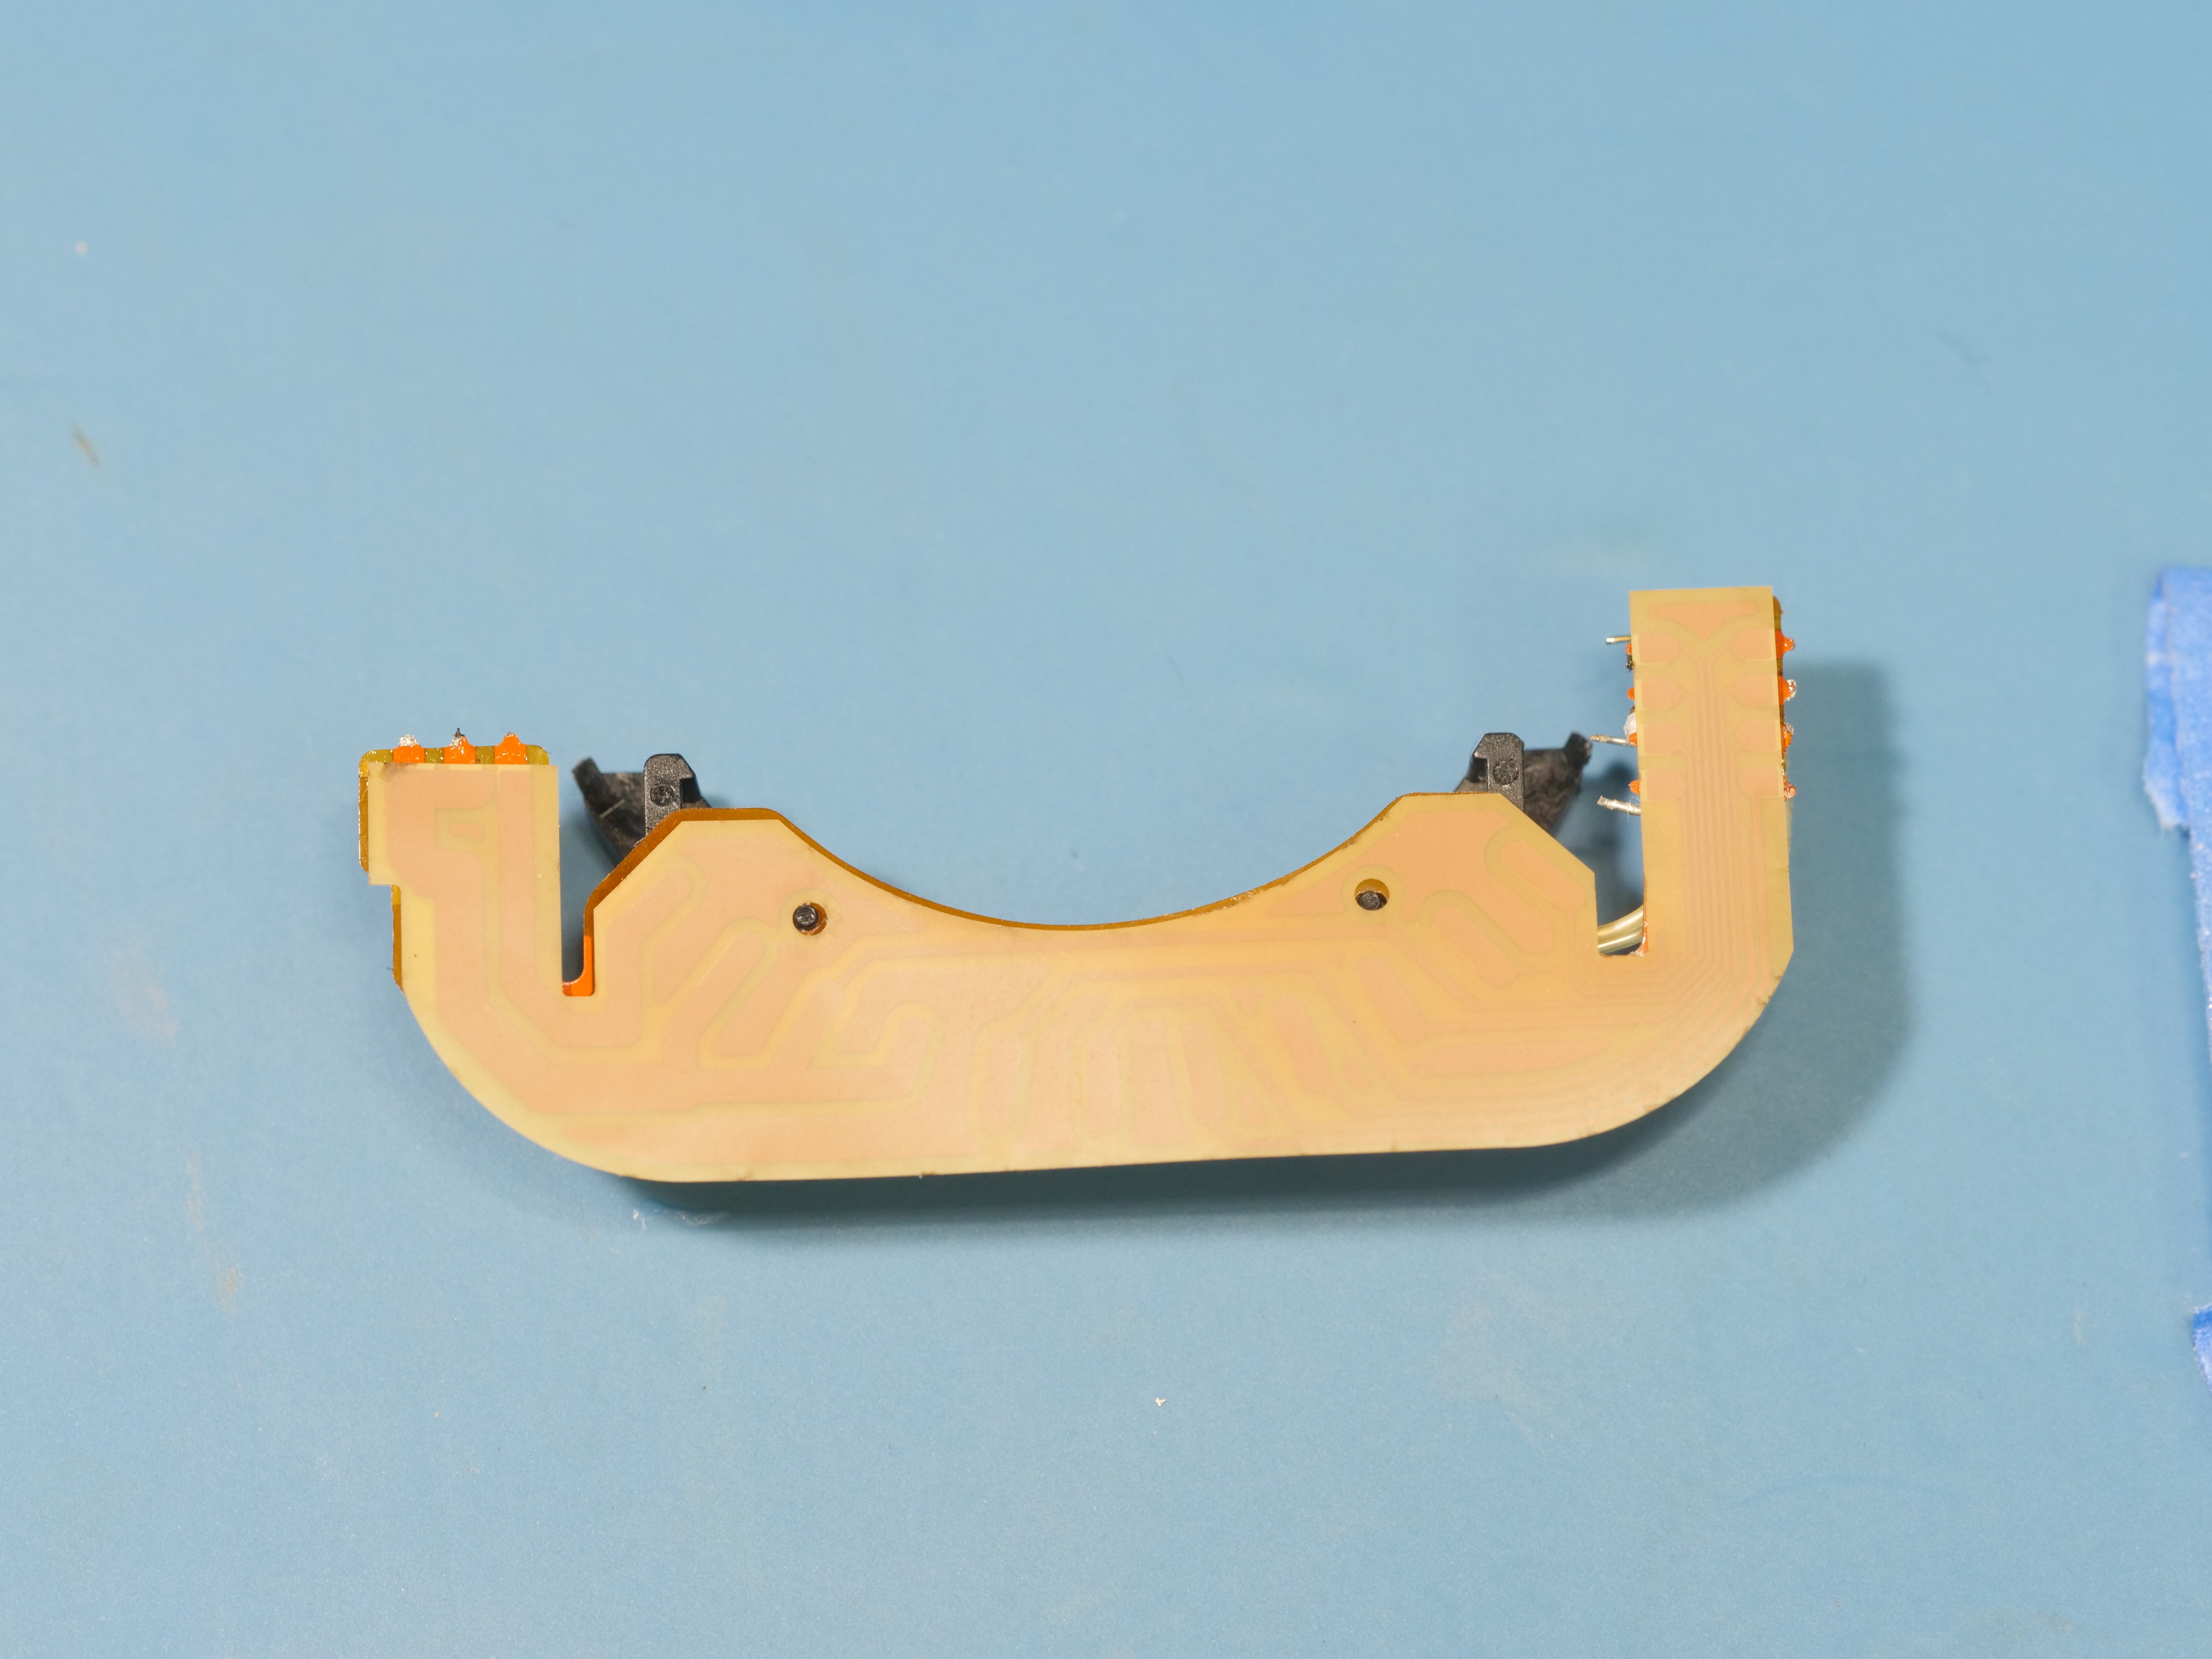
On first impression, the PCBs came out pretty much spot on, with slight hints of burn marks on the edges, but this has no impact on the performance of the breakout board. It's possible that JLC uses a fiber laser to cut out their Polyimide designs.
New flex PCB in place of old pcb
My only critique is that the overall flex PCB thickness was 0.07mm, where as the OEM Olympus flex PCB was 0.13mm. This could be contributed to Olympus using a 2oz copper thickness material, thicker base Polyimide material or just used a superior vendor.
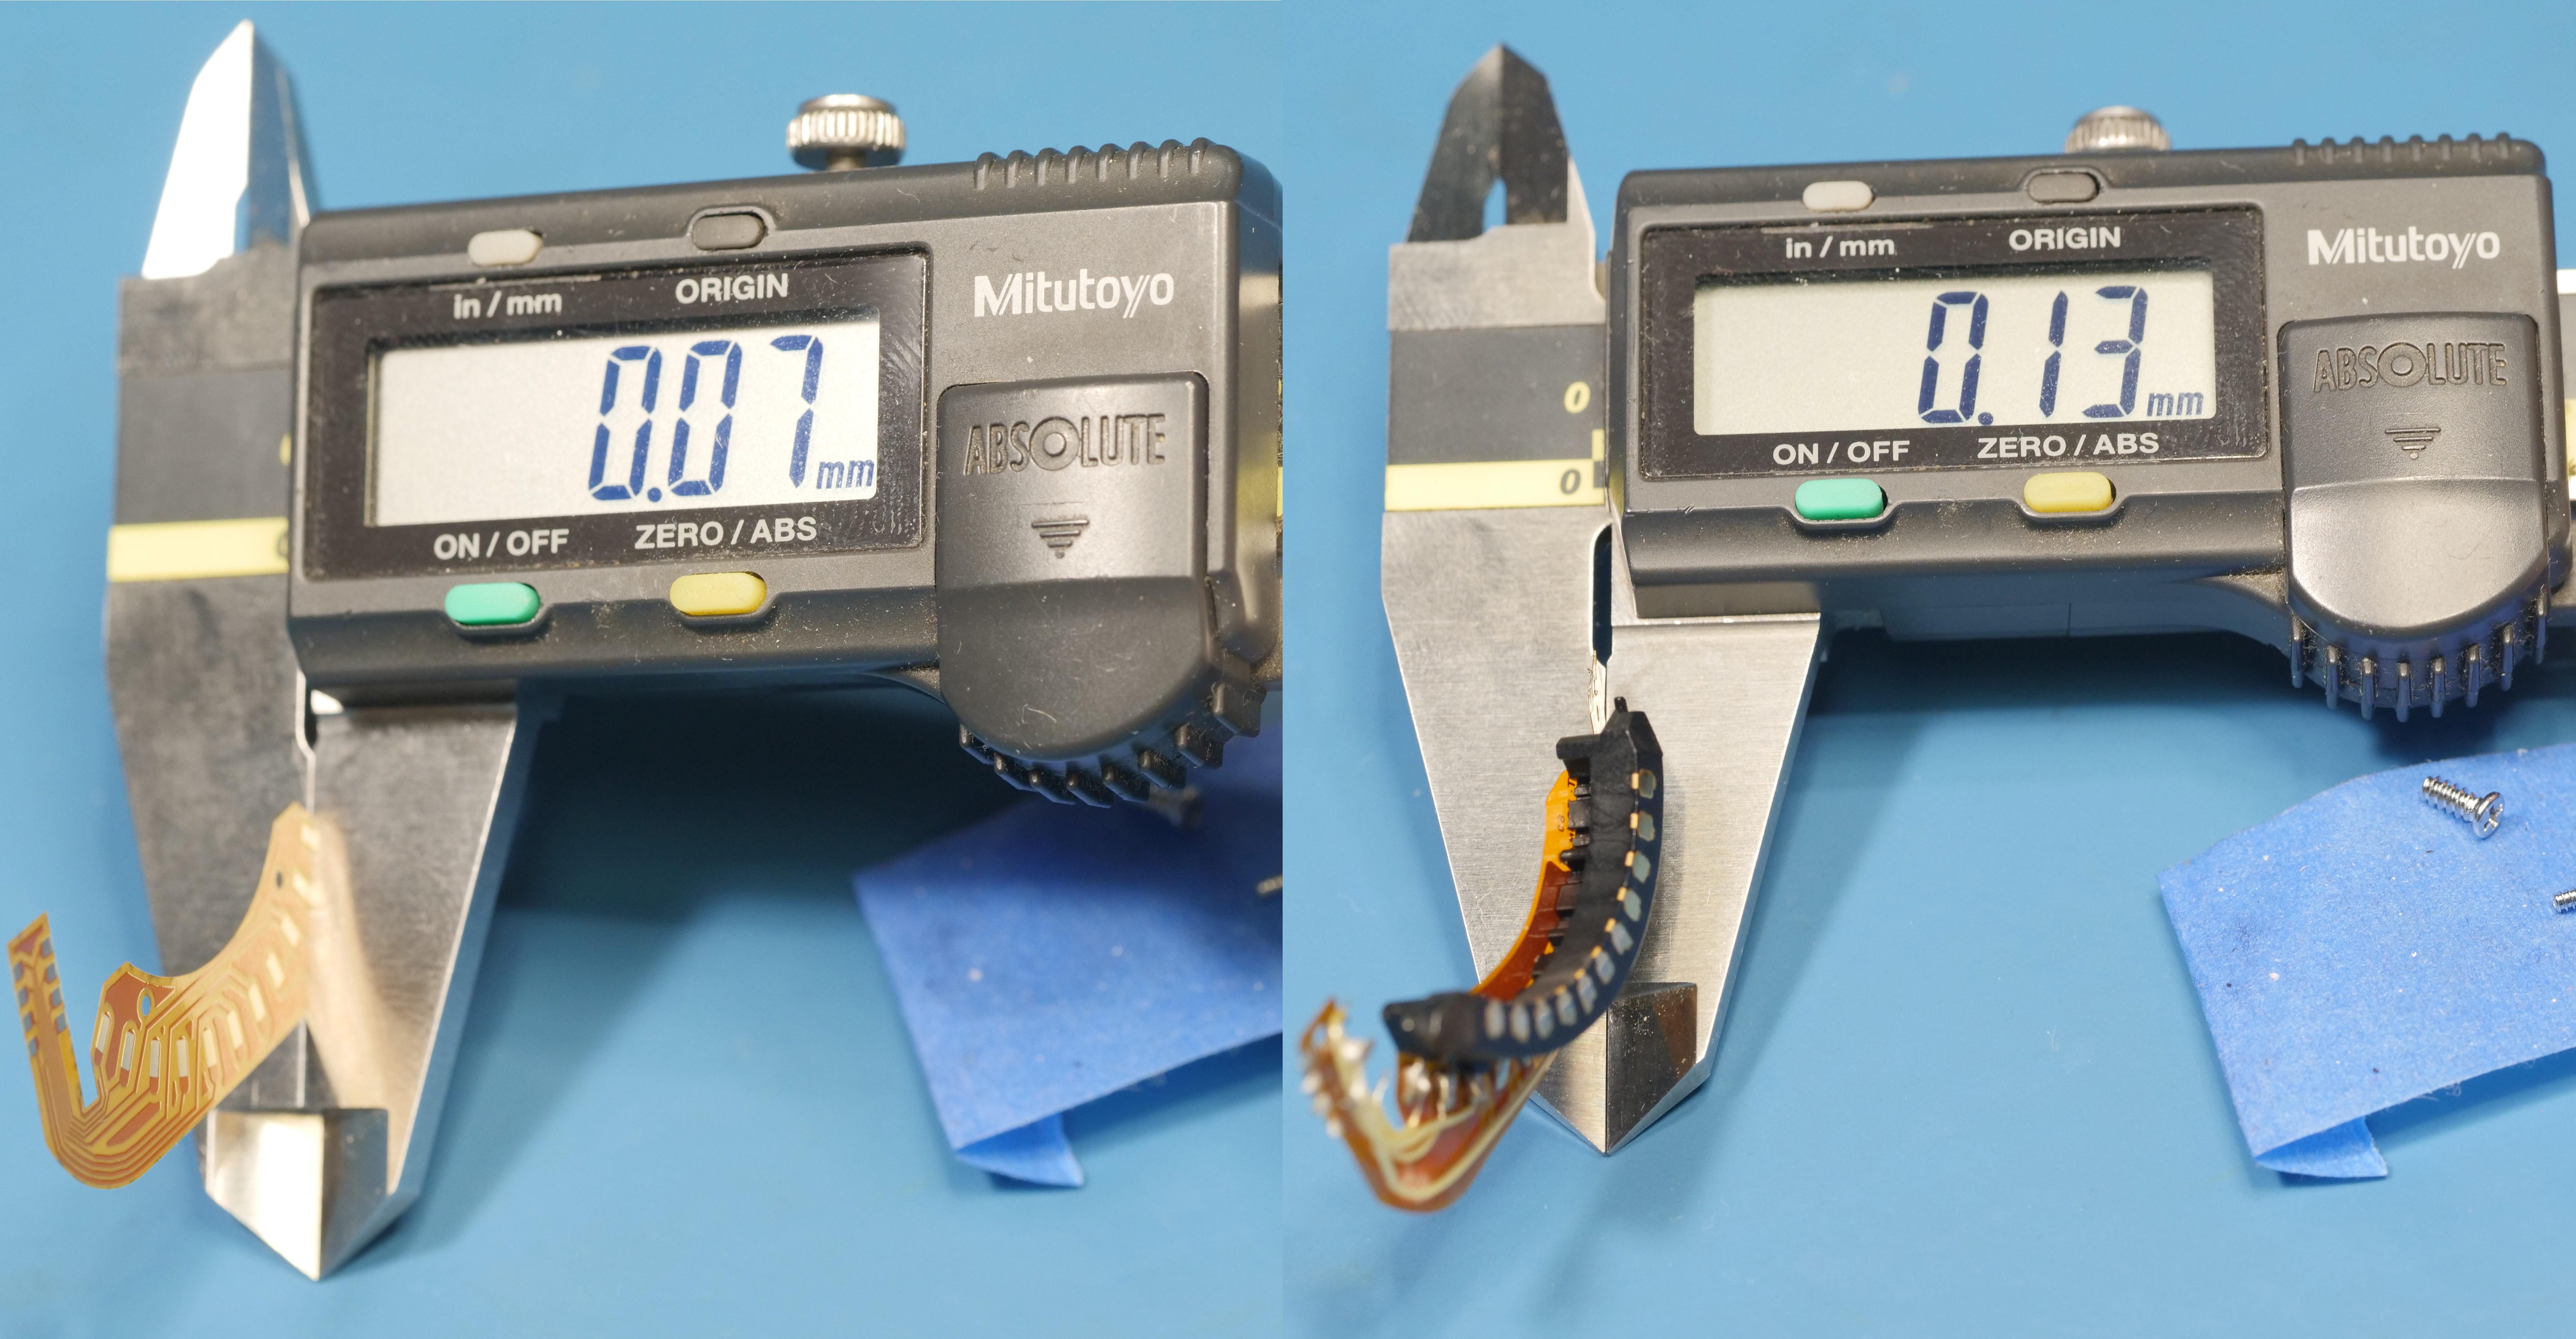
Flex PCB thickness comparison
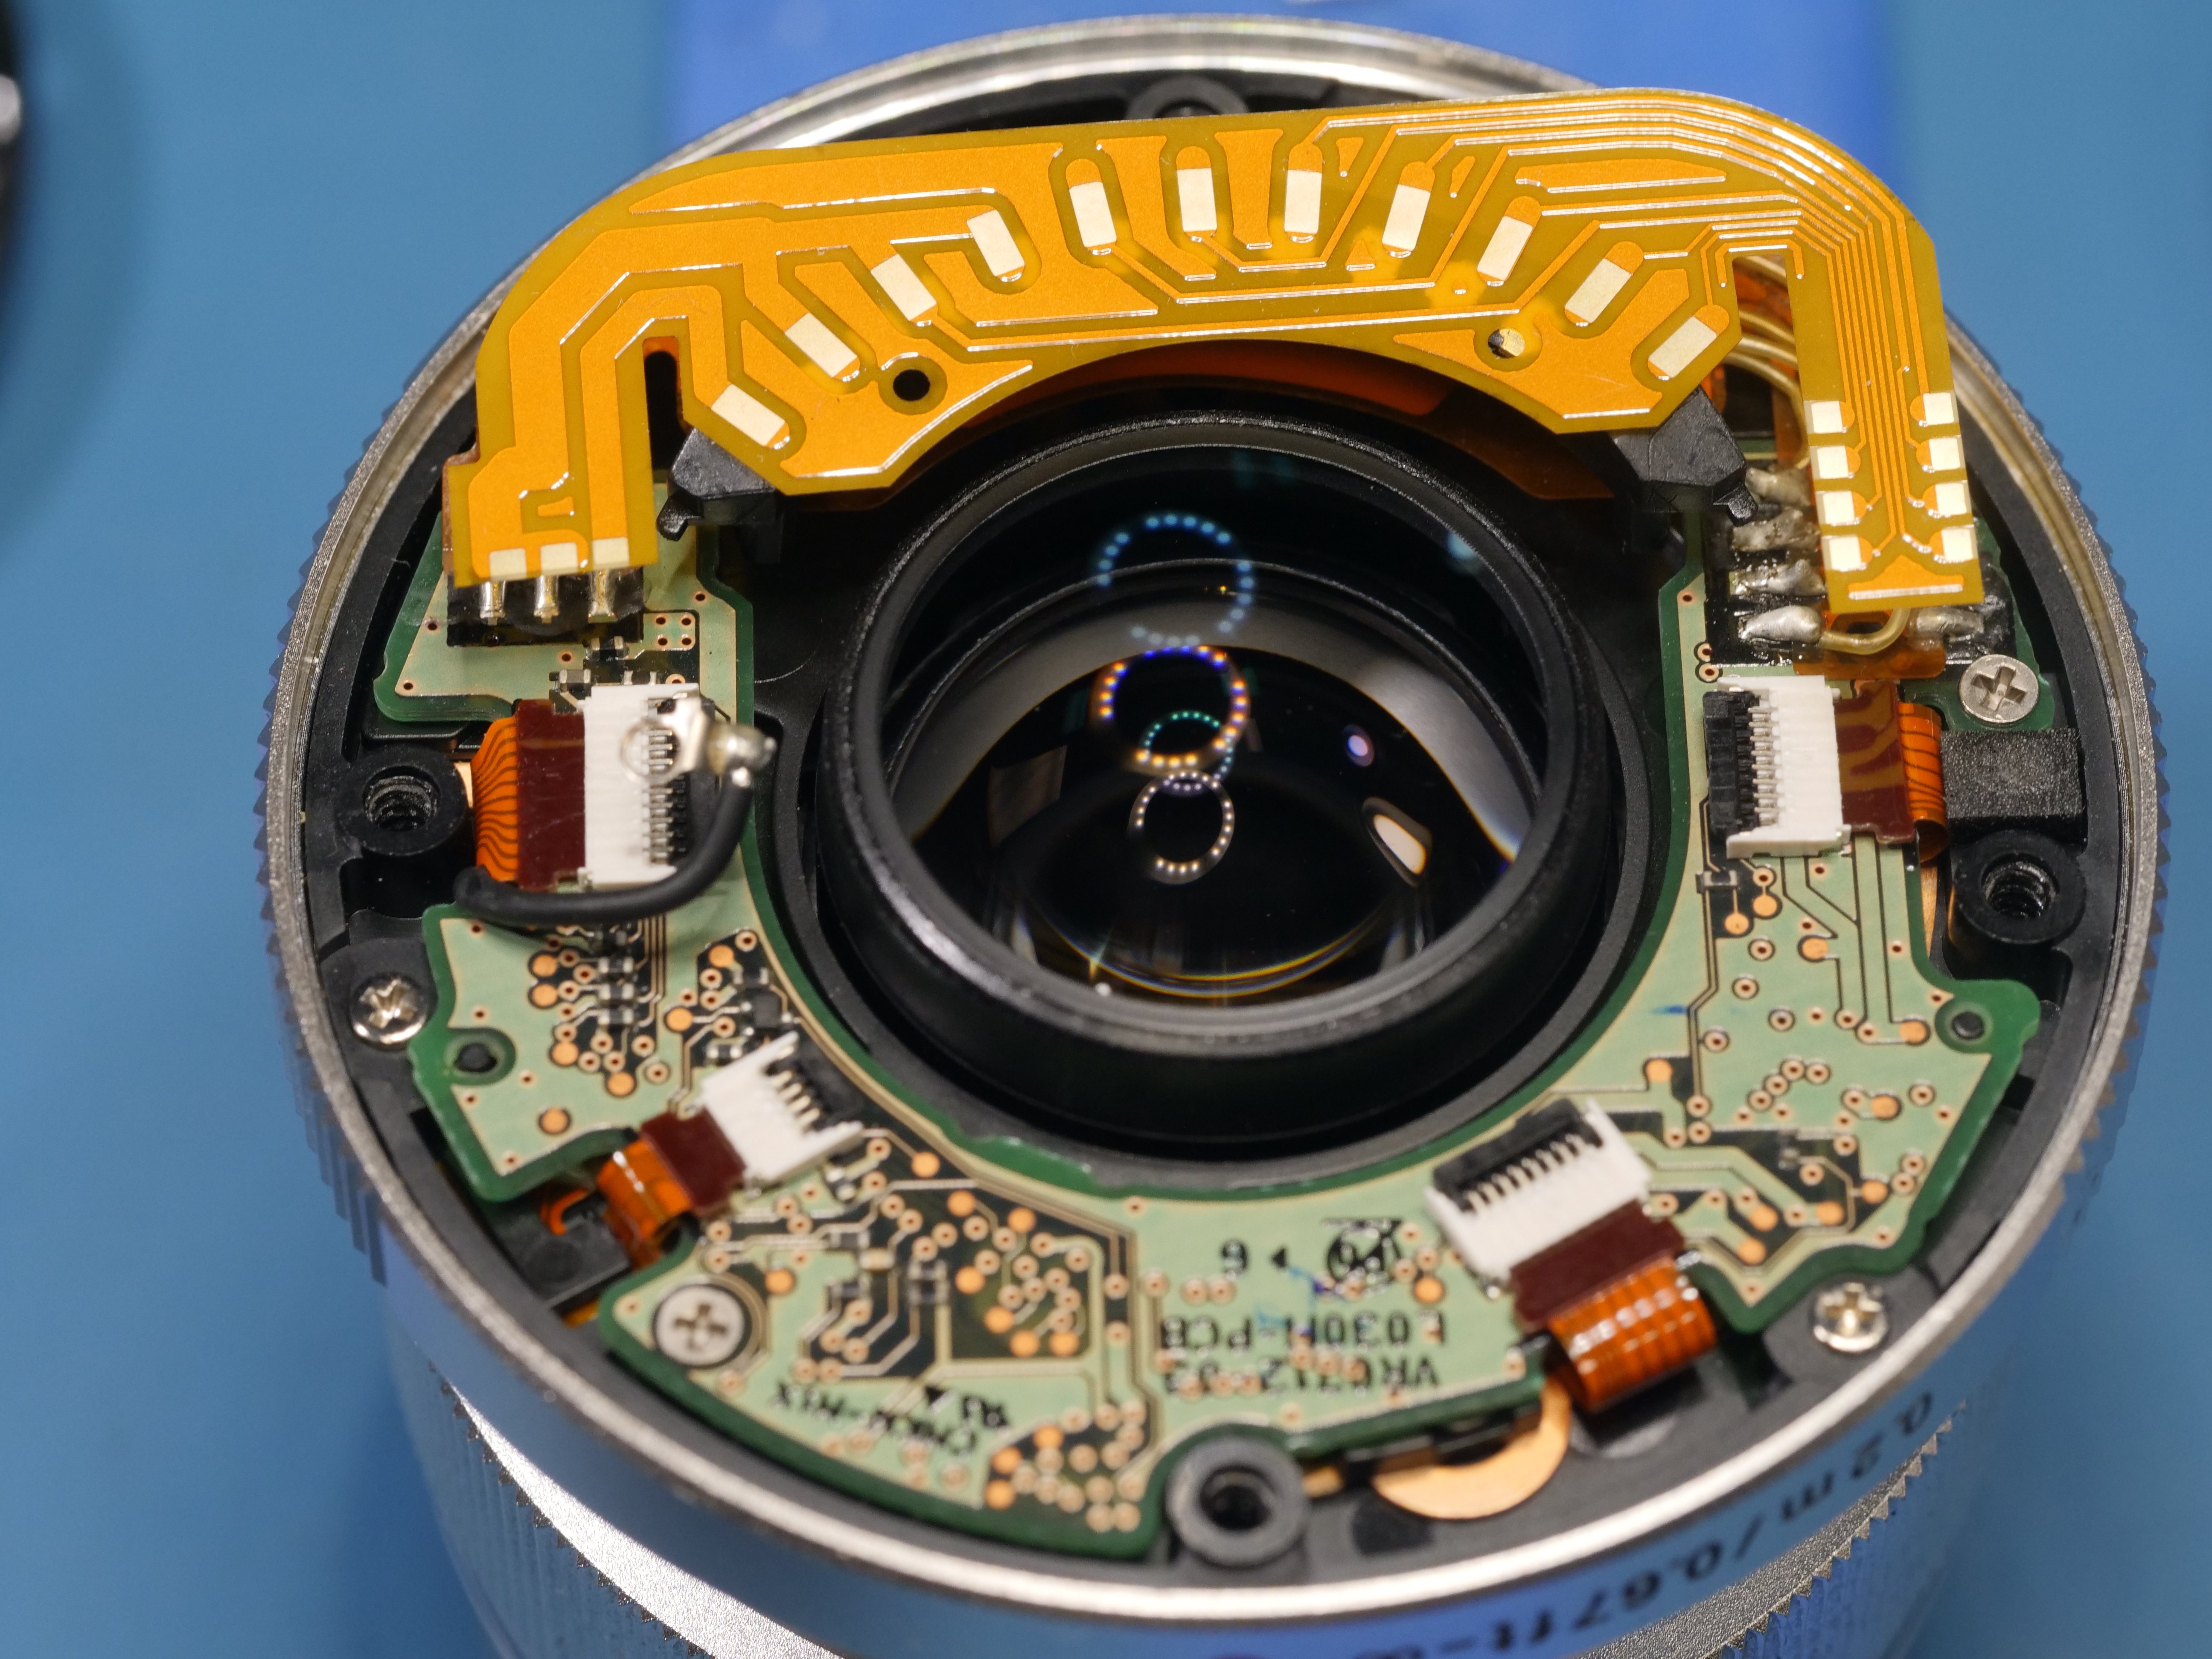
The flex looks like a near perfect fit. There's plenty of clearance between the sides of the lens body and the center lens element extrusion. The pads all line up to the rigid lens control PCB.
Properly lined up flex PCB
Fits like a glove! Those punch-outs in the flex really come in handy for the alignment of the lens block terminal. A few tiny strips of double sided tape between the lens block and flex aid significantly in the final assembly process.
Flex PCB aligned to the back of the lens contact block
I found that taping the entire flex + lens block assembly to an aluminum plate worked great to prevent movement during soldering. The same precautions are taken here as with the point-to-point solder repair. Flux all copper pads, pre-tin the solder tip, then quickly touch each of the 11 micro four thirds lens block pins. Finally, add solder to the copper pads on the flex that connects to the rigid lens PCB.
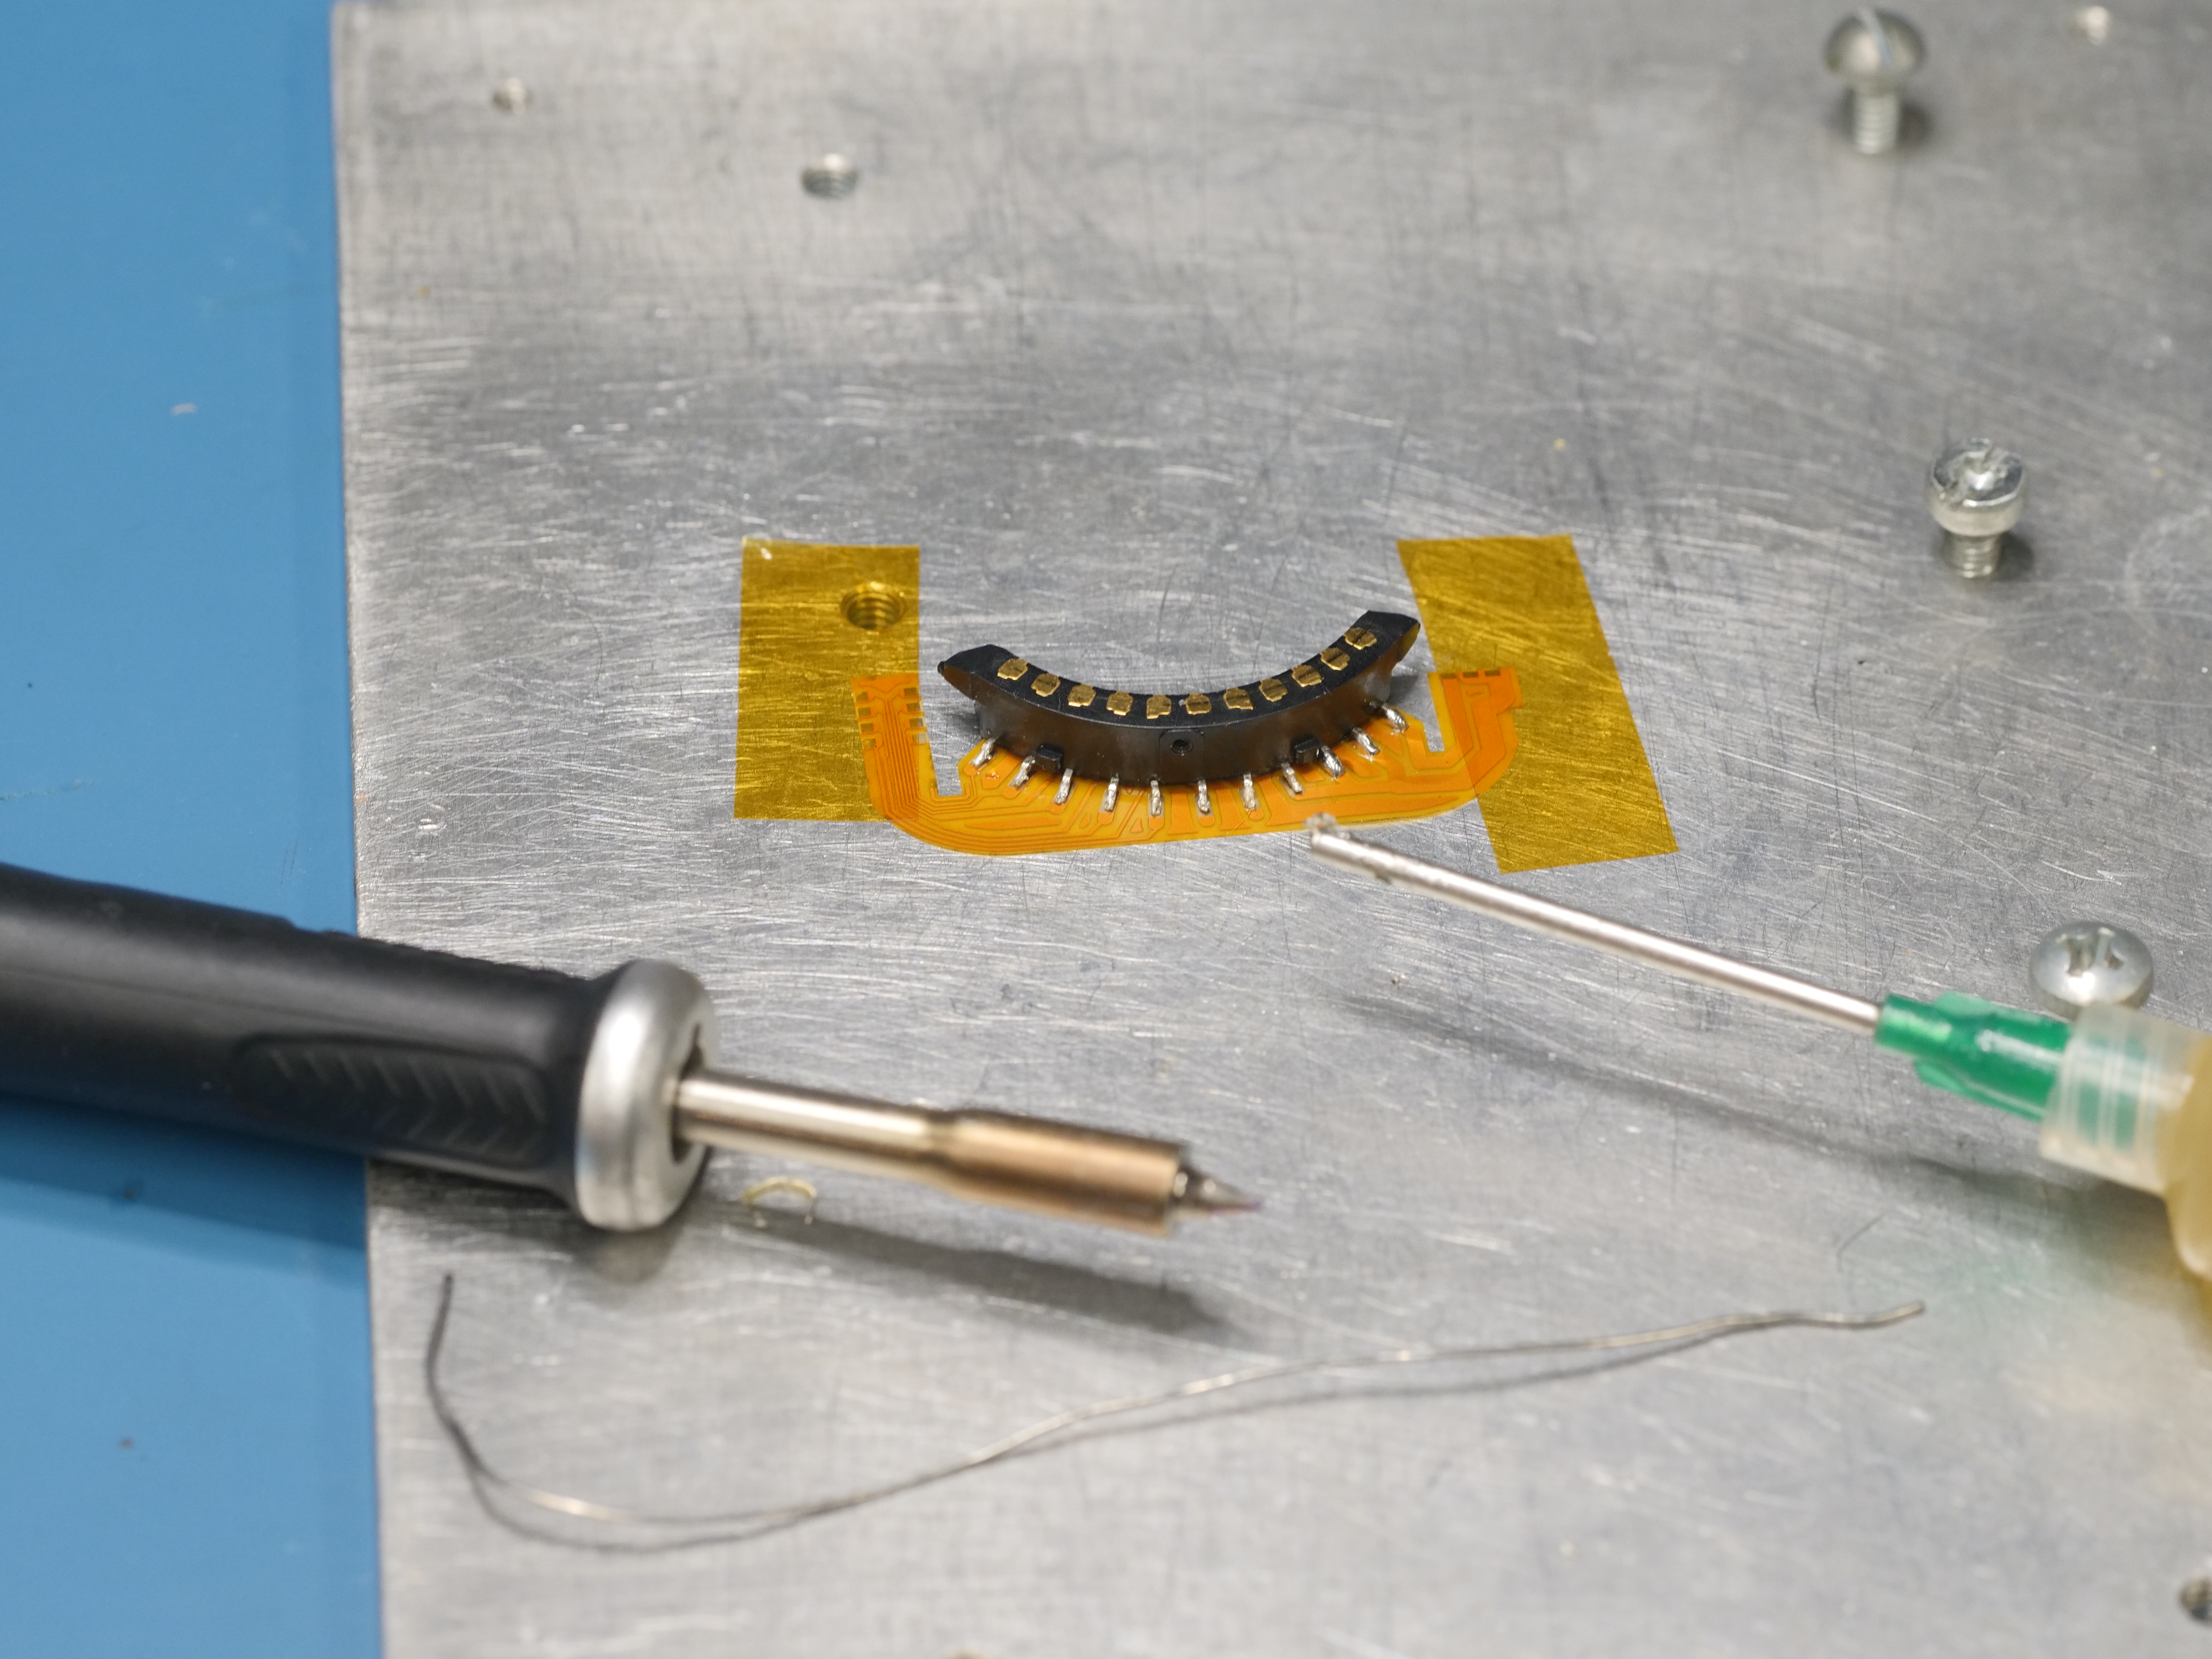
Flex PCB assembly ready for solder
Here's where things can get a bit hairy. You don't have to remove the rigid lens PCB from the lens to do this repair. You can solder the flex PCB in place if you have nerves of steel and protect the rear lens element and rigid PCB from accidental flux over spray. This usually is not a problem, but if you use too much flux, you can get flux residue on the lens element. I would highly suggest to just remove the rigid lens PCB from the lens and solder it up externally. I was up for a challenge, so I went ahead with soldering the lens mostly assembled.
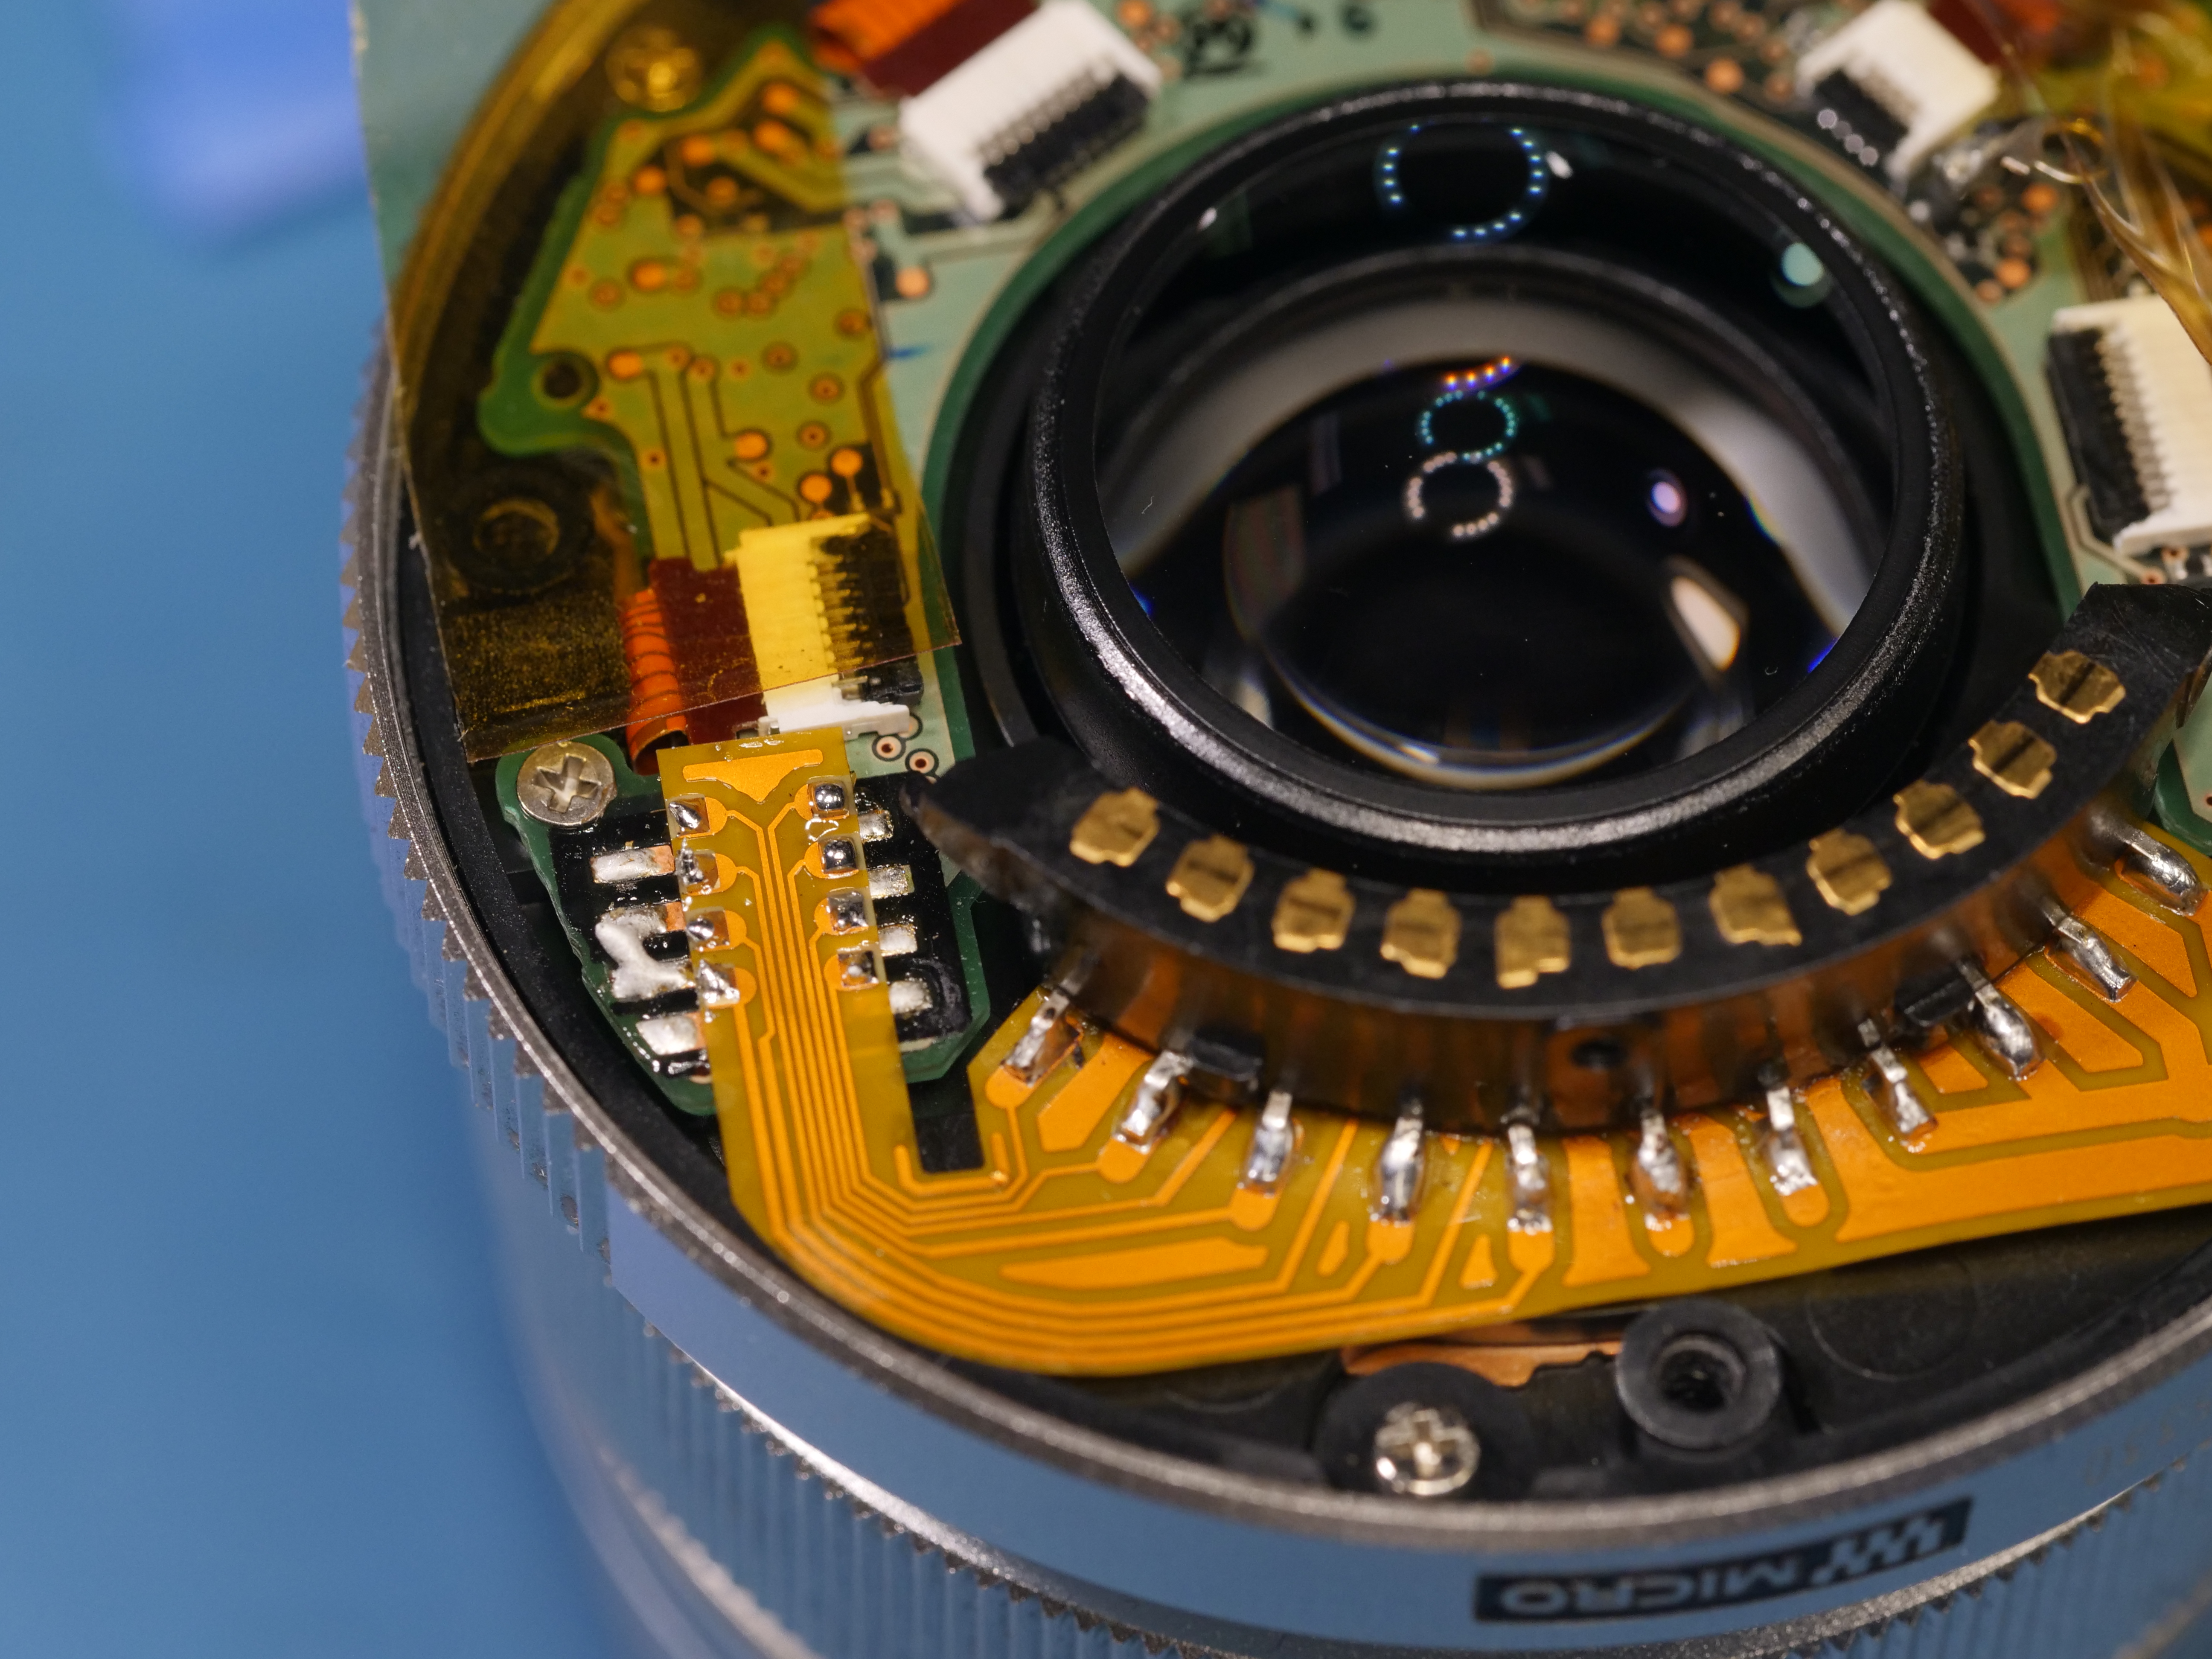
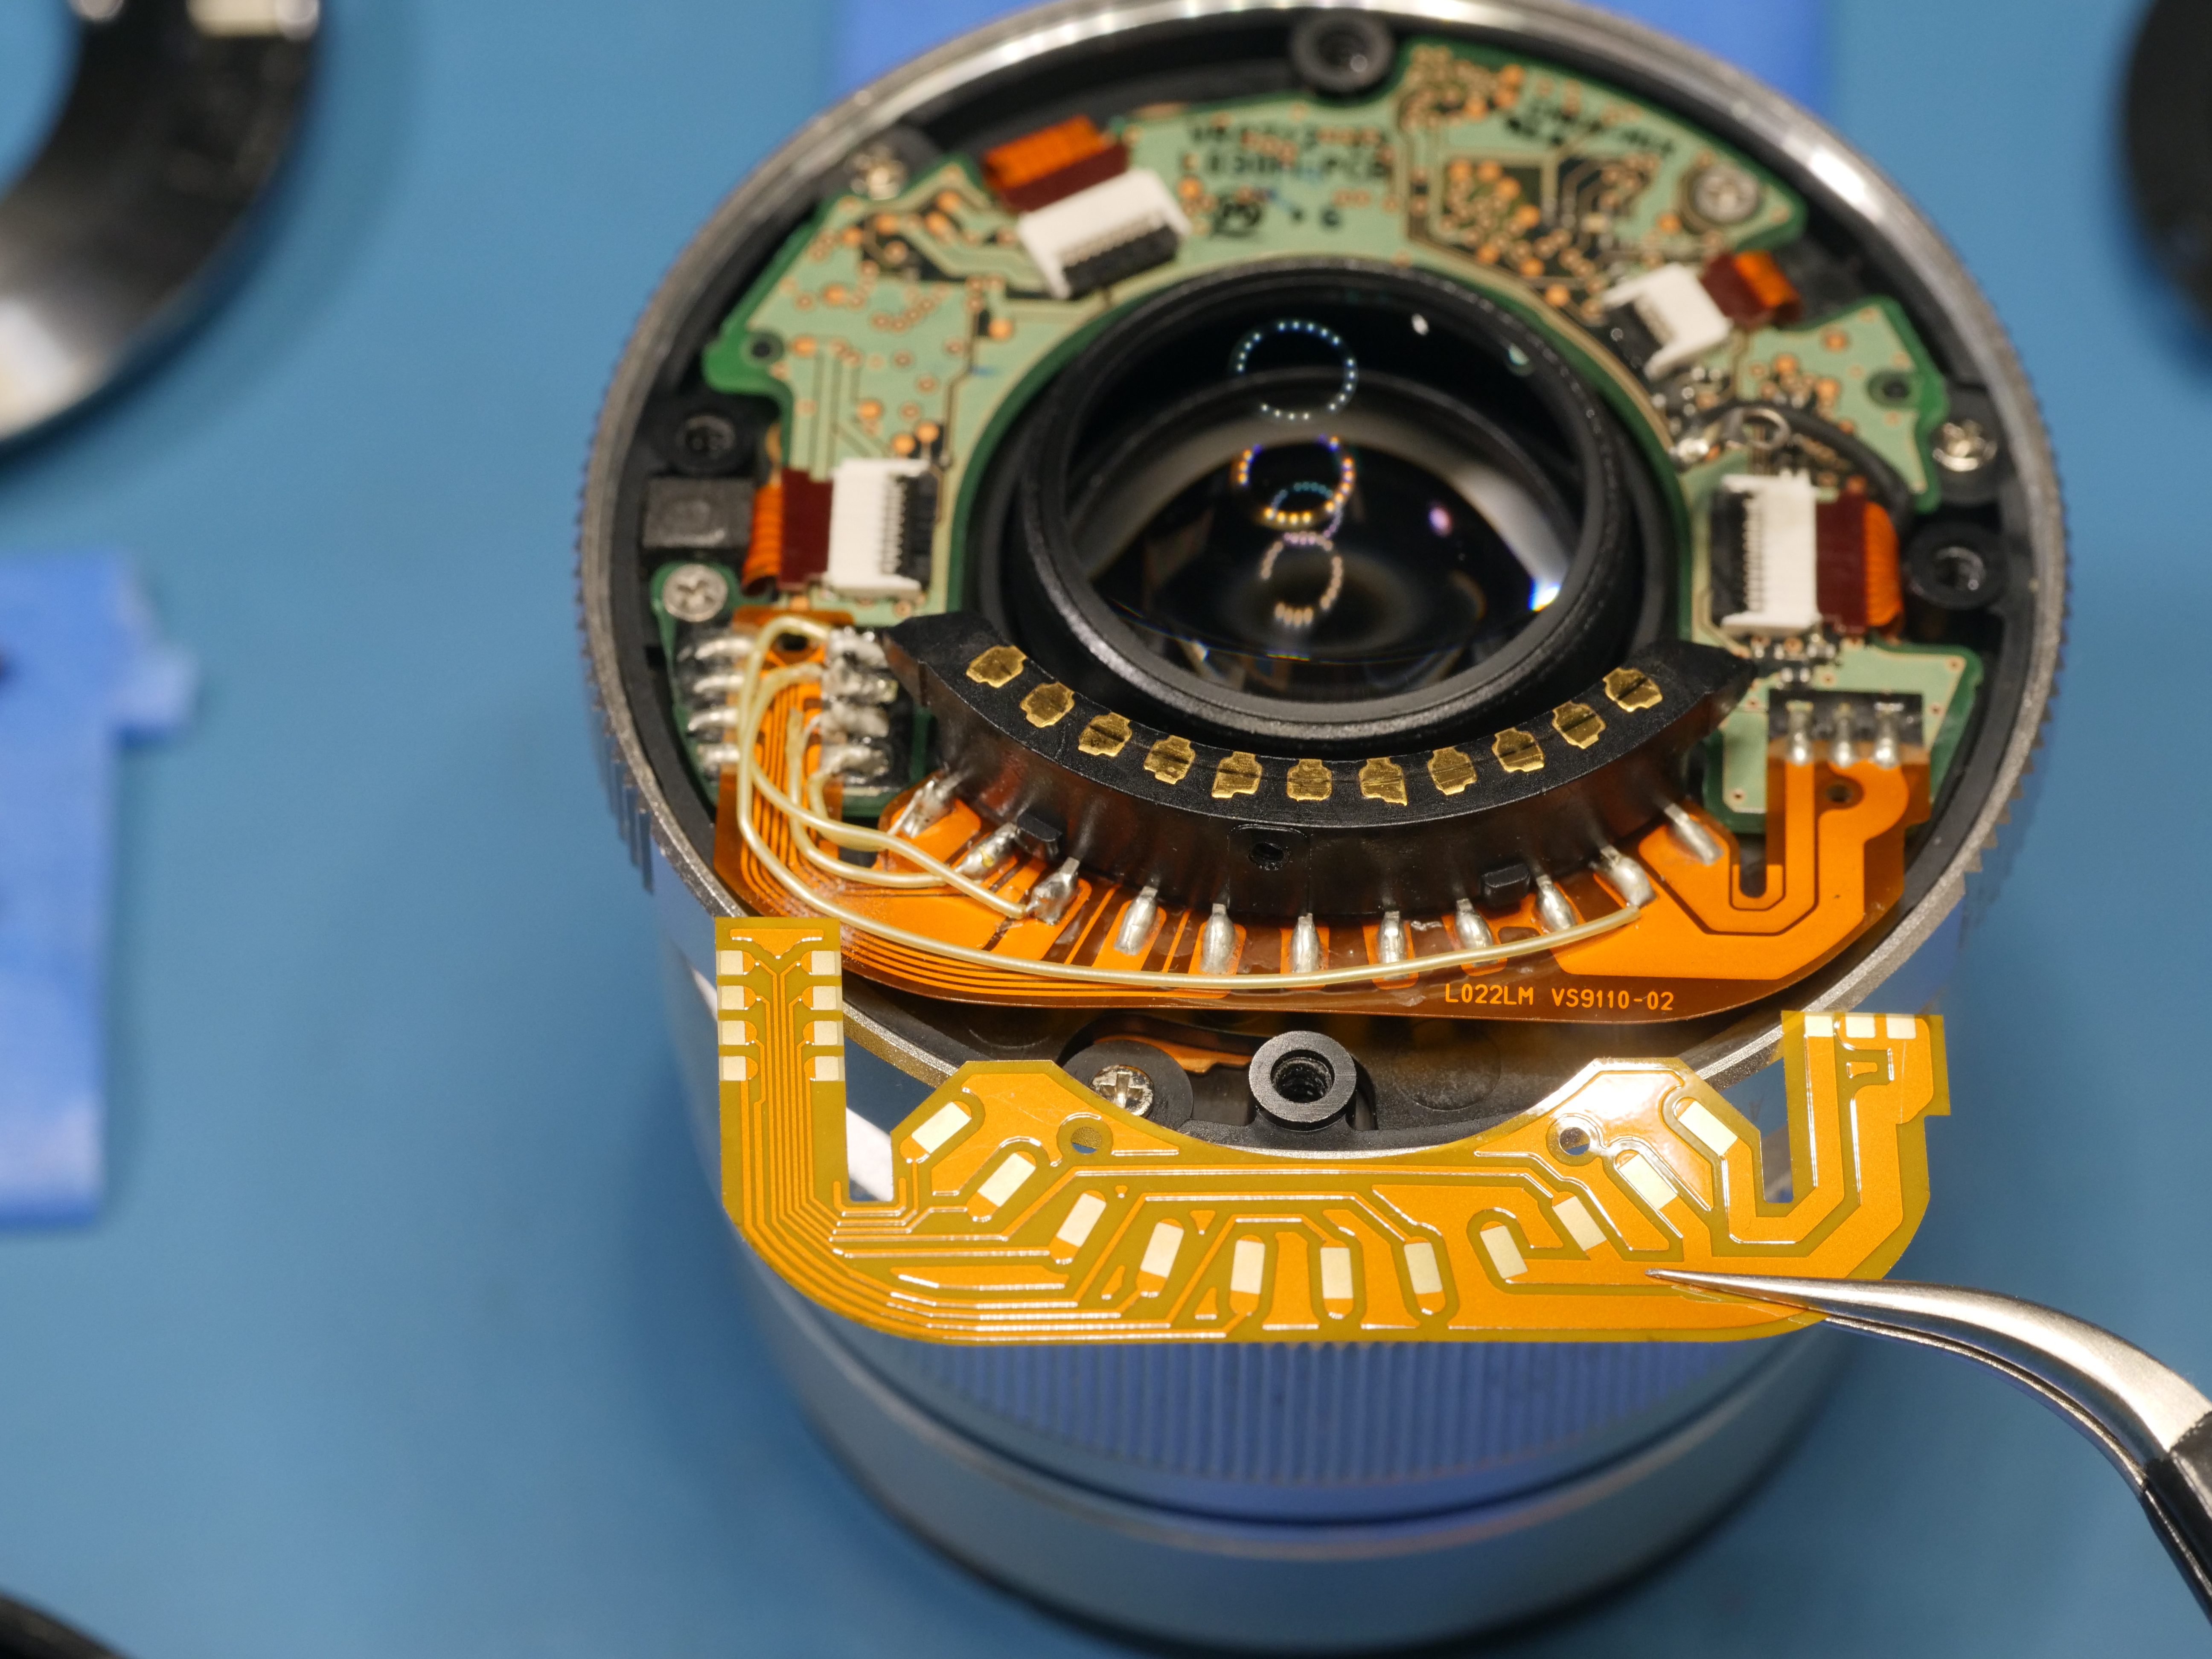
Alignment of new flex PCB inside lens
After soldering the lens contact block to the flex, I test fit the flex assembly in place. I found that using a tiny conical soldering iron tip was ideal to finish the job. One would think that a wide chisel tip would make quick work of soldering all four pads on each side at once, but what ends up happening is the flex PCB flops about, shifts or springs back, messing up alignment. Since the flex PCB is held in place by solder bridged over exposed pads, you really need to make sure the solder blobs are bulbous to ensure a good connection.
Final soldering of new flex PCB inside lens
Overall, I'm very happy with the end results. The flex PCB repair looks professional, almost even stock. The lens reassembly is unobstructed by the repair and the lens works flawlessly with the new flex PCB. No AF hiccups or issues with electronic control whatsoever. I would highly recommend this repair to anyone with a broken 12mm Olympus lens. It is truly a magnificent lens to use.
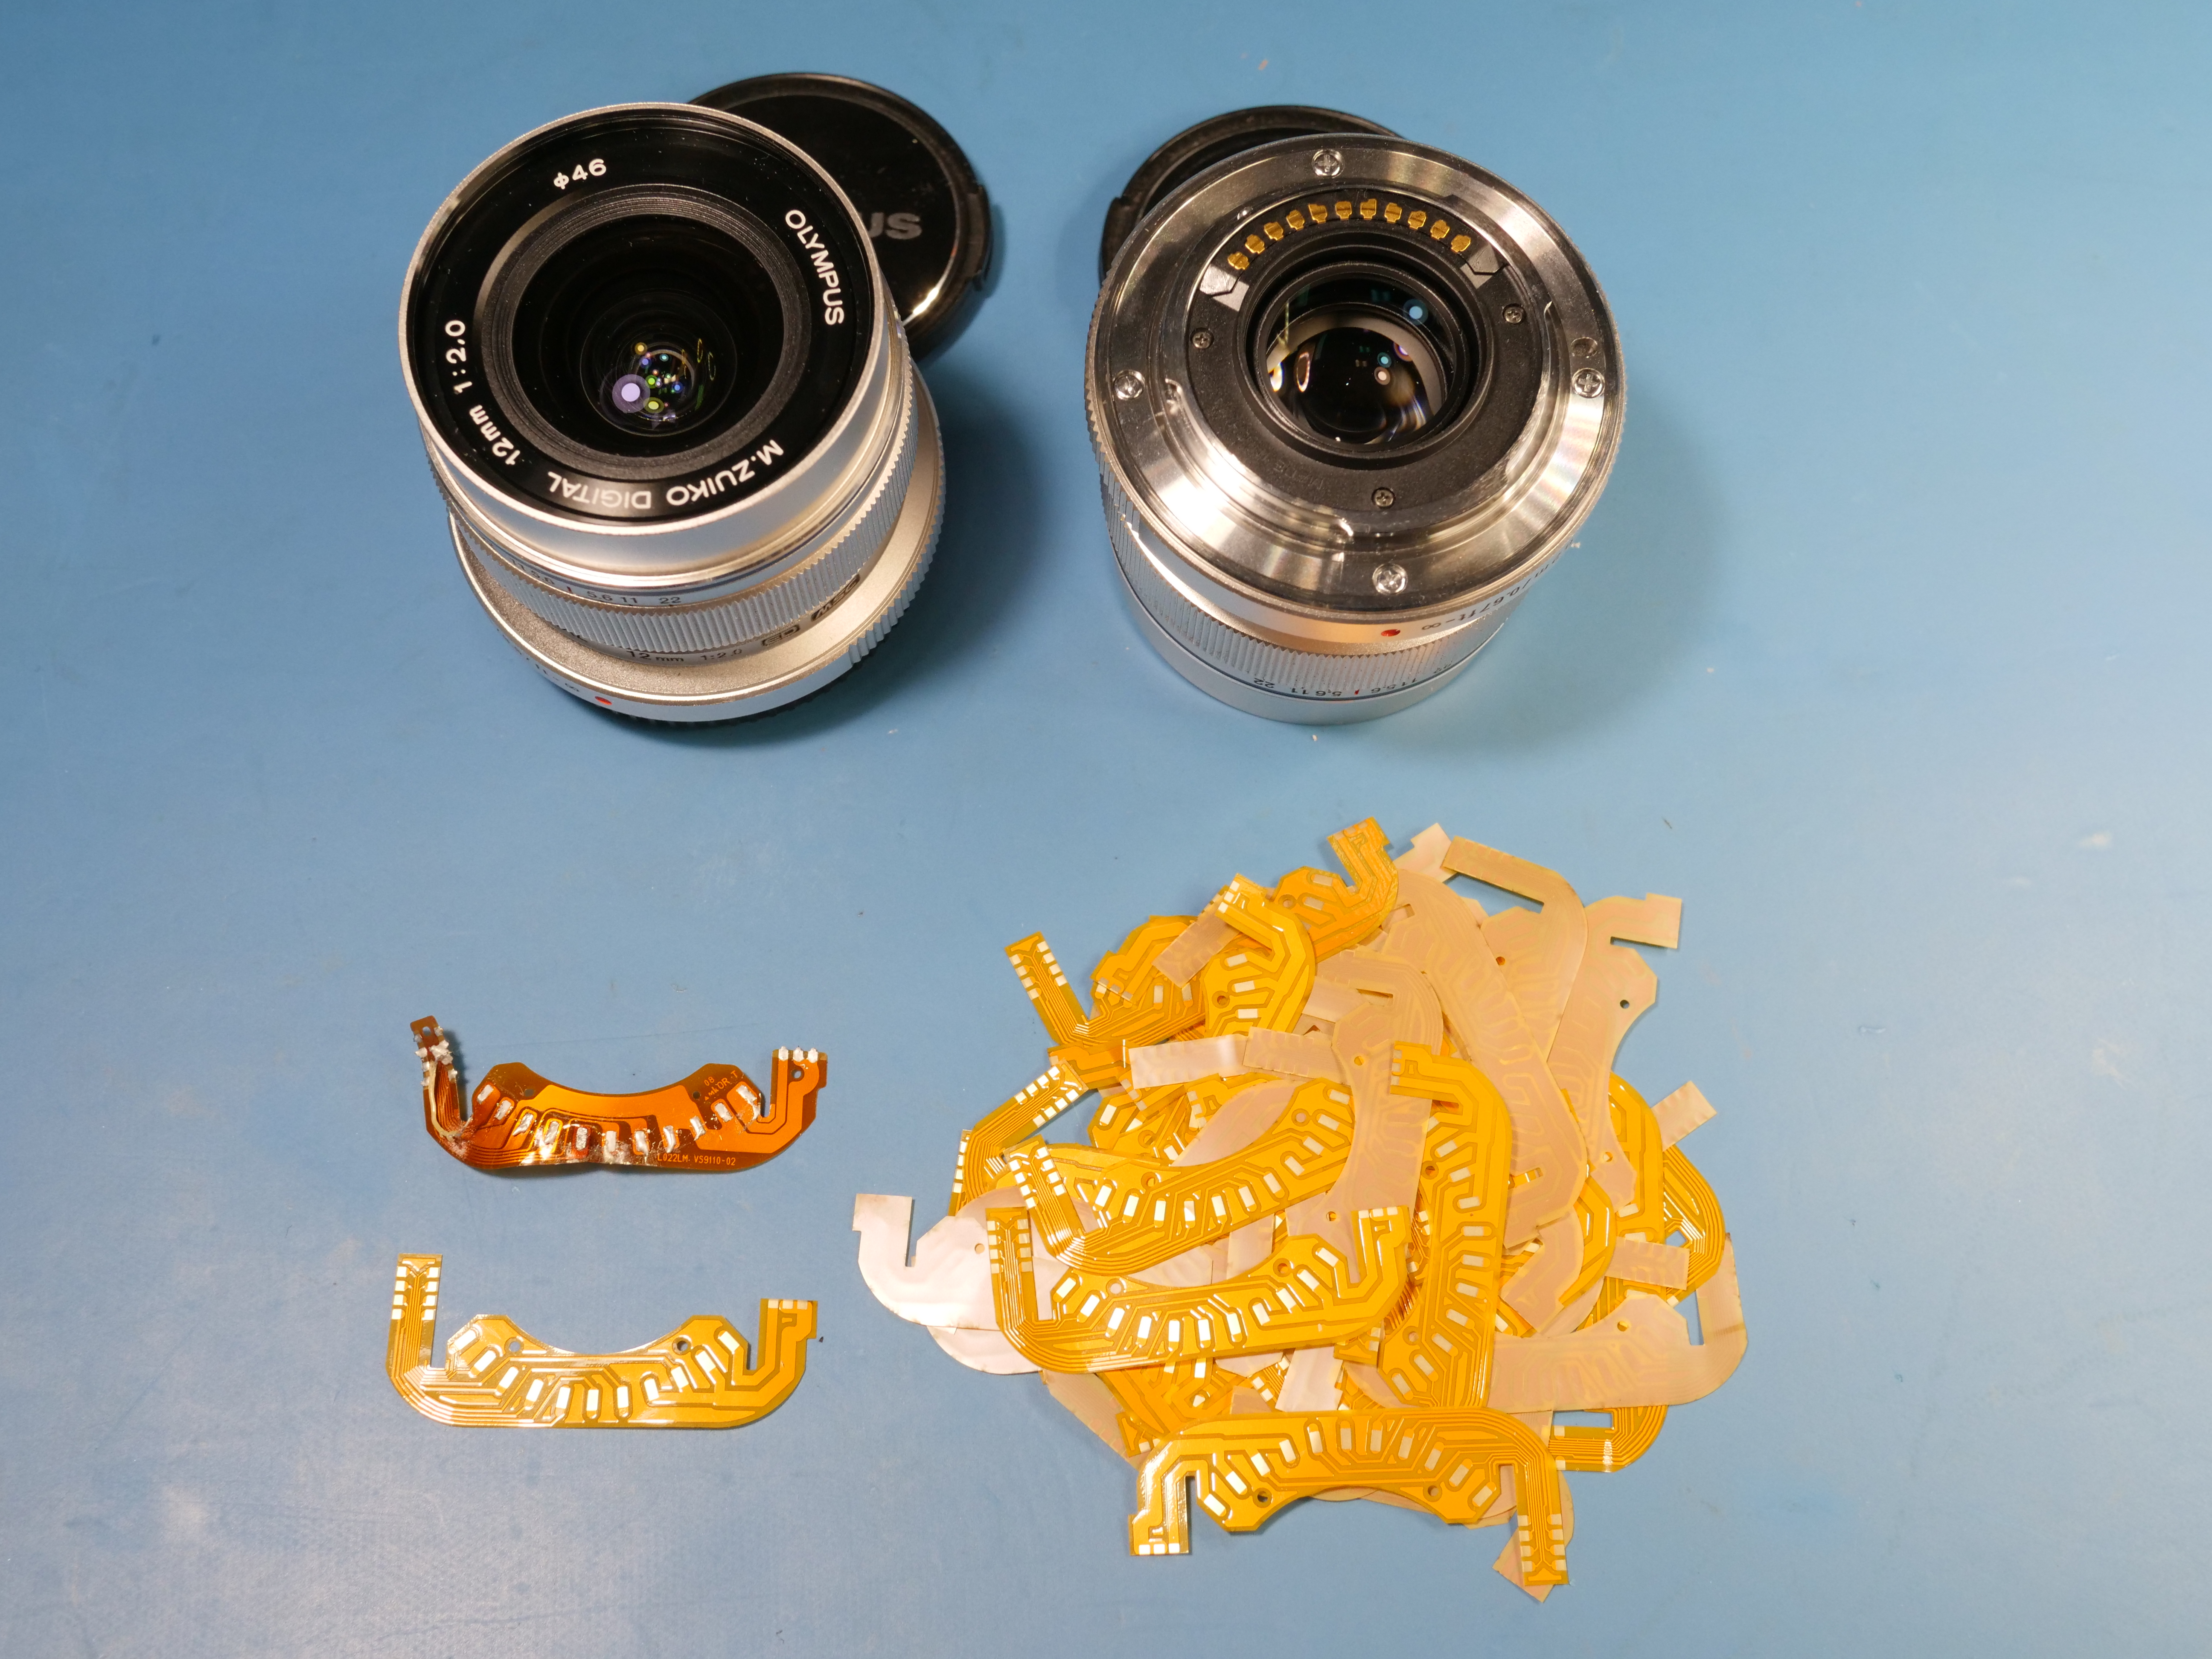
Lens fully assembled besides a pile of spare flex PCBs
Want more? Here's a behind the scenes look at my workspace and some of the images that did not make the cut to be included in the write-up: